Real Time Operating System
This section shows how to configure different Real Time Operating System in STM32CubeMX to work with the code generated by the TouchGFX Generator to have a functional TouchGFX OSAL.
Generally, the TouchGFX main loop is started by calling the function MX_TouchGFX_Process(). The call to this function should be inside the task handler where developers wish to run TouchGFX.
No OS
When TouchGFX runs without and operating system, the TouchGFX main loop runs in the infinite while-loop in main() where the MCU is
pooling for a VSYNC signal by calling MX_TouchGFX_Process().
main.c
/* Infinite loop */
/* USER CODE BEGIN WHILE */
while (1)
{
  /* USER CODE END WHILE */
  MX_TouchGFX_Process();
  /* USER CODE BEGIN 3 */
}
MX_TouchGFX_Process() calls forward to touchgfx_taskEntry(), where TouchGFX starts to process the next frame when a VSYNC has been detected.
TouchGFXConfiguration.cpp
void touchgfx_taskEntry()
{
    /*
     * Main event loop will check for VSYNC signal, and then process next frame.
     *
     * Note This function returns immediately if there is no VSYNC signal.
     */
     if (OSWrappers::isVSyncAvailable())
     {
         hal.backPorchExited();
     }
}
FreeRTOS (CMSIS V1 & CMSIS V2)
The following example shows how to configure FreeRTOS (CMSIS V2) to work with TouchGFX. The same configurations apply if running CMSIS V1.
Having enabled FreeRTOS in a project, navigate to the
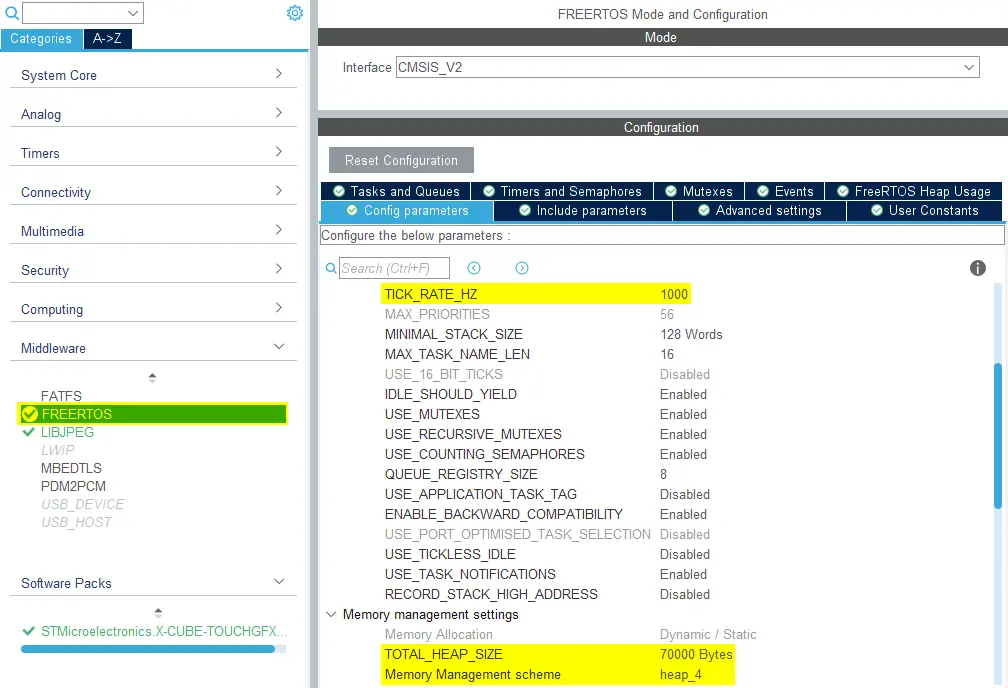
FREERTOS menu found under Middleware in the "Categories" list on the left side of the project menu in STM32CubeMX.
Set TICK_RATE_HZ to 1000 to get ticks once per millisecond. Configure the Memory Management scheme and TOTAL_HEAP_SIZE.
In this example we use heap_4 and a heap size of 70000 bytes to have a large enough heap for the touchgfx application.
Creating the TouchGFX Task for FreeRTOS
The required heap size depends on the application, as all software modules can allocate memory in the FreeRTOS heap.
A standard TouchGFX application generated with CubeMX allocates the following objects in the FreeRTOS heap:
| Object | Size |
|---|---|
| Frame buffer semaphore | 80 bytes |
| VSync message queue | 84 bytes |
| TouchGFX task control block | 96 bytes |
| TouchGFX task stack | 16,384 bytes |
| Default task control block | 96 bytes |
| Default task stack | 512 bytes |
| Total | 17,252 bytes |
This can be reduced by lowering the stack size (see below).
The Default task is not used by TouchGFX, but is created by default by CubeMX. It can be deleted.
If your application is using the LIBJPEG middleware or software based MJPEG video with TouchGFX you need more heap space. LIBJPEG is allocating many objects in the heap during decompression. The LIBJPEG memory usage depends on the video or images decompressed (mostly resolution). For one of the videos available in the TouchGFX Designer of resolution 480*272, the memory used by LIBJPEG is 42,600 bytes.
Adding this number to the heap requirements gives:
| Object | Size |
|---|---|
| Standard objects | 17,252 bytes |
| LIBJPEG objects | 42,600 bytes |
| Total | 59,852 bytes |
FreeRTOS aligns the heap array on 8-bytes in both ends (loosing a few bytes) and allocates a linked list of free blocks in the heap. So it is necessary to round up the calculated number a bit, for example to 60*1024 bytes.
Main loop
The TouchGFX main loop is entered when calling the following function.
void MX_TouchGFX_Process(void);
Developers can either configure their own custom task in STM32CubeMX where the TouchGFX main loop should run or use the TouchGFX_Task() handle which is generated by TouchGFX Generator.
Custom task
The function void touchgfx_taskEntry(void) is called by MX_TouchGFX_Process().
void MX_TouchGFX_Process(void)
{
  // Calling forward to touchgfx_taskEntry in C++ domain
  touchgfx_taskEntry();
}
Developers are required to call MX_TouchGFX_Process() in the task handler for the task they intend to run the TouchGFX main loop in.
If the developer has configured a FreeRTOS task in STM32CubeMX called MyTask for instance, then the following example shows how MX_TouchGFX_Process() should be called in the custom task handler to start TouchGFX.
void StartMyTask(void *argument)
{
  /* USER CODE BEGIN 5 */
  MX_TouchGFX_Process();
  /* USER CODE END 5 */
}
TouchGFX Task
The TouchGFX main loop can run in the TouchGFX Task. The TouchGFX Generator defines a task handler that calls touchgfx_taskEntry() named TouchGFX_Task() inside app_touchgfx.c.
app_touchgfx.c
void TouchGFX_Task(void *argument)
{
  // Calling forward to touchgfx_taskEntry in C++ domain
  touchgfx_taskEntry();
}
To have this task scheduled by the FreeRTOS scheduler, the task must be created in STM32CubeMX in the FREERTOS menu. In the Tasks and Queues tab, add a task with "TouchGFX_Task" as Entry Function and a large enough stack with Code Generation Option As external.
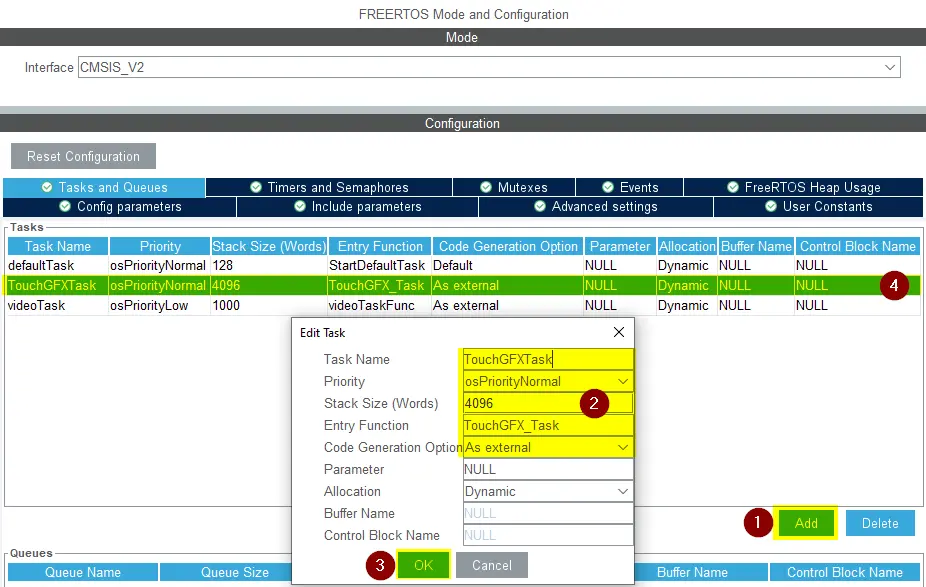
Creating the TouchGFX Task for FreeRTOS
Here we have configured a stack size of 4,096 words (equal to 16,384 bytes). The required stack size depends on the application (mostly on the number of widgets updated at the same time). A stack size of 2048 words is enough for most applications, and many can go even further down in stack size.
Tip
STM32CubeMX will create the TouchGFX Task in main.c when generating code, which will start the TouchGFX main loop.
To ensure that the SYS Timebase Source always receives its tick, which is used for some system functions including HAL_Delay(), the NVIC priority for the assigned timer must be higher (i.e. have a lower number) than the highest interrupt priority that can be used to make calls to interrupt safe FreeRTOS API functions.
This is configurable in FreeRTOS as configMAX_SYSCALL_INTERRUPT_PRIORITY and is set to 5 at default.
In most cases the timer used for SYS Timebase Source is TIM6.
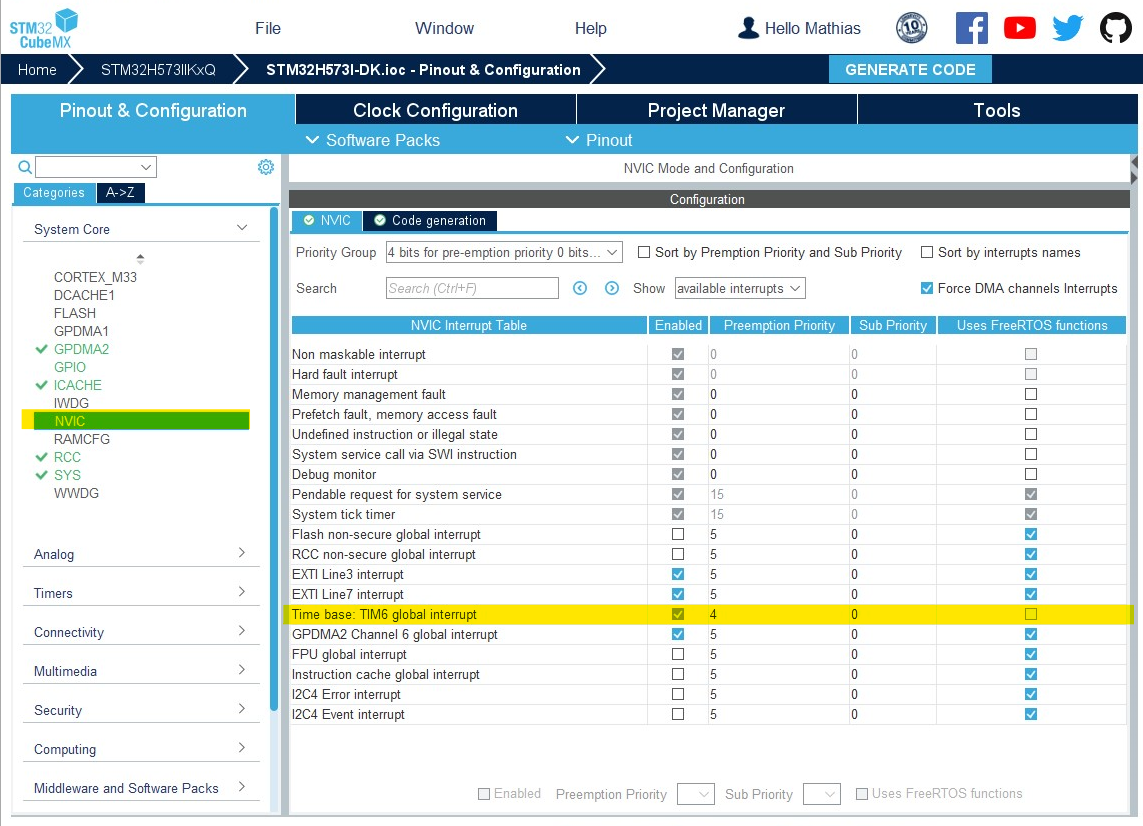
Setting the NVIC priority of the systick timer
ThreadX
This section shows how to configure a TouchGFX project using ThreadX either as an X-CUBE Software Pack or Native ThreadX Middleware.
Native Middleware configuration
The following example shows how to configure ThreadX for an STM32U5 MCU, which has ThreadX available as native middleware.
Having enabled Thread native middleware in a project navigate to the
THREADX menu found under Middleware in the "Categories" list on the left side of the project menu in STM32CubeMX. Enable the Core from the Mode list.
Set TX_TIMER_TICKS_PER_SECOND to 1000 to get ticks once per millisecond and set Memory Pool Allocation to Use Static Allocation.
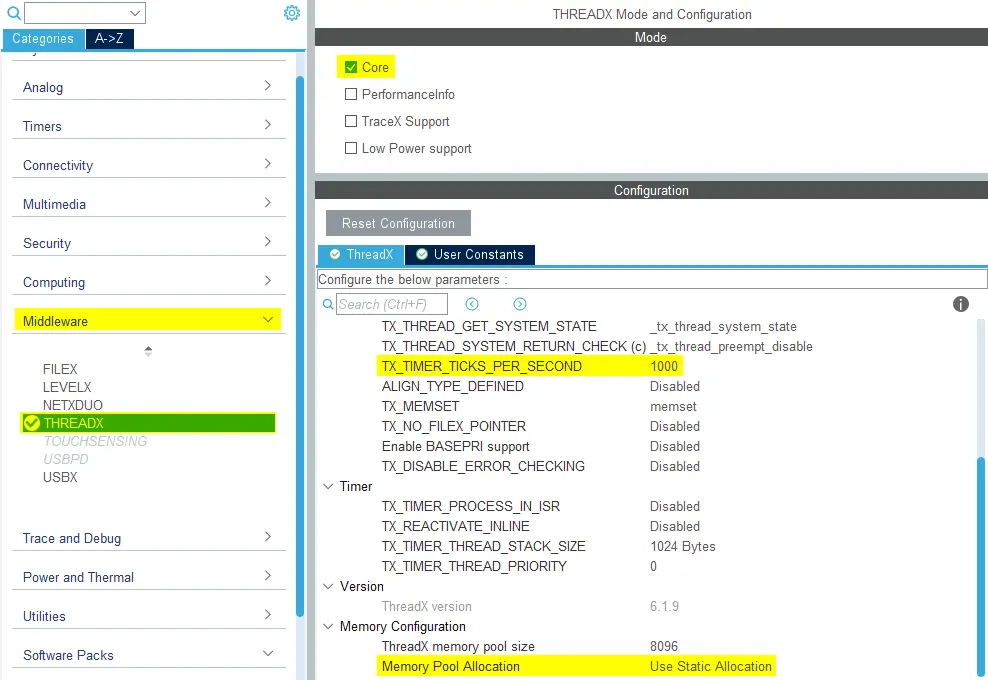
Enabling and Configuring Native ThreadX Middleware
Caution
- If Memory Pool Allocation is set to Use Dynamic Allocation then :
- User will have to add missing code in the USER CODE BEGIN DYNAMIC_MEM_ALLOC section in the generated app_azure_rtos.c file.
- User will need also to update the linker files following the recommendation described by code comments in the generated app_azure_rtos.c file.
- Depending on the STM32CubeMX version, the Dynamic Allocation may not work properly.
STM32CubeMX is not responsible for generating the code that allocates and schedules tasks when using ThreadX. For this reason, a call to the function MX_TouchGFX_PreOSInit(), which will initialize the TouchGFX
framework, will be generated by STM32CubeMX. After this, another call to the function MX_ThreadX_Init(), which will initialize and start the ThreadX kernel, is generated.
main.c
int main(void)
{
...
  /* Call PreOsInit function */
  MX_TouchGFX_PreOSInit();
...
  MX_ThreadX_Init();
...
}
TouchGFX Generator will generate the MX_TouchGFX_Init() function, which will create the TouchGFX thread.
app_touchgfx.c
UINT MX_TouchGFX_Init(VOID *memory_ptr)
{
  UINT ret = TX_SUCCESS;
  CHAR *pointer = 0;

  /* Allocate the stack for TouchGFX Thread.  */
  if (tx_byte_allocate((TX_BYTE_POOL*)memory_ptr, (VOID **) &pointer,
                       TOUCHGFX_STACK_SIZE, TX_NO_WAIT) != TX_SUCCESS)
  {
    ret = TX_POOL_ERROR;
  }

  /* Create TouchGFX Thread */
  else if (tx_thread_create(&TouchGFXThread, (CHAR *)"TouchGFX", TouchGFX_Task, 0,
                       pointer, TOUCHGFX_STACK_SIZE,
                       5, 5,
                       TX_NO_TIME_SLICE, TX_AUTO_START) != TX_SUCCESS)
  {
    ret = TX_THREAD_ERROR;
  }

  return ret;
}
TouchGFX Generator will then generate code that creates the TouchGFX task byte pool and calls MX_TouchGFX_Init().
This code is inserted in the appropriate location into the function tx_application_define() in the app_azure_rtos.c file where the TouchGFX Task byte pool is defined.
The tx_application_define() function is called by the ThreadX kernel at initialization time. The TouchGFX thread will then be started later when the ThreadX kernel is started.
app_azure_rtos.c
#include "app_touchgfx.h"
...
__ALIGN_BEGIN static UCHAR touchgfx_byte_pool_buffer[TOUCHGFX_APP_MEM_POOL_SIZE] __ALIGN_END;
static TX_BYTE_POOL touchgfx_app_byte_pool;
...
VOID tx_application_define(VOID *first_unused_memory)
{
  ...
  if (tx_byte_pool_create(&touchgfx_app_byte_pool, "TouchGFX App memory pool", touchgfx_byte_pool_buffer, TOUCHGFX_APP_MEM_POOL_SIZE) != TX_SUCCESS)
  {
    /* USER CODE BEGIN TouchGFX_Byte_Pool_Error */

    /* USER CODE END TouchGFX_Byte_Pool_Error */
  }
  else
  {
    /* USER CODE BEGIN TouchGFX_Byte_Pool_Success */

    /* USER CODE END TouchGFX_Byte_Pool_Success */

    memory_ptr = (VOID *)&touchgfx_app_byte_pool;
    if (MX_TouchGFX_Init(memory_ptr) != TX_SUCCESS)
    {
      /* USER CODE BEGIN  MX_X-CUBE-TOUCHGFX_Init_Error */

      /* USER CODE END  MX_X-CUBE-TOUCHGFX_Init_Error */
    }
    /* USER CODE BEGIN  MX_X-CUBE-TOUCHGFX_Init_Success */

    /* USER CODE END  MX_X-CUBE-TOUCHGFX_Init_Success */
  }

  ...
}
X-CUBE-AZRTOS configuration
The following example shows have to configure ThreadX for an STM32H7 MCU, which has ThreadX available as an X-CUBE Software Pack.
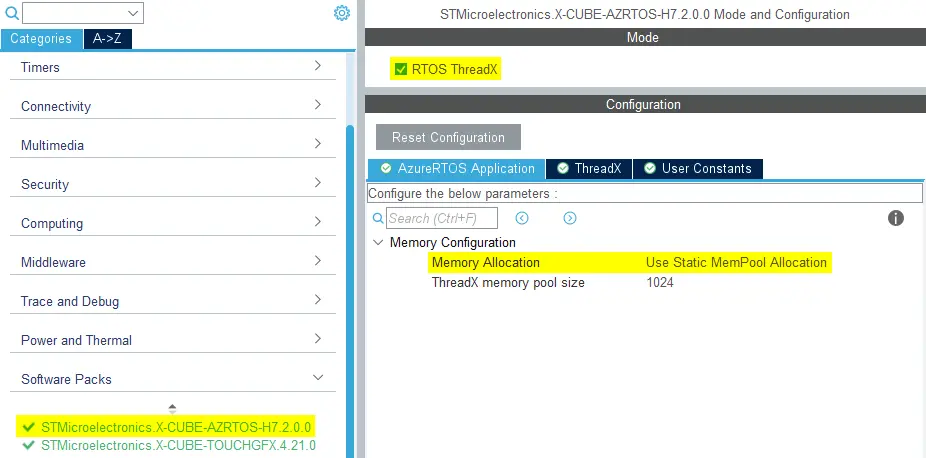
Having enabled Thread as an X-CUBE Software Pack in a project navigate to the
X-CUBE-AZRTOS-XX menu found under Software Packs in the "Categories" list on the left side of the project menu in STM32CubeMX and set the
Memory Allocation setting to Use Static MemPool Allocation.
ThreadX Configuration - X-CUBE-AZRTOS Software Pack
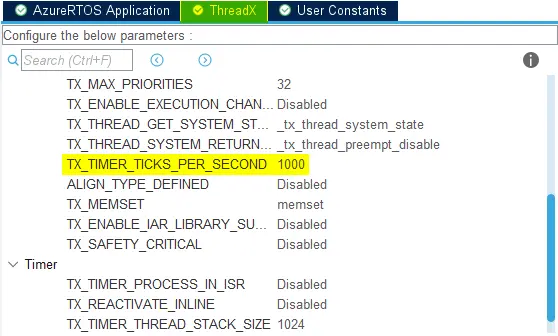
Select the ThreadX setting tab and set TX_TIMER_TICKS_PER_SECOND to 1000 to get ticks once per millisecond.
ThreadX Configuration - X-CUBE-AZRTOS Software Pack
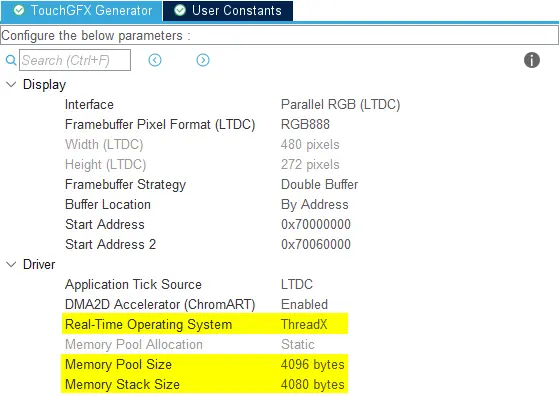
Once configuration is done in X-CUBE-AZRTOS-XX menu, navigate to TouchGFX Generator and select ThreadX as Real Time Operating System and define the Memory Pool Size and Memory Stack Size for the TouchGFX task.
Creating the TouchGFX Task for FreeRTOS