调试
由于TouchGFX应用程序是一组由TouchGFX Designer、TouchGFX Generator生成并由开发人员编写的C++文件,因此可以像任何其他C++应用程序一样调试。
目标板卡调试
如果您正在使用像IAR Workbench、KeilμVision或STM32CubeIDE这样的IDE,则可以直接使用IDE的可用机制进行目标调试。 由TouchGFX Generator或直接从TouchGFX板件设置生成的TouchGFX项目可以直接使用选定的工具链进行调试。
Board bring up代码和TouchGFX AL只在目标板卡上执行,因此需要在那部分进行调试。 应用程序的UI部分可以在目标板卡或使用模拟器进行调试。 在目标板卡上,您通常会调试性能问题等,如动画速度、更新频率和响应能力。 其他特定于UI的问题可以在目标上调试,但使用模拟器调试通常会更快。
模拟器调试
调试与UI相关的问题,如动画动作、转换、元素更新、程序逻辑等等;在大多数情况下,使用模拟器进行测试和调试比每次烧录板卡要高效得多。
TouchGFX应用程序还支持Visual Studio,并为其提供和维护一个项目文件。 使用Visual Studio时,可以在调试模式下运行模拟器,可以利用IDE的所有调试功能。
如果想要使用模拟器进行调试,您可以不局限于Visual Studio。 应用程序可以通过GCC进行编译,如果你在使用一个不同的IDE, 可能在配置调试一个GCC编译通过过的项目。 然而, 对于你选择的IDE, 你需要自己进行配置.
在Visual Studio中调试
使用DebugPrinter
DebugPrinter类是一种在显示屏上打印调试消息的简单方法,无需向屏幕添加TextArea或其他控件。 例如,这种方法可用于显示来自后端的事件、或FPS或渲染时间等测量值。
在使用DebugPrinter之前,需要分配一个实例并将其传递给Application类。 例如,这可以在FrontendApplication的构造函数中实现。
调试打印器需要和帧缓存格式保持兼容。 下表显示了可用的类名。 这里我们在gui/src/common/FrontendApplication.cpp中添加了一个16bpp调试打印机(与LCD16bpp兼容):
#include <gui/common/FrontendApplication.hpp>
#include <touchgfx/lcd/LCD16DebugPrinter.hpp>

LCD16DebugPrinter lcd16DebugPrinter; // Global object

FrontendApplication::FrontendApplication(Model& m, FrontendHeap& heap)
  : FrontendApplicationBase(m, heap)
{
  lcd16DebugPrinter.setPosition(0, 0, 240, 40);
  lcd16DebugPrinter.setScale(2);
  lcd16DebugPrinter.setColor(0x00); //black
  Application::setDebugPrinter(&lcd16DebugPrinter);
}
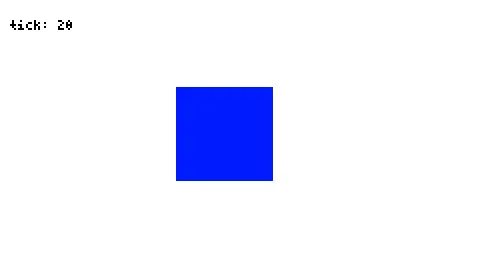
此时,我们已经将DebugPrinter配置为左上角240 x 40像素写入。 在您的应用程序中,现在可以使用以下命令打印字符串:
#include <stdio.h>

char debugStringBuffer[30];
void updateDebugString()
{
  static int count = 0;
  count++;
  snprintf(debugStringBuffer, sizeof(debugStringBuffer), "tick: %d", count);
  Application::getDebugPrinter()->setString(debugStringBuffer);
  Application::invalidateDebugRegion();
}
您不必在应用程序中多次调用DebugPrinter::setString法。 但是,当您更改了缓存区的内容时,请调用invalidateDebugRegion。 这将使DebugPrinter绘制新内容。 如果DebugPrinter覆盖区域中的普通控件被重绘,DebugPrinter也会重绘。
Note
使用DebugPrinter
DebugPrinter类
DebugPrinter实例必须兼容所使用的LCD类。 该表列出了DebugPrinter类名称:
| LCD 类 | DebugPrinter类 |
|---|---|
| LCD1bpp | LCD1DebugPrinter |
| LCD2bpp | LCD2DebugPrinter |
| LCD4bpp | LCD4DebugPrinter |
| LCD8bpp_ARGB2222 | LCD8ARGB2222DebugPrinter |
| LCD8bpp_ABGR2222 | LCD8ABGR2222DebugPrinter |
| LCD8bpp_RGBA2222 | LCD8RGBA2222DebugPrinter |
| LCD8bpp_BGRA2222 | LCD8BGRA2222DebugPrinter |
| LCD16bpp | LCD16DebugPrinter |
| LCD16bppSerialFlash | LCD16DebugPrinter |
| LCD24bpp | LCD24DebugPrinter |
| LCD32bpp | LCD32DebugPrinter |
使用与正在使用的LCD类匹配的DebugPrinter类。
对于模拟器项目,LCD实例在generated/Simulator/src/main base.cpp中创建。 对于目标项目,实例在Touch gfx/target/generated/touchgfxconfiguration.cpp中创建:
TouchGFX/target/generated/TouchGFXConfiguration.cpp
...
静态LCD16bpp显示;
...
您可以检查这些文件来验证您的LCD类名。