ダイナミック・ビットマップ
このセクションでは、ダイナミック・ビットマップの使用方法について説明します。標準のビットマップはアプリケーションにコンパイルされるので、コンパイル時に使用可能でなければならないことを思い出してください。ビットマップはPNGファイルなどから変換され、サイズおよびフォーマット情報と共に内部フォーマットで保存されます。
実行時にRAM内でビットマップを作成することも可能です。これはダイナミック・ビットマップと呼ばれます。ダイナミック・ビットマップは、アプリケーションにコンパイルされるスタティック・ビットマップと同じように使用できます。つまり、ダイナミック・ビットマップは画像ウィジェットやボタン・ウィジェットなどで使用できます。
ダイナミック・ビットマップの設定
ダイナミック・ビットマップの作成時には、ビットマップ・キャッシュからピクセル・メモリが割り当てられます。したがって、ダイナミック・ビットマップを作成する前に、ビットマップ・キャッシュを設定する必要があります。これは手動のプロセスで、TouchGFX DesignerやGeneratorでは実行できません。
設定手順については、「ビットマップ・キャッシュ」を参照してください。
アプリケーション内で使用されるダイナミック・ビットマップの最大数を定義する必要があります。この最大数は、ビットマップ・キャッシュのアドレスやサイズと共にTouchGFXに渡されます。ここでは、最大4つのダイナミック・ビットマップを持つビットマップ・キャッシュを設定します。この設定はアプリケーション内の任意のファイルで行うことができます。設定を一度だけ行う必要がある場合は、FrontendApplication.cppがよいでしょう。
FrontendApplication.cpp (extract)
#include <gui/common/FrontendApplication.hpp>
#include <touchgfx/Bitmap.hpp>

FrontendApplication::FrontendApplication(Model& m, FrontendHeap& heap)
    : FrontendApplicationBase(m, heap)
{
    // Place cache start address in SDRAM at address 0xC0008000;
    uint16_t* const cacheStartAddr = (uint16_t*)0xC0008000;
    const uint32_t cacheSize = 0x300000; //3 MB, as example
    Bitmap::setCache(cacheStartAddr, cacheSize, 4);
}
Windowsシミュレータを使用する場合には、ここでビットマップ・キャッシュも作成する必要があります。 Windowsで大きな配列を宣言したり、mallocを使用したりするのは簡単です。
FrontendApplication.cpp (extract)
#include <gui/common/FrontendApplication.hpp>
#include <touchgfx/Bitmap.hpp>

FrontendApplication::FrontendApplication(Model& m, FrontendHeap& heap)
    : FrontendApplicationBase(m, heap)
{
#ifdef SIMULATOR
    const uint32_t cacheSize = 0x300000; //3 MB, as example
    uint16_t* const cacheStartAddr = (uint16_t*)malloc(cacheSize);
    Bitmap::setCache(cacheStartAddr, cacheSize, 4);
#else
    // Place cache start address in SDRAM at address 0xC0008000;
    uint16_t* const cacheStartAddr = (uint16_t*)0xC0008000;
    const uint32_t cacheSize = 0x300000; //3 MB, as example
    Bitmap::setCache(cacheStartAddr, cacheSize, 4);
#endif
}
ダイナミック・ビットマップの使用例
ダイナミック・ビットマップを使用するには、それを表示すウィジェットが必要です。そこで、画像ウィジェットをビューに挿入します(コードまたはTouchGFX Designerを使用)。
#include <touchgfx/widgets/Image.hpp>
using namespace touchgfx;
class TemplateView : public View
{
private:
    Image image;
}
ダイナミック・ビットマップでこのウィジェットを使用するには、次の3つの手順を実行します。
- Create the Dynamic Bitmap in the bitmap cache
- Initialize the memory used by the dynamic bitmap
- ビットマップをウィジェットに割当て
The pixel memory returned by dynamicBitmapCreate() (and dynamicBitmapCreateL8() / dynamicBitmapCreateCustom()) is not cleared or initialized in any way. It simply points into the bitmap cache and contains whatever was there before, e.g. leftover data from a previously deleted bitmap, or random contents on system startup.
This is one of the most common mistakes when working with dynamic bitmaps: forgetting to initialize the memory results in a bitmap with garbage pixel data being shown on the display, or even data leaking between what looks like unrelated bitmaps.
Always initialize every pixel before the bitmap is used, either by calling Bitmap::dynamicBitmapClear() right after creating the bitmap, or by immediately writing your own image/pixel data into it (e.g. loading an image from a file, see Loading Images At Runtime).
ダイナミック・ビットマップはsetupScreenで作成します。ここでは、16bppフォーマットRGB565を使用します。フレームバッファが24ビットの場合はRGB888を使用します。透明なビットマップを作成するには、フォーマットARGB8888を使用します。
The address of the pixels in the dynamic bitmap is returned by the dynamicBitmapGetAddress function, but since dynamicBitmapClear() already knows the size and layout of the bitmap, you no longer need to compute the pixel buffer size yourself (which is error prone, since it depends on both format and bitmap dimensions):
#include <touchgfx/Bitmap.hpp>
void TemplateView::setupScreen()
{
    BitmapId bmpId;

    //Create (16bit) dynamic bitmap of size 100x150
    bmpId = Bitmap::dynamicBitmapCreate(100, 150, Bitmap::RGB565);

    //Clear all pixels; the memory returned above is *not* initialized
    if (bmpId != BITMAP_INVALID)
    {
        Bitmap::dynamicBitmapClear(bmpId);
    }

    //Make Image widget show the dynamic bitmap
    image.setBitmap(Bitmap(bmpId));

    //Position image and add to View
    image.setXY(20, 20);
    add(image);
    ...
}
As explained above, the pixel memory you get from the bitmap cache is not cleared automatically, so you must clear or overwrite it yourself before the bitmap is displayed. Bitmap::dynamicBitmapClear() is the recommended way to do this, it zeroes every pixel (and any CLUT/format specific data) of the dynamic bitmap in one call, without you having to know its size or format.
If you want to load your image from a file instead, you can skip the call to dynamicBitmapClear() and replace it with your loader code, since the loader will overwrite every pixel anyway. See the article Loading Images At Runtime.
ダイナミック・ビットマップの操作
ダイナミック・ビットマップの操作はすべてBitmapクラスで実行されます。
ダイナミック・ビットマップの作成
以下のメソッドでは、指定された幅、高さ、ビットマップ形式で、ダイナミック・ビットマップを作成します。ビットマップが作成されるのは、十分な量の未使用のメモリが使用可能な場合のみです。ビットマップが作成されなかった場合、このメソッドはBITMAP_INVALIDを返します。
static BitmapId Bitmap::dynamicBitmapCreate(const uint16_t width, const uint16_t height, BitmapFormat format, ClutFormat clutFormat)
This method (and dynamicBitmapCreateL8() / dynamicBitmapCreateCustom()) does not clear or initialize the pixel data of the new bitmap. The memory simply contains whatever was there before. Call Bitmap::dynamicBitmapClear() right after creating the bitmap, or overwrite every pixel yourself, before using or displaying it.
Clearing a Dynamic Bitmap
Since the pixel data of a newly created dynamic bitmap is uninitialized (see above), it must be cleared or overwritten before use. The following method zeroes all pixel data of a dynamic bitmap:
static void Bitmap::dynamicBitmapClear(BitmapId id)
dynamicBitmapClear() clears the entire bitmap, including any format specific data such as the CLUT (Color LookUp Table) header of an L8 bitmap, and it resets the solid area (see below) back to the same default as when the bitmap was created. Since the method already knows the size and format of the bitmap, you do not need to compute the number of bytes to clear yourself, unlike a manual memset() call on the address returned by dynamicBitmapGetAddress().
If you intend to immediately fill the bitmap with your own pixel data, e.g. by loading an image from a file or drawing into it, you can skip calling dynamicBitmapClear() as long as you are certain that every pixel will be overwritten.
ダイナミック・ビットマップの削除
次のメソッドはダイナミック・ビットマップを削除します。
static bool Bitmap::dynamicBitmapDelete(BitmapId id)
ダイナミック・ビットマップ内のピクセルのアドレスを取得
次のメソッドはダイナミック・ビットマップのアドレスを返します。このメソッドは、ファイル・ローダが画像データをビットマップにコピーするために使用します。
static uint8_t* dynamicBitmapGetAddress(BitmapId id)
ダイナミック・ビットマップの塗りつぶし領域を設定
次のメソッドは、ダイナミック・ビットマップの塗りつぶされた長方形を設定します。
static bool dynamicBitmapSetSolidRect(BitmapId id, const Rect& solidRect)
「塗りつぶし領域」の概念については、「カスタム・ウィジェット」を参照してください。
デフォルトでは、RGB565やRGB888などの不透明なフォーマットでは、塗りつぶし領域がビットマップ全体になるように設定されます。 ARGB8888などの透明なフォーマットでは空に設定されます。
メモリからのダイナミック・ビットマップの作成
ピクセル・データをRAMにキャッシュせずに、Flashメモリのピクセル・データからダイナミック・ビットマップを直接作成することもできます。通常のダイナミック・ビットマップとは異なり、キャッシュ・サイズにピクセル・データを考慮する必要はありません。
ピクセル・アドレスは4バイトに揃える必要があることに注意してください。
static BitmapId Bitmap::dynamicBitmapCreateExternal(const uint16_t width, const uint16_t height, const void* pixels, BitmapFormat format, uint8_t customSubformat = 0);
縦向きモードのダイナミック・ビットマップ
TouchGFXは縦向きモードで実行できます。このモードは、ディスプレイが本来の方向から90度回転した状態でマウントされている状況で使用されます。このモードでダイナミック・ビットマップを使用する場合、少し注意が必要です。
次に示すのはSTM32F746向けのプロジェクト例です。ここでは幅が480ピクセル、高さが272ピクセルのディスプレイが使用されています。フレームバッファは同じ寸法です。
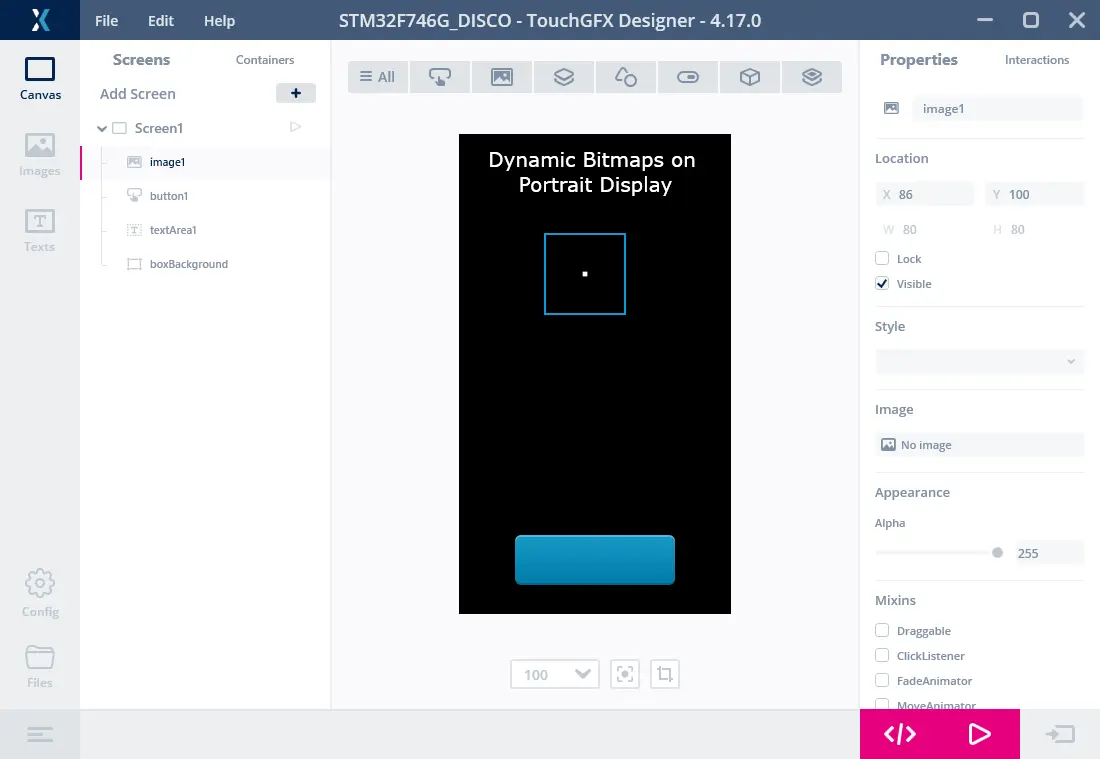
縦向きのプロジェクト
image1の画像ウィジェットにはビットマップは割り当てられていません。この例ではこれを使用してダイナミック・ビットマップを表示します。
縦向きモードを使用する場合は、座標系が反時計回りに90度回転します。座標(0, 0)は、左上隅の'D'の近くになります。フレームバッファの最初のバイト(スクリーン上の最初のピクセルの色を指定)は、右上隅にあります。
したがって、縦向きで実行されるときにフレームバッファは回転しません。ダイナミック・ビットマップにも同じことが言えます。しかし、(マウントする)ディスプレイの最初のラインに表示させるピクセルは、フレームバッファの左のエッジに描画する必要があります。
In the function below, we create a dynamic bitmap and make the upper row green, and the right edge red. Since we want a solid white base color rather than just zeroed/black memory, we use memset() directly here instead of Bitmap::dynamicBitmapClear() (which is only useful when zeroed/transparent memory is acceptable, e.g. as a starting point before drawing your own pattern):
Screen1View.cpp (extract)
void Screen1View::setupScreen()
{
    Screen1ViewBase::setupScreen();
    BitmapId bmpId;
    bmpId = Bitmap::dynamicBitmapCreate(100, 100, Bitmap::RGB565);

    if (bmpId != BITMAP_INVALID)
    {
        //set all pixels white
        uint16_t* const bitmapPixels = (uint16_t*)Bitmap::dynamicBitmapGetAddress(bmpId);
        memset(bitmapPixels, 0xFF, 100*100*2);

        //first 200 pixels red, => two column on the right on display
        for (int i = 0; i<200; i++) bitmapPixels[i] = 0xF800;

        //first two pixels in all rows green in bitmap => top two rows on display
        for (int i = 0; i<100; i++)
        {
            bitmapPixels[i*100]     = 0x07E0;
            bitmapPixels[i*100 + 1] = 0x07E0;
        }
    }

    image1.setBitmap(bmpId);
}
ディスプレイにダイナミック・ビットマップが表示されます。
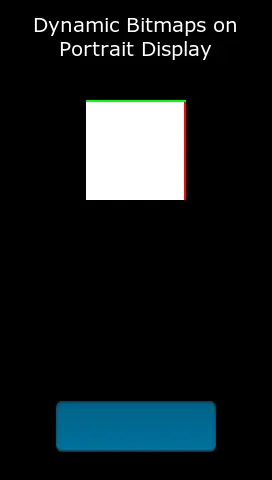
縦向きプロジェクトのフレームバッファのコンテンツ