4. External RAM
Motivation
In this step we will enable the external SDRAM. External RAM is often required in graphical applications as the framebuffer is too big to fit into the internal RAM in many resolutions. Some applications use two or three framebuffers, making external RAM even more a necessity.
Note
When the framebuffer is to be placed in external RAM it is important that we ensure that the external RAM
- Can be read and written.
- Runs at desired (typically maximum) speed.
Goal
The goal in this section is to enable the external RAM and read and write data from it.
Verification
Here are the verification points for this section:
| Verification Point | Rationale |
|---|---|
| External RAM is readable | External RAM can be used for framebuffer location |
| External RAM writable | External RAM can be used for framebuffer location |
| External RAM Performance | Graphics performance is acceptable with framebuffer in external RAM |
Prerequisites
The following are the prerequisites for this step:
- Information about the RAM, typically a datasheet
- Information about the connections between the MCU and the external RAM
Do
The external SDRAM controller is configured in STM32CubeMX under Connectivity -> FMC -> SDRAM1:
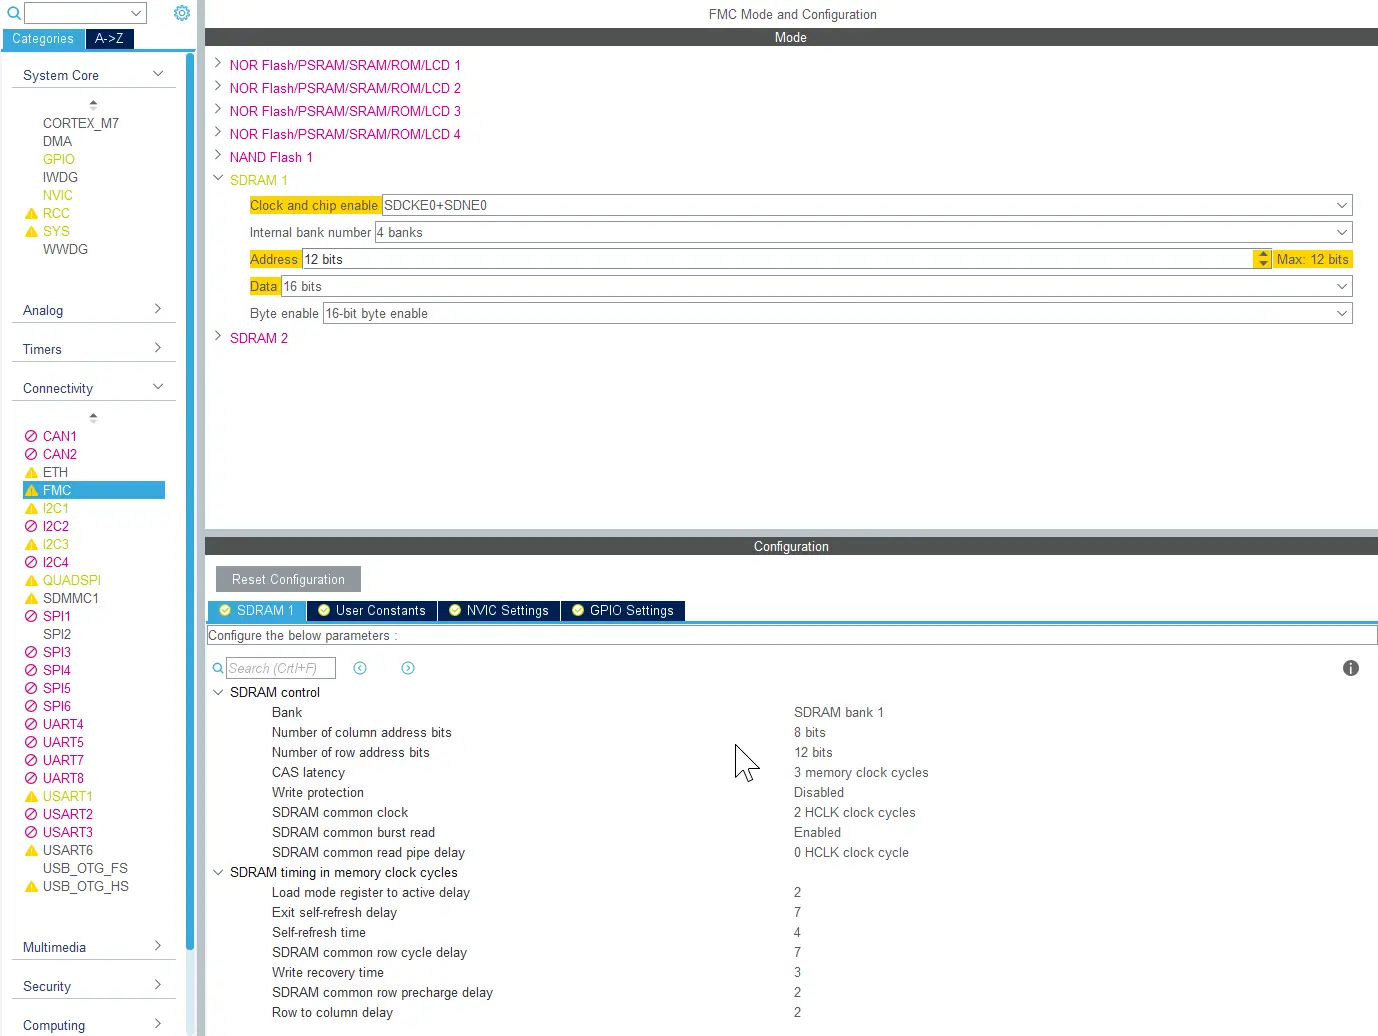
Configuring SDRAM
The AHB clock (HCLK) is reference clock for the FMC memory controller. Check the clock frequency under "Clock Configuration" and use that to calculate the various SDRAM clock cycles.
Remember to configure all the GPIOs used for the SDRAM:

Configuring SDRAM GPIO
Further configuration
For some RAM chips it is necessary to do additional device specific configuration. This cannot be configured in STM32CubeMX, but must be done in the C code. The STM32Cube HAL contains functions to send commands to the device. Here is an example:
main.c
FMC_SDRAM_CommandTypeDef Command;

/* Step 1: Configure a clock configuration enable command */
Command.CommandMode            = FMC_SDRAM_CMD_CLK_ENABLE;
Command.CommandTarget          = FMC_SDRAM_CMD_TARGET_BANK1;
Command.AutoRefreshNumber      = 1;
Command.ModeRegisterDefinition = 0;

/* Send the command */
HAL_SDRAM_SendCommand(&hsdram1, &Command, SDRAM_TIMEOUT);
Testing the RAM
After configuring the external RAM it is important to test it. We should test at least the following:
- RAM is visible in the debugger
- RAM is readable and writeable in the whole range
- Performance is as expected
The memory controller uses a fixed address mapping of external memories based on their type. Check the datasheet for your microcontroller for the addresses. SDRAM is typically mapped to 0xC0000000 (bank1) or 0xD0000000 (bank2).
Test RAM is visible in the debugger.
The first test when the RAM is enabled is to access it from the debugger. This will easily show if you can read and write to the memory. Just open a memory viewer on the address:

Testing memory in Bank2 at 0xD0000000 in the debugger
RAM is readable and writeable in the whole range
The next test is to write small programs to write more data to the external memory. Preferably test the whole memory. Here is a starting point:
uint32_t *externalRAM = 0xC000000;
const uint32_t size = 1000;

//write external RAM
for(int i = 0; i < size; i++)
{
    externalRAM[i] = i;
}
Now check the memory again in the debugger. This can reveal some types of error, for example if some of the address pins are not connected or exchanged. You should also try with different value patterns. Writing low numbers like 0, 1, 2, 3, will not reveal if some of the data pins are bad.
We can also read the memory with a little program:
uint32_t *externalRAM = 0xC000000;
const uint32_t size = 1000;

//read external RAM
for(int i = 0; i < size; i++)
{
    ASSERT(externalRAM[i] == i, "external RAM not as expected");
}
Remember that a test like this will not tell if the addresses are incorrect.
Test all memory cells. Either by running a longer loop, or by changing the starting address.
Performance is as expected
We need now to test the performance of the external RAM. The performance is important when the framebuffer is in external memory. A slow memory will degrade the graphics performance of your system.
Test the speed of reading, writing, and modifying the RAM. Typically, a graphics application copies a lot of data from one memory to another. There will be a lot of writing to the framebuffer during draw operations, and a lot of reading when transmitting to the display. We can mimic that in our test programs:
volatile uint32_t *externalRAM = 0xC000000;
uint32_t sourcedata[10000];
const uint32_t size = 10000;

int begin = HAL_GetTick();
//write external RAM
for(int i = 0; i < size; i++)
{
    externalRAM[i] = sourcedata[i];
}
int end = HAL_GetTick();
int begin = HAL_GetTick();
//Read external RAM
for(int i = 0; i < size; i++)
{
    sourcedata[i] = externalRAM[i];
}
int end = HAL_GetTick();
Graphics software reads and writes data in the framebuffer when e.g. blending an image on a background.
//Time modifying external RAM
int begin = HAL_GetTick();
for(int i = 0; i < size; i++)
{
    externalRAM[i] += 2;
}
int end = HAL_GetTick();
Depending on your memory speed and the accuracy you would like, you may like to loop the tests, say 100 times, to make the results more reliable.
If the external RAM is clocked too fast it can result in incorrect values during read or write operations. This can be difficult to see with these simpler tests, but will be visible on the display.