Custom Triggers and Actions
With TouchGFX Designer it is possible to define your own interaction components with Custom Triggers and Actions. Each Screen in your application can contain a collection of actions (these are simply void methods in C++) that you can call from within the TouchGFX Designer as well as in code, while custom containers can also have a collection of triggers (which is equal to a callback in C++) which your application can react to. In this article, we will go through this functionality to learn the possibilities this gives us to create more clean and dynamic TouchGFX applications.
Custom Triggers
Custom Containers have the ability to create Custom Triggers. These are generated as C++ callbacks and can be emitted or reacted to from the Interaction system, or from User Code.
Adding Custom Triggers
Adding a Custom Trigger is done via the properties tab of a Custom Container, by clicking the blue button with a plus icon in the TRIGGERS section highlighted in the image below.

Adding a Custom Trigger
When the Custom Trigger has been created further options become available as shown in the image below.
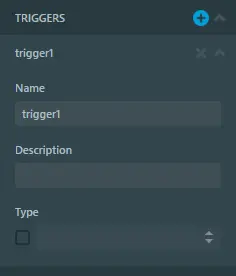
Editing a Custom Trigger
Name
The name specified here will be used for reference within the Interaction system and in the generated code files, as shown in the code examples below:
CustomContainer1Base.hpp
class CustomContainer1Base : public touchgfx::Container
{
public:
    CustomContainer1Base();
    virtual ~CustomContainer1Base() {}
    virtual void initialize();

    /*
     * Custom Trigger Callback Setters
     */
    void setTrigger1Callback(touchgfx::GenericCallback<>& callback)
    {
        this->trigger1Callback = &callback;
    }

protected:
    FrontendApplication& application() {
        return *static_cast<FrontendApplication*>(touchgfx::Application::getInstance());
    }

    /*
     * Custom Trigger Emitters
     */
    virtual void emitTrigger1Callback()
    {
        if (trigger1Callback && trigger1Callback->isValid())
        {
            this->trigger1Callback->execute();
        }
    }

private:

    /*
     * Custom Trigger Callback Declarations
     */
    touchgfx::GenericCallback<>* trigger1Callback;

};
CustomContainer1Base.cpp
CustomContainer1Base::CustomContainer1Base() :
    trigger1Callback(0)
{
    setWidth(250);
    setHeight(250);
}

void CustomContainer1Base::initialize()
{

}
Description
The text written here, will be used in the Interaction system and can be seen when hovering over the Trigger when selecting it in the Interaction system. If a description has not been specified a standard description will be created as shown in the Emitting Custom Triggers from Interactions section.
Type
Enabling Type will allow for creating triggers that return a value given a specific type. The type can either be selected from a list, or by writing the type manually.
Shown below is the code generated when selecting bool.
CustomContainer1Base.hpp
class CustomContainer1Base : public touchgfx::Container
{
public:
    CustomContainer1Base();
    virtual ~CustomContainer1Base() {}
    virtual void initialize();

    /*
     * Custom Trigger Callback Setters
     */
    void setTrigger1Callback(touchgfx::GenericCallback<bool>& callback)
    {
        this->trigger1Callback = &callback;
    }

protected:
    FrontendApplication& application() {
        return *static_cast<FrontendApplication*>(touchgfx::Application::getInstance());
    }

    /*
     * Custom Trigger Emitters
     */
    virtual void emitTrigger1Callback(bool value)
    {
        if (trigger1Callback && trigger1Callback->isValid())
        {
            this->trigger1Callback->execute(value);
        }
    }

private:

    /*
     * Custom Trigger Callback Declarations
     */
    touchgfx::GenericCallback<bool>* trigger1Callback;

};
Emitting Custom Triggers from Interactions
A Custom Trigger can be emitted by using the Interaction system. Simply go to the Interaction tab of the Custom Container that owns the Custom Trigger, create a new Interaction and select the Custom Trigger as the action as shown in the image below.
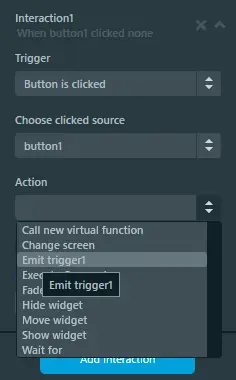
Emitting a Custom Trigger from an Interaction
As shown in the above picture, whenever the button, that has been added to the Custom Container, is clicked the Custom Trigger is emitted.
If the Custom Trigger has type enabled, the parameter value or variable must be specified as shown in the image below, where bool has been specified as the Type.

Specifying a parameter on a Custom Trigger emitted from an Interaction
Emitting Custom Triggers from User Code
Custom Triggers can also be emitted from the User Code class file that inherits from the generated Custom Container. In the generated Custom Container the method below is generated, for a CustomTrigger named "trigger1".
CustomContainer1Base.hpp
virtual void emitTrigger1Callback(bool value)
{
    if (trigger1Callback && trigger1Callback->isValid())
    {
        this->trigger1Callback->execute(value);
    }
}
This function can be overwritten or called in the User Code class file that inherits from it.
Reacting to Custom Triggers from Interactions
If a Custom Container with a Custom Trigger is added to a Screen, the Custom Trigger can be used as Trigger on an Interaction on the Screen, as shown in the Image below.
The naming scheme of the Custom Trigger when selecting it as Trigger in an Interaction is: <Custom Container Name> <Custom Trigger name> happens.
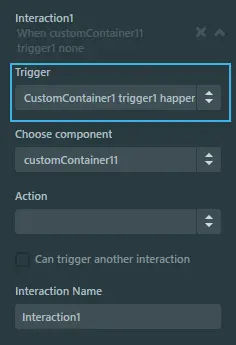
Selecting Custom Trigger as Trigger on an Interaction
After selecting the Trigger, if there are multiple instances of the same Custom Container containing the Custom Trigger, the component needs to be selected. However if there is only one instance, it will be auto selected.
Reacting to Custom Triggers from User Code
A Custom Trigger can also be reacted to from User Code by implementing the callback as shown in the following code example, where a Custom Container with a Custom Trigger name "trigger1" has been added to a Screen. In the User Code class file that inherits from the Screen, the following highlighted lines have been added to implement the Callback/Custom Trigger.
Screen1View.hpp
class Screen1View : public Screen1ViewBase
{
public:
    Screen1View();
    virtual ~Screen1View() {}
    virtual void setupScreen();
    virtual void tearDownScreen();

private:
    /*
     * Callback Declarations
     */
    touchgfx::Callback<Screen1View> customContainer1Trigger1Callback;

    /*
     * Callback Handler Declarations
     */
    void customContainer1Trigger1CallbackHandler();
};
Screen1View.cpp
#include <gui/screen1_screen/Screen1View.hpp>

Screen1View::Screen1View():
    customContainer1Trigger1Callback(this, &Screen1View::customContainer1Trigger1CallbackHandler)
{
    customContainer1.setTrigger1Callback(customContainer1Trigger1Callback);
}

void Screen1View::setupScreen()
{
    Screen1ViewBase::setupScreen();
}

void Screen1View::tearDownScreen()
{
    Screen1ViewBase::tearDownScreen();
}

void Screen1View::customContainer1Trigger1CallbackHandler()
{
    //Your code here.
}
Custom Actions
Screens and Custom Containers have the ability to create Custom Actions. These are generated as virtual C++ methods, and can be executed from the Interaction system, or from User Code. The implementation and behaviour of a Custom Action, can either be configured within the Interaction system, or by overwriting the generated C++ methods in the User Code class file.
Adding Custom Actions
Adding a Custom Trigger is done via the properties tab of a Screen or Custom Container, by clicking the blue button with a plus icon in the ACTIONS section highlighted in the image below.

Adding a Custom Action
When the Custom Action has been created further options become available as shown in the image below.

Editing a Custom Action
Name
The name specified here will be used for further reference within the Interaction system and in the generated code files, as shown in the code examples below.
CustomContainer1Base.hpp
class CustomContainer1Base : public touchgfx::Container
{
public:
    CustomContainer1Base();
    virtual ~CustomContainer1Base() {}
    virtual void initialize();

    /*
     * Custom Actions
     */
    virtual void action1();

protected:
    FrontendApplication& application() {
        return *static_cast<FrontendApplication*>(touchgfx::Application::getInstance());
    }

private:

};
CustomContainer1Base.cpp
CustomContainer1Base::CustomContainer1Base()
{
    setWidth(250);
    setHeight(250);
}

void CustomContainer1Base::initialize()
{

}

void CustomContainer1Base::action1()
{

}
Description
The text written here, will be used in the Interaction system and can be seen when hovering over the Action when selecting it in the Interaction system. If a description has not been specified a standard description will be created as shown in the Calling Custom Action from Interactions section, that follows this scheme: Call <Name> on <Screen or Custom Container Name>.
Type
Enabling Type will allow for creating actions that require a parameter given a specific type. The type can either be selected from a list, or by writing the type manually.
Shown below is the code generated when selecting bool.
CustomContainer1Base.hpp
/*
 * Custom Actions
 */
virtual void action1(bool value);
CustomContainer1Base.cpp
void CustomContainer1Base::action1(bool value)
{

}
Calling Custom Action from Interactions
When a Custom Action has been created the action can be executed from within the Interaction system. If the Action is created on a Custom Container and the Custom Container is added to a Screen, the Action can be executed from the screens Interaction tab as shown in the image below.
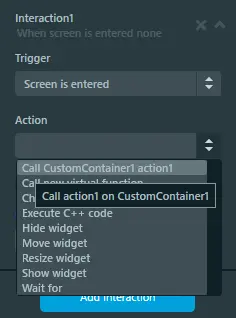
Executing a Custom Action from an Interaction
After selecting the action, if there are multiple instances of the same Custom Container, the component needs to be selected. However if there is only one instance, it will be auto selected.
If the Custom Action has type enabled, the parameter value or variable must be specified as shown in the image below, where bool has been specified as the Type.
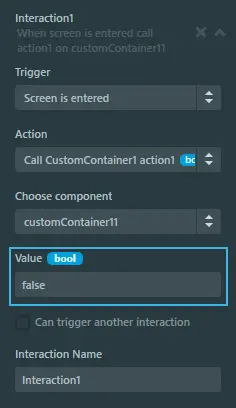
Specifying a parameter on a Custom Action executed from an Interaction
Calling Custom Action from User Code
Custom Actions can also be called directly from User Code. In the following code example a Custom Container with a Custom Action named "action1" is created. The Custom Container has been added to a Screen resulting in the generated code below.
Screen1ViewBase.cpp
Screen1ViewBase::Screen1ViewBase()
{

    customContainer11.setXY(50, 11);

    add(customContainer11);
}

void Screen1ViewBase::setupScreen()
{
    customContainer11.initialize();
}
In the User Code class file Screen1View that inherits from Screen1ViewBase the Custom Action "action1" can be called as shown below.
Screen1View.hpp
Screen1View::Screen1View()
{
    customContainer11.action1();
}

void Screen1View::setupScreen()
{
    Screen1ViewBase::setupScreen();
}

void Screen1View::tearDownScreen()
{
    Screen1ViewBase::tearDownScreen();
}
Adding Behaviour to Custom Actions from Interactions
Behaviour can be added to Custom Actions by using the Interaction system. Simply go to the Interaction tab of the Screen or Custom Container that owns the Custom Action, create a new Interaction and select the Custom Action as the trigger as shown in the image below.
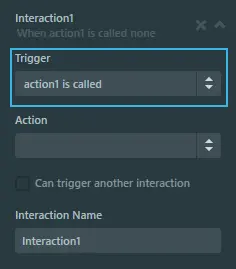
Selecting a Custom Action as Trigger on an Interaction
Then any Action that is defined in the Interaction, will be executed whenever the Custom Action is called.
Adding Behaviour to Custom Actions from User Code
Custom Actions can also implement its behaviour by overwriting the Action in the User Code class CustomContainer1 that inherits from CustomContainer1Base as shown below.
CustomContainer1.hpp
class CustomContainer1 : public CustomContainer1Base
{
public:
    CustomContainer1();
    virtual ~CustomContainer1() {}

    virtual void initialize();

    void action1();

protected:
};
CustomContainer1.cpp
CustomContainer1::CustomContainer1()
{

}

void CustomContainer1::initialize()
{
    CustomContainer1Base::initialize();
}

void CustomContainer1::action1()
{
    //Your code here
}