Simulator
Building a TouchGFX UI often involves a lot of tweeking of the graphics details to match the specification of the UI.
To speed up the development process it is important to have a fast turnaround time when trying out and debugging your application. Flashing a board can often take quite some time so doing this each time you have made a small change to your application will really slow down the development. To alleviate this, the TouchGFX PC simulator is a great addition to your development tools.
You simply compile your application for your PC and run the application there. The code executed is exactly the same as on target hardware except for the Board Bring Up code and Abstraction Layer which are made for the PC instead of your board. This means that you can test things like placement of widgets, interactions, animations, state machines and so on just as precise as on target hardware. You can even debug your code using IDEs like Visual Studio if you like. Of course things like performance analysis and interactions with real backend systems must be done on your board.
Simulator example
How To Run
Using TouchGFX Designer
To launch the simulator from within TouchGFX Designer, simply press the "Run Simulator" button in the top right corner or press F5 on your keyboard.
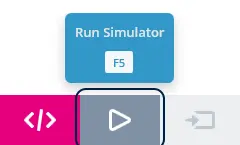
Launching the simulator from TouchGFX Designer
Using TouchGFX Environment
To launch the simulator using the TouchGFX environment, follow these steps:
- Open the TouchGFX Environment
- Navigate to the location of your TouchGFX application
- for simulator only projects, this is e.g.
C:/TouchGFXProjects/MyApplication_1 - for target projects, this is e.g.
C:/TouchGFXProjects/MyApplication_1/TouchGFX/
- for simulator only projects, this is e.g.
- Run the command
make -f simulator/gcc/Makefile -j6to compile the simulator - Run the command
./build/bin/simulator.exeto launch the simulator
Run steps 3 and 4 whenever you have made a change to your TouchGFX application.
Simulator Features
Apart from capturing mouse input, the TouchGFX simulator also includes other useful features, listed below:
| Shortcut | Feature |
|---|---|
F1 | Enables/disables display of pointer coordinates as well as RGB color of the pixel at that coordinate (in hexadecimal). |
F2 | Enables/disables highlighting invalidated area. |
F3 | Takes a screenshot and places the image under the screenshots folder. |
CTRL + F3 | Takes screenshots of the next 50 frames and places the images under the screenshots folder. |
SHIFT + F3 | Takes a screenshot and places it in your clipboard. |
F4 | If a simulator skin is used - enables/disables the simulator skin. If a simulator skin is not used - enables/disables window border. |
F9 | Pauses the simulator by preventing ticks to be sent to the application. Pressing F9 again will resume normal execution. |
F10 | While the simulator is paused (after pressing F9) it is possible to send a single tick to the application by pressing F10 thereby "single step" the application. |
ESC | Close the simulator. |
Simulator Only User Code
If you have some code that should only run when using TouchGFX simulator, you can use #ifdef SIMULATOR in your C++ code:
#ifdef SIMULATOR
  // Your simulator specific user code here
#endif
If you want to output a debug text to the console you can use the touchgfx_printf function. This is a printf like function that will only be included when building simulator code and thus will not interfere when running on target hardware. Therefore there is no need to use #ifdef SIMULATOR in this case.
int i = 0;
touchgfx_printf("Application is running through simulator! \n");
touchgfx_printf("Print our value for integer i = %i \n", i);
Locking and unlocking the framebuffer
If you write code that directly manipulates the framebuffer, it is important to lock the framebuffer before writing pixels to the framebuffer memory, and it is just as important to remember to unlock the framebuffer after having written to the framebuffer.
Locking the framebuffer
The framebuffer is locked using this code snippet:
uint16_t* RESTRICT buf = HAL::getInstance()->lockFrameBuffer();
For historical reasons the return value is a 16 bit pointer to the framebuffer. Cast the pointer to the appropriate pointer type for easier access to the framebuffer.
Unlocking the framebuffer
Use the following code to unlock the framebuffer after use:
HAL::getInstance()->unlockFrameBuffer();
Forgetting to unlock the framebuffer
If you forget to unlock the framebuffer, the hardware will freeze while waiting forever for the framebuffer to be available. To help detecting this situation, you will get an assert if the framebuffer is asked by the TouchGFX framework to be locked, while still being locked. The error will look like this from Microsoft Visual Studio:
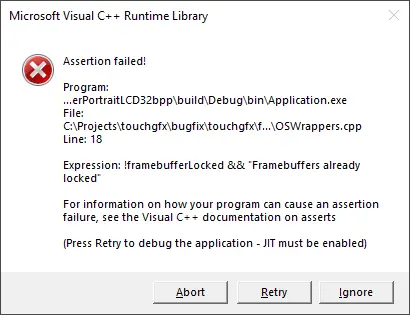
Windows dialog when framebuffer is not unlocked
For console programs, the error will look like this:

Console printout when framebuffer is not unlocked
Simulating hardware framebuffer with a different size than the display
Some setups may have a display size which is smaller than the actual hardware's framebuffer. This can also be handled by the simulater, and is configured in the file simulator/main.cpp right after the call to touchgfx_generic_init().
The width and height passed to touchgfx_generic_init() defines the size of the display and the framebuffer, but if the hardware framebuffer has a different size, simply call setFrameBufferSize() after calling touchgfx_generic_init() to specify the size of the actual framebuffer, e.g. as follows where SIM_WIDTH=800 and SIM_HEIGHT==480:
touchgfx::HAL& hal = touchgfx::touchgfx_generic_init<touchgfx::HALSDL2>(dma, lcd, tc, SIM_WIDTH, SIM_HEIGHT, 0, 0);
hal.setFrameBufferSize(832, 480); // Hardware framebuffer is wider