화면 전환
TouchGFX는 화면 간 다양한 전환을 지원합니다. 화면 전환을 통해 애플리케이션 프로그래머는 애플리케이션에서 화면을 변경할 때 다양한 시각적 효과를 사용할 수 있습니다.
대부분의 경우에는 화면 전환이 없는 애플리케이션이 적절하며, 화면 전환이 없으면 사용자가 애플리케이션과 매우 빠르게 인터랙션할 수 있습니다. 다른 경우에는 애니메이션이 애플리케이션의 사용 경험(예: 애플리케이션 시작 시)을 개선할 수 있습니다.
TouchGFX Designer에서 스크린 전환 설정하기
화면 전환을 설정하려면 다음과 같이 전환이 시작되는 화면에서 인터랙션을 생성하면 됩니다.
화면 전환 설정하기
위의 예제에는 Screen1과 Screen2라는 두 개의 화면이 있는 애플리케이션이 있습니다. Screen1에는 ButtonWithLabel 위젯인 buttonNext가 있습니다. 여기에서는 버튼을 누르면 애플리케이션이 Screen2로 변경되게 하려고 합니다.
이렇게 하려면 Screen1이 활성화되어 있는 상태에서 오른쪽 상단 모퉁이에 있는 "Interactions"를 클릭하고 이미지에 표시된 대로 인터랙션을 구성하면 됩니다.
예제에서 Screen1에는 상단에 숫자 0~9가 있습니다. Screen2에는 하단에 숫자가 있습니다. 이 숫자를 통해 화면의 어느 부분이 표시되는지 쉽게 파악할 수 있습니다.
화면 전환
TouchGFX에서는 다양한 전환을 사용할 수 있습니다. 이러한 전환은 모양도 다르고 성능 특성도 다릅니다.
인터랙션 구성의 "Transition" 콤보 상자에서 사용하려는 전환을 선택할 수 있습니다(위 이미지 참조).
None Transition
None 전환은 애니메이션 없이 Screen1에서 Screen2로 바로 변경합니다. 새 화면이 프레임 버퍼에 최대한 빠르게 그려져 이전 화면을 완전히 덮어씁니다.
가장 빠른 전환입니다.
None Transition
Slide Transition
슬라이드 전환은 원래 화면을 한쪽으로 이동시키고 새 화면을 반대쪽에서 들어오게 합니다. 다음 그림은 첫 프레임, 중간 프레임 중 하나, 마지막 프레임 등 전환 중인 세 프레임을 보여줍니다.
슬라이드 전환. 왼쪽의 시작 화면, 가운데의 전환 중인 화면. 오른쪽의 최종 화면.
Screen1이 왼쪽으로 밀려나므로 가운데 이미지에서는 Screen1의 흰색 숫자 0, 1, 2, 3이 보이지 않습니다. 빨간색 화살표는 Screen2가 들어오는 가장자리를 나타냅니다.
Slide Transition은 매 tick 마다 프레임 버퍼의 모든 픽셀을 업데이트합니다. 이로 인해 성능 문제가 발생할 수 있습니다. 새 Screen의 보이는 부분은 매 tick 마다 그려집니다. Texture Mapper와 같이 그리는 데 리소스가 많이 소모되는 요소가 새 화면에 포함되어 있는 경우 문제가 될 수 있습니다(이 경우 전환이 완료될 때까지 리소스가 많이 소모되는 요소가 숨겨질 수도 있음).
Slide Transition을 사용하려면 Animation Storage를 사용할 수 있어야 합니다.
Cover Transition
Cover Transition은 Slide Transition처럼 측면에서 새 Screen이 들어오게 하지만 시작 Screen은 그대로 유지합니다(가운데 이미지에 Screen1의 0, 1, 2, 3이 보임).
새 Screen의 보이는 부분이 매 tick 마다 그려집니다. 새 Screen에 리소스를 많이 소모하는 요소가 포함되어 있으면 다시 문제가 될 수 있습니다. 성능은 SlideTransition보다 조금 더 좋습니다.
Cover Transition. 왼쪽의 시작 화면, 가운데의 전환 중인 화면. 오른쪽의 최종 화면.
Cover Transition에는 Animation Storage가 필요하지 않습니다.
Wipe Transition
Wipe Transition은 원래 Screen을 측면에서 시작하여 새 Screen으로 부분적으로 대체하는 방식으로, 매 tick 마다 새 Screen을 점점 더 많이 표시합니다. 픽셀은 이동되지 않으므로 Screen1에서 Screen2로 변경되는 픽셀만 그리면 됩니다.
보통은 성능이 매우 뛰어나므로 부분 프레임 버퍼와 함께 사용하기에도 적합합니다.
Wipe Transition. 왼쪽의 시작 화면, 가운데의 전환 중인 화면. 오른쪽의 최종 화면.
Block Transition
Block Transition은 화면을 8 x 4 직사각형의 그리드로 나눕니다. 그런 다음 직사각형의 픽셀을 무작위 순서로 새 화면의 픽셀로 대체합니다. 총 24회 tick의 전환 시간 동안 모든 프레임에서 2개의 직사각형을 업데이트합니다.
Block Transition. 왼쪽의 시작 화면, 가운데의 전환 중인 화면. 오른쪽의 최종 화면.
위의 애플리케이션에서는 개별 직사각형이 더 잘 보이도록 Screen2의 배경이 녹색으로 대체되었습니다.
보통은 Block Transition의 성능이 매우 뛰어나므로 Partial Frame Buffer와 함께 사용하기에 적합합니다.
코드에서 전환 시작하기
위의 예제에서는 UI에서 Screen 전환을 시작하는 방법을 살펴보았습니다. 경우에 따라 코드에서 전환을 시작해야 할 때도 있습니다.
다음과 같이 Screen1에서 "Action"을 생성하는 방법으로도 전환을 시작할 수 있습니다.
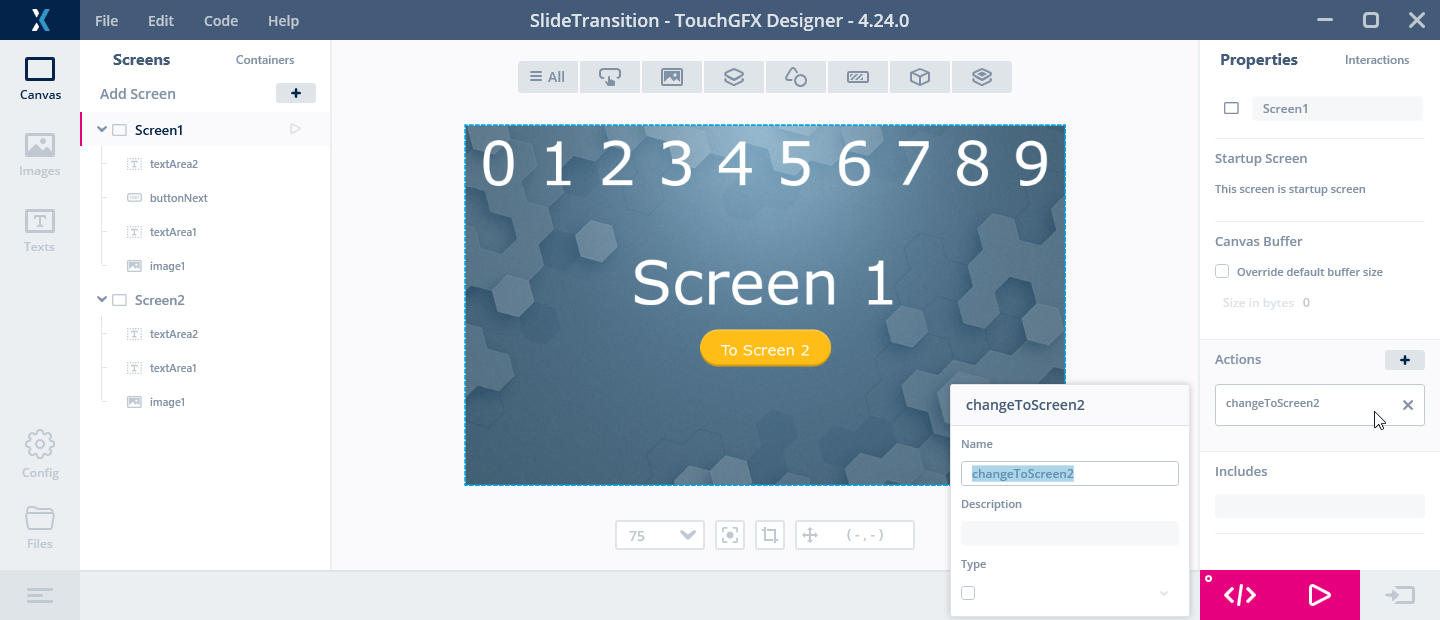
Screen1에서 Action 생성하기
TouchGFX Designer 창의 왼쪽에 있는 트리 뷰에서 Screen1 요소를 클릭합니다. 그런 다음 오른쪽의 "액션" 옆에 있는 "+"를 클릭하여 Custom Action을 생성합니다.
이름을 "changeToScreen2"라고 입력합니다.
이제 새 Custom Action이 호출될 때 트리거되는 인터랙션을 생성할 수 있습니다.
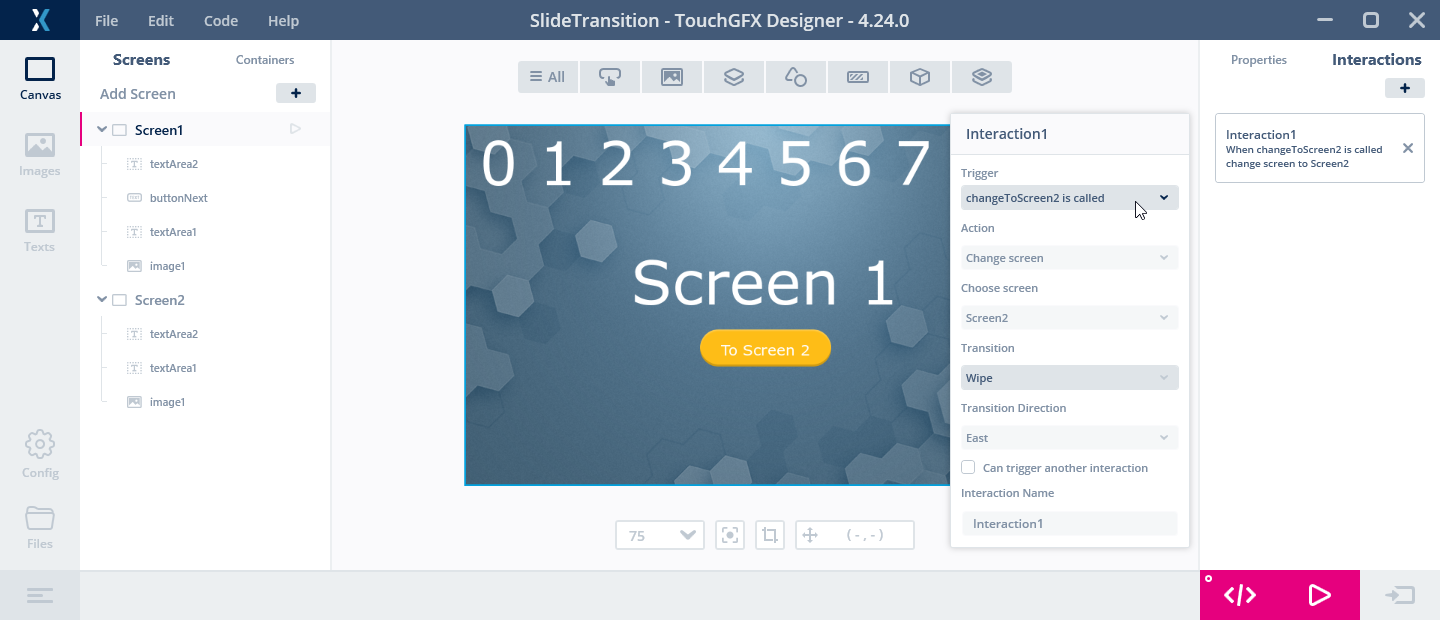
인터랙션의 트리거로 Custom Action 사용하기
"changeToScreen2 is called" 트리거를 선택합니다. 그렇지 않으면 이전과 같이 인터랙션을 설정합니다.
이제 코드에서 Custom Action을 호출하기만 하면 됩니다. 예를 들어, 아래 코드는 Screen1의 handleTickEvent 이벤트 핸들러에서 액션을 호출합니다.
class Screen1View : public Screen1ViewBase
{
public:
    ...
    virtual void handleTickEvent()
    {
        if (++count == 30)
        {
            changeToScreen2();
        }
    }
private:
   int count = 0;
이 코드는 Custom Action을 호출하는 30번째 프레임까지 프레임을 계산합니다.