模拟器
构建TouchGFX UI通常涉及大量的图形细节,以匹配UI的规范。
为了加快开发过程,在试验和调试应用程序时,有一个快速的周转时间很重要。 烧录一个板卡通常需要相当长一段时间,所以每次对应用程序进行小的改动都会真正减慢开发速度。 为了缓解这种情况,TouchGFX PC模拟器是对开发工具的一个很好补充。
您只需面向PC编译应用程序并在PC上运行应用程序。 除了启动板卡代码和抽象层(这是面向PC(而不是您的板卡)的),执行的代码与目标硬件上运行的代码完全相同。 这意味着可以像在目标硬件上一样精确地测试控件的位置安排、交互、动画、状态机等。 如果愿意,甚至可以使用Visual Studio这样的IDE调试自己的代码。 当然像性能分析和与真正的后端系统进行交互这样的事情必须在板卡上进行。
模拟器示例
如何运行
使用TouchGFX Designer
如要从TouchGFX Designer内部启动模拟器,只需按下右上角的“Run Simulator”按钮, 或 者按下键盘上的F5
使用TouchGFX Environment
如要使用TouchGFX环境启动模拟器,请遵循以下步骤:
- 打开TouchGFX Environment
- 导航到TouchGFX应用程序所在位置
- 对于仅模拟器项目,示例
C:/TouchGFXProjects/MyApplication_1 - 对于目标项目,示例
C:/TouchGFXProjects/MyApplication_1/TouchGFX/
- 对于仅模拟器项目,示例
- 运行命令
make -f simulator/gcc/Makefile -j6以编译模拟器 - 运行命令
./build/bin/simulator.exe以启动模拟器
如果对TouchGFX应用程序进行了更改,请运行步骤3和步骤4。
模拟器功能
除了捕捉鼠标输入,TouchGFX模拟器还包括其他有用的功能,如下所列:
| 快捷键 | 特征 |
|---|---|
F1 | 启用/禁用指针坐标的显示以及该坐标上像素的RGB颜色(十六进制)。 |
F2 | 启用/禁用突出显示无效区域。 |
F3 | 截屏并将图片置于screenshots(截屏)文件夹中。 |
CTRL + F3 | 对接下来的50帧进行截屏并将图片置于screenshots(截屏)文件夹中。 |
SHIFT + F3 | 截屏并将图片置于剪贴板中。 |
F4 | 如果使用模拟器皮肤 - 启用/禁用模拟器皮肤。 如果未 使用模拟器皮肤 - 启用/禁用窗口边框。 |
或 | 通过调用FrontendApplication::changeToStartScreen()将应用程序直接发送回启动屏幕. |
F9 | 通过阻止向应用程序发送时钟信号拍来暂停模拟器。 再次按下F9可恢复正常执行。 |
F10 | 当(按下F9)模拟器暂停后,可以通过按下F10发送一个时钟信号到应用程序,从而对应用程序进行“单步操作”。 |
ESC | 关闭模拟器。 |
仅可通过模拟器运行的代码
如果您有一些代码只能在使用TouchGFX模拟器时运行, 可以在您的C++代码中使用#ifdef SIMULATOR in your C++ code:
#ifdef SIMULATOR
  // Your simulator specific user code here
#endif
从模拟器打印
如需在运行模拟器时向控制台输出调试文本,可使用touchgfx_printf函数:
#include <touchgfx/Utils.hpp>

int i = 0;
touchgfx_printf("Application is running through simulator! \n");
touchgfx_printf("Print our value for integer i = %i \n", i);
切记包含Utils.hpp文件获取函数声明。
在实际应用中(对于Cortex-M) ,touchgfx_printf被定义为一个空宏。 因此,不会生成任何代码,如果您愿意,也可在目标代码中使用。 这里不需要使用#ifdef模拟器。
锁定和解锁帧缓冲区
如果您编写直接操作帧缓存区的代码,重要的是要在将像素写入帧缓存区内存之前锁定帧缓存区,同样重要的是记住要在写入帧缓存区之后解锁帧缓存区。
锁定帧缓冲区
使用该代码片段锁定帧缓冲区:
uint16_t* RESTRICT buf = HAL::getInstance()->lockFrameBuffer();
由于历史原因,返回值是指向帧缓冲区的16位指针。 将指针强制转换为适当的指针类型,以便更轻松地访问帧缓冲区。
解锁帧缓冲区
使用以下代码解锁使用后的帧缓冲区:
HAL::getInstance()->unlockFrameBuffer();
忘记解锁帧缓冲区
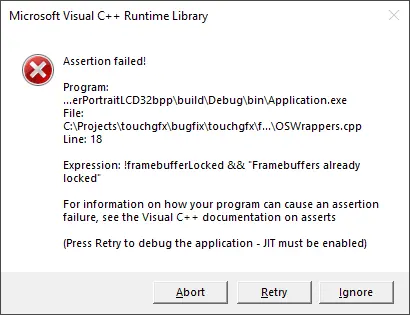
如果忘记解锁帧缓冲区,则硬件在帧缓冲区变得可用之前会一直等待并且暂时冻结。 为了帮助检测这种情况,如果TouchGFX框架要求锁定帧缓冲区,而帧缓冲区仍然处于锁定状态,你会得到一个断言. 报错信息就像Microsoft Visual Studio所提示的:
对于控制台程序,报错信息就像这样:
模拟硬件帧缓存区,尺寸与显示屏不同
有些设置的显示屏尺寸可能小于实际硬件的帧缓存区。 该问题也可以由模拟器处理,并在调用touchgfx_generic_init()之后在文件模拟器/main.cpp中配置。
传递给touchgfx_generic_init()的宽度和高度定义了显示器和帧缓存的大小,但是如果硬件帧缓存有不同的尺寸,只需在调用touchgfx_generic_init()之后调用setFrameBufferSize()来指定实际帧缓存的大小,例如,SIM_WIDTH=800和SIM_HEIGHT==480:
touchgfx::HAL& hal = touchgfx::touchgfx_generic_init<touchgfx::HALSDL2>(dma, lcd, tc, SIM_WIDTH, SIM_HEIGHT, 0, 0);
hal.setFrameBufferSize(832, 480); // Hardware framebuffer is wider
模拟具有不同帧率的硬件
int CALLBACK WinMain(HINSTANCE hInstance, HINSTANCE hPrevInstance, LPSTR lpCmdLine, int nCmdShow)
{
    ...
    setupSimulator(argc, argv, hal);
    ((touchgfx::HALSDL2*)&hal)->setVsyncInterval(25);

    ...
}
setVsyncInterval(间隔)将更改2帧之间的间隔,以找到合适的值,将1000/YOUR_FRAME_RATE=interval
对于40 fps = 1000/40)= 25ms
默认为60fps = (1000/60) ~16,66ms


