動態點陣圖
本節介紹如何使用動態點陣圖。 注意,標準點陣圖會被編譯到應用中,因此必須在編譯時提供。 點陣圖從PNG等格式的檔案轉換而來,與大小和格式資訊一起以內部格式保存。
此外,還可以在執行時間在RAM中創建點陣圖。 這被稱為動態點陣圖。 動態點陣圖的使用與編譯到應用中的靜態點陣圖相同。 這意味著您可以通過圖像和按鈕等小部件使用動態點陣圖。
動態點陣圖配置
在創建動態點陣圖時,從點陣圖快取分配像素存儲空間。 因此,您必須先配置點陣圖快取,然後才能創建動態點陣圖。 這是一個不能在TouchGFX Designer或Generator中執行的手動過程。
參見關於點陣圖快取的文章獲取配置說明。
必須定義應用中使用的動態點陣圖的最大數量。 該最大值與點陣圖快取位址和大小一起傳遞到TouchGFX。 這裡我們配置的是具有最多4張動態點陣圖的點陣圖快取。 您可以在應用中的任何檔中執行。 如需只執行一次,檔FrontendApplication.cpp是個不錯的選擇:
FrontendApplication.cpp (extract)
#include <gui/common/FrontendApplication.hpp>
#include <touchgfx/Bitmap.hpp>

FrontendApplication::FrontendApplication(Model& m, FrontendHeap& heap)
    : FrontendApplicationBase(m, heap)
{
    // Place cache start address in SDRAM at address 0xC0008000;
    uint16_t* const cacheStartAddr = (uint16_t*)0xC0008000;
    const uint32_t cacheSize = 0x300000; //3 MB, as example
    Bitmap::setCache(cacheStartAddr, cacheSize, 4);
}
如果您使用Windows模擬器,則還必須在此創建點陣圖快取。 在Windows上,可以容易地宣告大陣列或使用malloc:
FrontendApplication.cpp (extract)
#include <gui/common/FrontendApplication.hpp>
#include <touchgfx/Bitmap.hpp>

FrontendApplication::FrontendApplication(Model& m, FrontendHeap& heap)
    : FrontendApplicationBase(m, heap)
{
#ifdef SIMULATOR
    const uint32_t cacheSize = 0x300000; //3 MB, as example
    uint16_t* const cacheStartAddr = (uint16_t*)malloc(cacheSize);
    Bitmap::setCache(cacheStartAddr, cacheSize, 4);
#else
    // Place cache start address in SDRAM at address 0xC0008000;
    uint16_t* const cacheStartAddr = (uint16_t*)0xC0008000;
    const uint32_t cacheSize = 0x300000; //3 MB, as example
    Bitmap::setCache(cacheStartAddr, cacheSize, 4);
#endif
}
使用動態點陣圖範例
為了使用動態點陣圖,我們需要一個小部件來顯示它。 為此,在視圖(在程式碼中或Designer中)中插入一個圖像小部件:
#include <touchgfx/widgets/Image.hpp>
using namespace touchgfx;
class TemplateView : public View
{
private:
    Image image;
}
此小部件和動態點陣圖的使用過程分為三步:
- 在點陣圖快取中創建動態點陣圖
- 清空動態點陣圖使用的存儲空間
- 將點陣圖分配給小部件
在setupScreen中創建動態點陣圖。 這裡我們使用16bpp格式RGB565。 如果影像緩衝為24位,則使用RGB888。 如需創建透明點陣圖,使用格式ARGB8888。
通過dynamicBitmapGetAddress函數返回動態點陣圖中像素的位址:
#include <touchgfx/Bitmap.hpp>
void TemplateView::setupScreen()
{
    BitmapId bmpId;

    //Create (16bit) dynamic bitmap of size 100x150
    const int width = 100;
    const int height = 150;
    bmpId = Bitmap::dynamicBitmapCreate(100, 150, Bitmap::RGB565);

    //set all pixels white
    if (bmpId != BITMAP_INVALID)
    {
       memset(Bitmap::dynamicBitmapGetAddress(bmpId), 0xFF, width*height*2);
    }

    //Make Image widget show the dynamic bitmap
    image.setBitmap(Bitmap(bmpId));

    //Position image and add to View
    image.setXY(20, 20);
    add(image);
    ...
}
您從點陣圖快取獲得的像素存儲空間未清空,建議立即將其清空或重寫。
如需從檔案載入圖像,可以用載入器程式碼替代對memset的呼叫。 參見文章在執行時間載入圖像
動態點陣圖操作
動態點陣圖操作全部位於Bitmap類中。
創建動態點陣圖
以下方法用指定的寬度、高度和點陣圖格式創建動態點陣圖。 僅當有足夠大的未使用存儲空間時,才能創建點陣圖。 如果未創建點陣圖,該方法返回BITMAP_INVALID。
static BitmapId Bitmap::dynamicBitmapCreate(const uint16_t width, const uint16_t height, BitmapFormat format, ClutFormat clutFormat)
刪除動態點陣圖
此方法刪除動態點陣圖。
static bool Bitmap::dynamicBitmapDelete(BitmapId id)
獲取動態點陣圖中像素的位址
以下方法返回動態點陣圖的位址。 檔案載入器使用此方法將圖像資料複製到點陣圖中。
static uint8_t* dynamicBitmapGetAddress(BitmapId id)
設置動態點陣圖的實心區域
以下方法設置動態點陣圖的實心矩形。
static bool dynamicBitmapSetSolidRect(BitmapId id, const Rect& solidRect)
請閱讀Custom Widget一節中關於“實心區域”概念的更多內容。
對於像RGB565和RGB888這樣的非透明格式,將實心區域預設設置為整個點陣圖。 對於像ARGB8888這樣的透明格式,將實心區域設置為空。
豎屏模式的動態點陣圖
TouchGFX能以豎屏模式運行。 這適用於顯示器自其原始方向旋轉90度後安裝的情況。 在該模式下使用動態點陣圖時,需要格外小心。
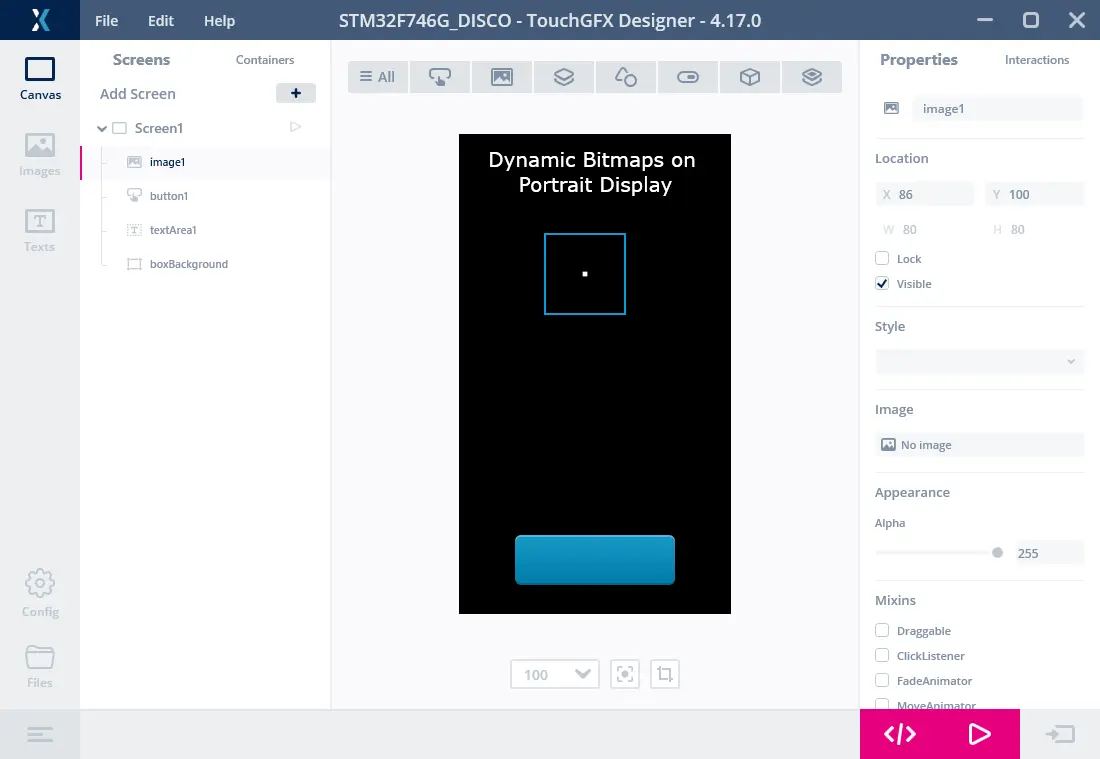
下面是STM32F746的專案範例。 它的顯示器寬度為480像素,高度為272像素。 影像緩衝具有相同大小。
沒有為image1圖像小部件分配點陣圖。 我們將使用它顯示動態點陣圖。
在使用豎屏模式時,坐標系統沿逆時針方向旋轉90度。 (0, 0) 座標位於“D”附近的左上角。 影像緩衝的第一個位元組(將螢幕上第一個像素著色),位於右上角。
因此,當以豎屏模式運行時,不旋轉影像緩衝。 對於動態點陣圖也是如此。 但是我們希望在顯示器(安裝時)第一行顯示的像素必須繪製在影像緩衝區的左邊緣。
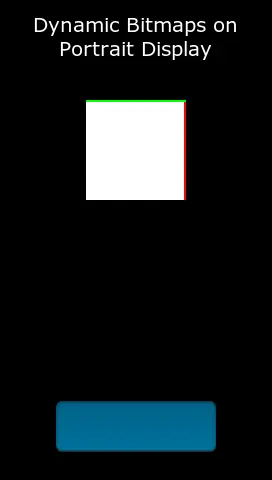
在下面的函數中創建動態點陣圖,使上面一行為綠色且右邊緣為紅色:
Screen1View.cpp (extract)
void Screen1View::setupScreen()
{
    Screen1ViewBase::setupScreen();
    BitmapId bmpId;
    bmpId = Bitmap::dynamicBitmapCreate(100, 100, Bitmap::RGB565);

    if (bmpId != BITMAP_INVALID)
    {
        //set all pixels white
        uint16_t* const bitmapPixels = (uint16_t*)Bitmap::dynamicBitmapGetAddress(bmpId);
        memset(bitmapPixels, 0xFF, 100*100*2);

        //first 200 pixels red, => two column on the right on display
        for (int i = 0; i<200; i++) bitmapPixels[i] = 0xF800;

        //first two pixels in all rows green in bitmap => top two rows on display
        for (int i = 0; i<100; i++)
        {
            bitmapPixels[i*100]     = 0x07E0;
            bitmapPixels[i*100 + 1] = 0x07E0;
        }
    }

    image1.setBitmap(bmpId);
}
顯示器顯示動態點陣圖:

