画布控件
画布控件和画布控件渲染器是强大的多功能TouchGFX插件,在使用相对较小的存储空间的同时保持高性能,可提供平滑、抗锯齿效果良好的几何图形绘制。 但是,渲染几何图形必然是成本非常高的操作,如果使用不小心,很容易对微控制器资源造成浪费。
画布控件渲染器(Canvas Widget Renderer,以下简称CWR)是一种通用图形API,为图元提供优化绘制,自动消除最多余的绘制。 TouchGFX使用CWR可绘制复杂的几何图形。 通过画布控件(Canvas Widget)定义几何图形。 TouchGFX支持许多画布控件,但是就像普通控件一样,您可以创自定义画布控件来满足您的需求。 画布控件定义要通过CWR绘制的图形的几何形状,而图形中每个像素的实际颜色则由相关Painter类定义。 同样地,TouchGFX自带许多Painter,但是您也可以创建自定义Painter来满足您的需求。
Using Canvas Widgets
TouchGFX中其他控件的大小是自动设置的。 例如,可以自动获取位图控件的宽度和高度。 因此,在位图控件上使用 setXY() 将位图放置在显示屏上就足够了。
画布控件没有默认大小,其值既可以自动确定,也可以一开始就设置。 不仅要注意位置,还要正确地确定控件的大小,否则画布控件的宽度和高度将为零,并且不会在显示屏上绘制任何内容。
因此,不要使用 setXY(),而是使用 setPosition() 来放置和调整画布控件的大小。 关于如何创建和使用自定义画布控件的示例另请参见下文Custom Canvas Widget部分。
在设置了画布空间的位置和大小后,可以在其内部绘制几何图形。 坐标系将使 (0, 0) 位于控件(不是显示屏)的左上角,X轴向右延伸且Y轴向下延伸。
TouchGFX设计器也支持“画布控件(Canvas Widget)”,让使用变得简单,可自动计算内存需求和自动分配内存。
Available Canvas Widgets in the TouchGFX Designer:
通过TouchGFX Designer使用这些控件时,可通过显示控件在运行时的状态,使得放置和大小调整非常简单。
存储空间分配和使用
为了生成反锯齿效果良好的复杂几何图形,需要额外的存储空间。 为此,CWR必须具有专门分配的存储缓冲区,以便在渲染过程中使用。 CWR与TouchGFX的其余部分一样,没有动态存储空间分配。
TouchGFX Designer中的存储空间分配
在向屏幕的画布添加控件时,会自动生成存储缓冲区。 缓冲区大小基于屏幕宽度,计算公式为 (宽度 × 3) × 5。 但是,这并非所有情况下的理想缓冲区大小。 因此,可以重写缓冲区大小,如下图所示。
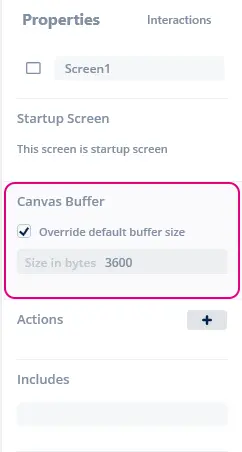
在屏幕属性中重写画布缓冲区大小
用户代码中的存储空间分配
The TouchGFX Designer only allocates a memory buffer for screens that uses Canvas Widgets in the Designer. If you add Canvas Widgets in user code in a screen that does not have Canvas Widgets in the Designer you must manually setup a buffer. It is recommended to do this in the Screen::setupScreen method.
Add this to your Screen class definition as private members:
private:
  static const uint16_t CANVAS_BUFFER_SIZE = 3600;
  static uint8_t canvasBuffer[CANVAS_BUFFER_SIZE]
Then in setupScreen() method of ScreenView.cpp the following line setting up the buffer can be added.
void ScreenView::setupScreen()
{
    ...
    CanvasWidgetRenderer::setupBuffer(canvasBuffer, CANVAS_BUFFER_SIZE);
    ...
}
需要的CWR存储空间的量取决于要在应用中绘制的最大图形大小。 但是,您可以保留比最复杂形状所需内存空间更少的内存。 为了应对这种情况,CWR将图形绘制分割成较小的帧缓冲区部分,在这种情况下,由于有时需要不止一次地渲染图像,因此渲染时间稍长。 在模拟器模式下运行时,可以更细致地查看存储空间消耗并进行微调。 只需向main.cpp中添加以下函数:
CanvasWidgetRenderer::setWriteMemoryUsageReport(true);
现在,无论绘制操作何时结束,CWR都将报告(在控制台上打印)所需存储空间的大小。 对于canvas_widget_example,可以是“CWR需要3604字节”(第一个绘制操作),然后是“CWR需要7932字节(4328字节缺失)”(第二个绘制操作)。 尽管显示CWR没有足够存储空间(本例中为4328字节缺失),应用仍正常运行。 这是因为CWR检测到可用于完成一次运行中复杂绘制操作的存储空间太少。 为此,它将绘制操作分割成两项独立的绘制操作,可以很好地绘制图形,但需要更多时间渲染。
因此,设置正确的存储缓冲区大小以便在存储空间与性能(渲染时间)之间取得平衡。 好的起始值通常约为3000,但使用上述技巧通常可以确定更优值。 If the shape is too complex and the allocated memory buffer is way too small, part of the shape will not be drawn (some vertical pixel lines will be skipped) and it is possible that nothing is drawn at all. 在任何情况下,渲染时间都会增加许多。
这意味着如果您希望应用以最快速度渲染CWR绘图,您需要满足分配请求的存储空间大小。 但是,如果能够接受更长的渲染时间,完全可以缩小存储缓冲区。
CWR坐标系
TouchGFX中的坐标系通常用于寻址像素,以便在显示屏上定位位图。 位图、文本和其他图形元素都位于坐标系中,其中 (0,0) 是左上角像素,X轴向右延伸,Y轴向下延伸。 在CWR中,能够使用整数寻址像素是不够的,尽管在特殊情况下已经足够,在一般情况下远远不够。 为了证明这一点,假设有一个线宽为1的圆,必须被精确地嵌入一个5x5像素的方块中。 The center of this circle must be at (2.5, 2.5) and the radius must be 2 (the line is drawn .5 out from both sides of the circumference), so fractions are required for the center coordinate. 类似地,如果圆应嵌入一个6x6像素的方块,则中心必须位于 (3, 3),半径必须是2.5,因此半径需为小数。
这种新的图形绘制坐标寻址方式意味着 (0,0) 处像素的中心的CWR坐标为 (0.5, 0.5)。 因此,包含屏幕左上角像素的方块的轮廓如下:(0,0) -> (1,0) -> (1,1) -> (0,1) -> (0,0)。
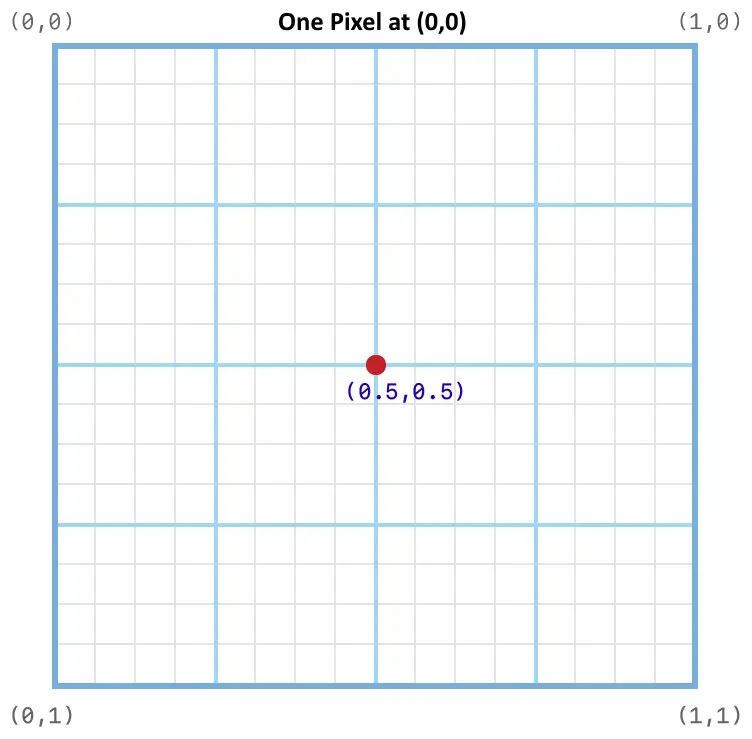
(0,0) 处像素的CWR坐标系
尽管最初看起来令人困惑,但很快会发现这是十分自然的。 位图的坐标系寻址像素,画布控件的同一坐标系寻址像素之前有间隙。
Since circles are shapes that often will have to be moved half a pixel to place the center correctly, the function Circle::setPixelCenter() will place the circle center at the center of the given pixel, i.e. half a pixel further to the right and down, compared to the coordinates specified.
自定义画布控件
实现自定义画布控件需要用下列函数实现新类:
virtual bool drawCanvasWidget(const Rect& invalidatedArea) const;
virtual Rect getMinimalRect() const;
drawCanvasWidget() 必须绘制自定义控件需要绘制的任何内容,并且 getMinimalRect() 应该返回 Widget 中包含几何形状的实际矩形。
Note
getMinimalRect() 的原因在于可以在其控件内部到处移动几何图形,并且当形状变为仅使最小可能区域无效时,改变控件的大小和重新定位控件通常都不切实际。 函数 getMinimalRect() 的虚拟实现可能只 返回rect;这是控件的大小,但这会导致被画布控件覆盖的整个区域的重新绘制,而不只是包含几何图形的画布控件的一部分。 几何图形通常只占据画布控件的一小部分。
画布控件全部使用Canvas类,它如上文所述压缩Canvas Widget Renderer。 CWR有许多自动应用的优化,尽管知道几何图形与无效区域有关,避免无效区域之外的不必要绘制,始终是一种提升性能的好方法。
在10x10方块内部粗略实现一个菱形块,方式可能像这样:
#include <touchgfx/widgets/canvas/CanvasWidget.hpp>
#include <touchgfx/widgets/canvas/Canvas.hpp>

using namespace touchgfx;

class Diamond10x10 : public CanvasWidget
{
public:
  virtual Rect getMinimalRect() const
  {
    return Rect(0,0,10,10);
  }
  virtual bool drawCanvasWidget(const Rect& invalidatedArea) const
  {
    Canvas canvas(this, invalidatedArea);
    canvas.moveTo(5,0);
    canvas.lineTo(10,5);
    canvas.lineTo(5,10);
    canvas.lineTo(0,5);
    return canvas.render(); // Shape is automatically closed
  }
};
Note
getMinimalRect() 返回到正确矩形,否则屏幕上的图形可能是错误的。In order to see the Diamond10x10 on the display, the color must be set up by passing a Painter to the diamond. Read more about Painters in the next section. 另外,必须正确地放置Diamond10x10并调整其大小。 方式可能像这样:
在头文件中声明
Diamond10x10 box;
PainterRGB565 myPainter; // For 16bpp displays
and in the code you should have something like this in setupScreen():
myPainter.setColor(Color::getColorFromRGB(0xFF, 0x0, 0x0));
box.setPosition(100,100,10,10);
box.setPainter(myPainter);
add(box);
Painter
绘图器定义一个配色方案,用于填充‘Canvas Widget’对象,因此绘图器需要使形状可见。 绘图器可以为所有像素提供单一颜色(例如PainterRGB565),或者从提供的位图中复制每个像素(例如PainterRGB565Bitmap)。 Since a painter writes the pixels directly to the framebuffer, the selected painter must match the format of the framebuffer or dynamic bitmap. TouchGFX提供的绘图器面向所有支持的显示屏,专门用于纯色或位图绘制。
Painter classes
The following table lists the available painters in TouchGFX. When you use Canvas Widgets with the TouchGFX Designer, the Designer will select the correct painter, but if you write code yourself that uses Canvas Widgets, you must select a suitable painter.
| Framebuffer format | Color Painter | Bitmap painters |
|---|---|---|
| BW | PainterBW | PainterBWBitmap |
| GRAY2 | PainterGRAY2 | PainterGRAY2Bitmap |
| GRAY4 | PainterGRAY4 | PainterGRAY4Bitmap |
| ABGR2222 | PainterABGR2222 | PainterABGR2222Bitmap |
| ARGB2222 | PainterARGB2222 | PainterARGB2222Bitmap |
| BGRA2222 | PainterBGRA2222 | PainterBGRA2222Bitmap |
| RGBA2222 | PainterRGBA2222 | PainterRGBA2222Bitmap |
| RGB565 | PainterRGB565 | PainterRGB565Bitmap, PainterRGB565L8Bitmap |
| RGB888 | PainterRGB888 | PainterRGB888Bitmap, PainterRGB888L8Bitmap |
| ARGB8888 | PainterARGB8888 | PainterARGB8888Bitmap, PainterARGB8888L8Bitmap |
| XRGB8888 | PainterXRGB8888 | PainterXRGB8888Bitmap, PainterXRGB8888L8Bitmap |
The bitmap painters support various bitmap formats:
| Painter | Supported bitmap formats |
|---|---|
| PainterBWBitmap | BW, BW_RLE |
| PainterGRAY2Bitmap | GRAY2 |
| PainterGRAY4Bitmap | GRAY4 |
| PainterABGR2222Bitmap | ABGR2222 |
| PainterARGB2222Bitmap | ARGB2222 |
| PainterBGRA2222Bitmap | BGRA2222 |
| PainterRGBA2222Bitmap | RGBA2222 |
| PainterRGB565Bitmap | RGB565, ARGB8888 |
| PainterRGB565L8Bitmap | L8_RGB565, L8_RGB888, L8_ARGB8888 |
| PainterRGB888Bitmap | RGB888, ARGB8888 |
| PainterRGB888L8Bitmap | L8_RGB565, L8_RGB888, L8_ARGB8888 |
| PainterARGB8888Bitmap | RGB565, RGB888, ARGB8888 |
| PainterARGB8888L8Bitmap | L8_RGB565, L8_RGB888, L8_ARGB8888 |
| PainterXRGB8888Bitmap | RGB565 (no transparency), RGB888, ARGB8888 |
| PainterXRGB8888L8Bitmap | L8_RGB565, L8_RGB888, L8_ARGB8888 |
Tiled bitmaps
Painters that draw pixels from a bitmap puts the bitmap in upper left corner of the Canvas Widget. The pixels of the shape that are outside of the bitmap dimension is not drawn.
The bitmap painters can be configured to repeat the widget (tiled) to cover the whole shape.
Tiling is enabled by calling the setTiled(bool) method on your painter:
    PainterRGB888Bitmap bitmapPainter;
    ...
    bitmapPainter.setBitmap(touchgfx::Bitmap(BITMAP_BLUE_LOGO_TOUCHGFX_LOGO_ID));
    bitmapPainter.setTiled(true);
Tiling can not be enabled in the Designer.

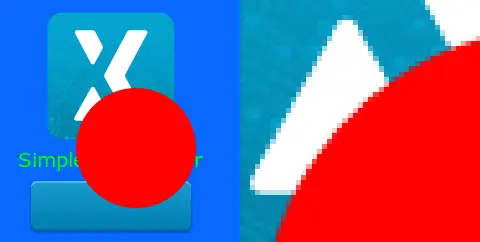
An application showing an Image, Circle with bitmap painter, and Circle with tiling bitmap painter.
定制绘图器
Even though TouchGFX comes with a set of predefined painter classes covering most use case scenarios, custom painters can also be implemented.
In this section we will give a few examples, that can be used as inspiration. The examples are for 16bpp RGB565 only. Slight modifications must be done for other framebuffer formats.
A custom painter is just a subclass of the AbstractPainter class. Painters for 16bpp (RGB565) framebuffers can use the AbstractPainterRGB565 class as superclass. Painters for 24bpp (RGB888) framebuffers can use AbstractPainterRGB888 as superclass.
These super classes are abstract classes. The custom painter class must implement the method:
virtual void paint(uint8_t* destination, int16_t offset, int16_t widgetX, int16_t widgetY, int16_t count, uint8_t alpha) const = 0;
The destination points to the start position in the framebuffer (the left edge of the widget).
The offset is how many pixels from this start position to put the first pixel.
widgetX, widgetY are the coordinates of the first pixel relative to widget (given in the framebuffer coordinate system).
count is the number of pixels to draw with the specified alpha.
The Canvas Widgets will call this method many times, so it is very important that the implementation of paint is not slow. If the Canvas Widget is not updated often, this is less important.
Color painters
The simplest painter just writes a fixed color to the framebuffer. Here is how to implement that:
#include <touchgfx/widgets/canvas/AbstractPainterRGB565.hpp>
using namespace touchgfx;
class RedPainter : public AbstractPainterRGB565
{
public:
    virtual void paint(uint8_t* destination, int16_t offset, int16_t widgetX, int16_t widgetY, int16_t count, uint8_t alpha) const
    {
        uint16_t* framebuffer = reinterpret_cast<uint16_t*>(destination) + offset; // Address of first pixel to paint
        const uint16_t* const lineend = framebuffer + count; // Address of last pixel to paint
        const uint16_t redColor565 = 0xF800;  // Full red in RGB565
        do
        {
            *framebuffer = redColor565;
        } while (++framebuffer < lineend);
    }
};
Remember to create an instance of your painter and assign it to your Canvas widget. Add a member of the painter type to your class:
Circle myCircle;
RedPainter myPainter;
and in the code you should have something like this in setupScreen():
...
myCircle.setPainter(myPainter);
...

The RedPainter painting a Circle. On the right a magnified part.
The RedPainter class above ignores the alpha parameter. This makes the edges harsh (no alpha-blending) as all pixels are made fully red. We can improve this with a slight code update where we use the alpha parameter to do blending if needed:
#include <touchgfx/widgets/canvas/AbstractPainterRGB565.hpp>
using namespace touchgfx;
class AlphaRedPainter : public AbstractPainterRGB565
{
public:
    virtual void paint(uint8_t* destination, int16_t offset, int16_t widgetX, int16_t widgetY, int16_t count, uint8_t alpha) const
    {
        uint16_t* framebuffer = reinterpret_cast<uint16_t*>(destination) + offset; // Address of first pixel to paint
        const uint16_t* const lineend = framebuffer + count;
        const uint16_t redColor565 = 0xF800;  // Full red in RGB565
        do
        {
            if (alpha == 0xFF)
            {
                *framebuffer = redColor565; // Write red to framebuffer
            }
            else
            {
                *framebuffer = alphaBlend(redColor565, *framebuffer, alpha); // Blend red with the framebuffer color
            }
        } while (++framebuffer < lineend);
    }
};
The function alphaBlend blends two RGB565 pixels with a given alpha for the first pixel. The function is provided by the super class AbstractPainterRGB565. The circle now has smooth edges with this code:
The RedAlphaPainter painting a Circle. On the right a magnified part showing alpha blending.
The WidgetX and WidgetY parameters can be used to restrict the drawing to certain areas. Here is for example a painter that only draws on every other horizontal line. The WidgetY is used to control that:
#include <touchgfx/widgets/canvas/AbstractPainterRGB565.hpp>
using namespace touchgfx;
class StripePainter : public AbstractPainterRGB565
{
public:
    virtual void paint(uint8_t* destination, int16_t offset, int16_t widgetX, int16_t widgetY, int16_t count, uint8_t alpha) const
    {
        if ((widgetY & 2) == 0)
        {
            return; // Do not draw anything on line 0,1, 4,5, 8,9, etc.
        }
        uint16_t* framebuffer = reinterpret_cast<uint16_t*>(destination) + offset;
        const uint16_t* const lineend = framebuffer + count;
        if (alpha == 0xFF)
        {
            do
            {
                *framebuffer = 0xF800;
            } while (++framebuffer < lineend);
        }
        else
        {
            do
            {
                *framebuffer = alphaBlend(0xF800, *framebuffer, alpha);
            } while (++framebuffer < lineend);
        }
    }
};

The StripePainter painting a Circle. On the right a magnified part.
Changing the framebuffer
The painter in this section does not paint a specific content to the framebuffer, but changes the framebuffer to be gray-scale. It does this by reading the pixel value in the framebuffer (written by the Widgets that are in the background of the Circle), extracting the green component, using this to create a gray color (same value for red, green, blue), and writing that back to the framebuffer.
Many similar techniques can be developed using this principle of reading and modifying the framebuffer.
#include <touchgfx/widgets/canvas/AbstractPainterRGB565.hpp>
#include <touchgfx/Color.hpp>
using namespace touchgfx;
class GrayscalePainter : public AbstractPainterRGB565
{
public:
    virtual void paint(uint8_t* destination, int16_t offset, int16_t widgetX, int16_t widgetY, int16_t count, uint8_t alpha) const
    {
        uint16_t* framebuffer = reinterpret_cast<uint16_t*>(destination) + offset;
        const uint16_t* const lineend = framebuffer + count;
        do
        {
            const uint8_t green = Color::getGreenFromRGB565(*framebuffer) & 0xF8; // Keep only 5 bits of the green
            const uint16_t color565 = LCD16bpp::getNativeColorFromRGB(green, green, green);
            if (alpha == 0xFF)
            {
                *framebuffer = color565;
            }
            else
            {
                *framebuffer = alphaBlend(color565, *framebuffer, alpha);
            }
        } while (++framebuffer < lineend);
    }
};
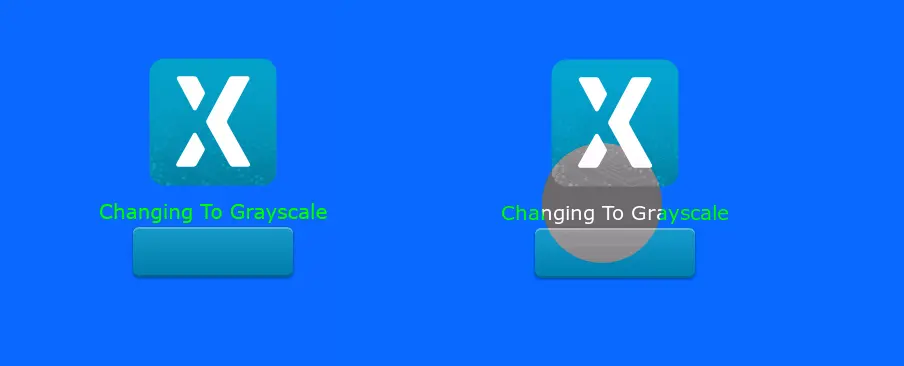
Original background on the left. On the right the Circle painter has changed the inner pixels in the circle to gray-scale.
Custom Containers on rotated displays
If your application is using a rotated display, the custom container code must take this into account, if it is using the coordinates in the painting.
Here is the StripePainter used with a rotated display:
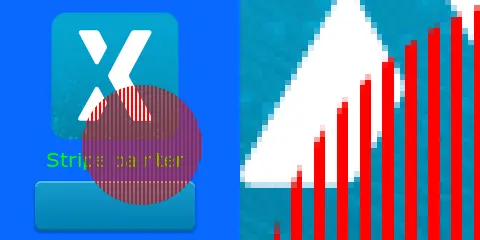
The StripePainter painting a Circle. On the right a magnified part.
The Image, text, and the Button has been rotated by the TouchGFX engine, but we see that the stripes are now perpendicular to the text, where it is supposed to parallel. The lines have not been rotated.
The problem is that the framebuffer is not rotated, so as the painter paints in sequential addresses (pixels in the framebuffer), the lines are oriented as before (not rotated).
We can fix that by using the WidgetX to decide if we are painting or not. The widgetX and widgetY parameters are given in the framebuffer coordinate system. This means that widgetX grows when we go down on the display and corresponds to y in the display coordinate system.
#include <touchgfx/widgets/canvas/AbstractPainterRGB565.hpp>
#include <touchgfx/Color.hpp>
using namespace touchgfx;
class StripePainterRotate90 : public AbstractPainterRGB565
{
public:
    virtual void paint(uint8_t* destination, int16_t offset, int16_t widgetX, int16_t widgetY, int16_t count, uint8_t alpha) const
    {
        uint16_t* framebuffer = reinterpret_cast<uint16_t*>(destination) + offset;
        const uint16_t* const lineend = framebuffer + count;
        if (alpha == 0xFF)
        {
            do
            {
                if (widgetX++ & 2)
                {
                    *framebuffer = 0xF800;
                }
            } while (++framebuffer < lineend);
        }
        else
        {
            do
            {
                if (widgetX++ & 2)
                {
                    *framebuffer = alphaBlend(0xF800, *framebuffer, alpha);
                }
            } while (++framebuffer < lineend);
        }
    }
};
The stripes are now correctly oriented:
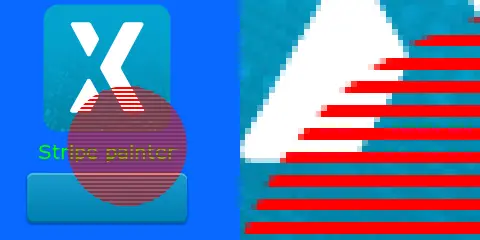
The StripePainterRotate90 painting a Circle.