캔버스 위젯
캔버스 위젯(Canvas Widget)과 캔버스 위젯 렌더러(Canvas Widget Renderer)는 TouchGFX에 추가되는 기능으로서 높은 성능을 유지하면서 비교적 적은 메모리를 사용하여 기하학적 형상의 부드럽고 안티앨리어싱(anti-aliasing)된 그리기를 제공합니다. 하지만 기하학적 형상 렌더링은 매우 복잡한 작업일 수 있어서 주의를 기울이지 않으면 마이크로컨트롤러 리소스가 쉽게 고갈될 수 있습니다.
캔버스 위젯 렌더러(이하 CWR)는 일반적인 그래픽 API로서 가장 불필요한 그리기 작업을 자동으로 제거하여 프리미티브에 최적화된 그리기 작업을 제공합니다. CWR은 TouchGFX에서 복잡한 기하학적 형상을 그리기 위한 목적으로 사용됩니다. 기하학적 형상은 캔버스 위젯에서 정의합니다. TouchGFX는 다수의 캔버스 위젯을 지원하지만 일반 위젯과 마찬가지로 사용자의 요구사항에 따라 커스텀 캔버스 위젯을 만들 수 있습니다. 캔버스 위젯은 CWR에서 그려질 그림의 기하학적 형상을 정의하지만 그림에서 각 픽셀의 실제 색상은 관련된 Painter 클래스에서 정의합니다. 마찬가지로 TouchGFX에는 다수의 Painter가 제공되지만 사용자의 요구사항에 따라 커스텀 Painter를 만들 수 있습니다.
Using Canvas Widgets
TouchGFX에서 다른 위젯은 크기가 자동으로 설정됩니다. 예를 들어 비트맵 위젯은 포함된 비트맵의 가로, 세로 길이를 자동으로 가져옵니다. 따라서 비트맵 위젯에서 setXY() 함수를 사용해 비트맵을 디스플레이에 배치해도 충분합니다.
캔버스 위젯에는 자동 측정을 통해 처음부터 설정할 수 있는 기본 크기가 없습니다. 따라서 위젯의 위치는 물론이고 크기까지 정확하게 고려해야 합니다. 그렇지 않으면 캔버스 위젯의 가로, 세로 길이가 0이 되어 디스플레이에 아무것도 그려지지 않습니다.
따라서 setXY() 메소드 대신 setPosition() 메소드를 사용해 캔버스 위젯을 배치하고 크기를 설정합니다. 또한 커스텀 캔버스 위젯을 생성하여 사용하는 방법에 대한 예로서 아래 커스텀 캔버스 위젯을 참조하십시오.
캔버스 위젯의 위치와 크기 설정을 마쳤으면 이제 기하학적 형상이 위젯 내에 그려질 수 있습니다. 좌표계는 위젯(디스플레이 아님)의 왼쪽 상단 모퉁이가 (0, 0)이 되어 X 축이 오른쪽으로, 그리고 Y 축이 아래로 연장됩니다.
캔버스 위젯은 TouchGFX Designer에서도 지원되며, 사용이 간단할 뿐만 아니라 메모리 요구 사항을 자동으로 계산하고, 메모리도 자동으로 할당됩니다.
Available Canvas Widgets in the TouchGFX Designer:
TouchGFX Designer에서 위의 위젯을 사용하면 런타임에서 위젯의 모습을 확인할 수 있어서 위치 및 크기 조정이 더 쉬워집니다.
메모리 할당 및 사용
멋진 안티앨리어싱된 복잡한 기하학적 형상을 생성하기 위해서는 추가적인 메모리가 필요합니다. 이를 위해 CWR에는 렌더링 과정에서 사용할 별도의 메모리 버퍼가 필요합니다. 나머지 TouchGFX와 마찬가지로 CWR에도 동적 메모리 할당 기능이 없습니다.
TouchGFX Designer의 메모리 할당
위젯을 스크린의 캔버스에 추가하면 메모리 버퍼가 자동으로 생성됩니다. 이때 버퍼의 크기는 (가로 길이 x 3) x 5 공식에 들어가는 스크린의 가로 길이에 따라 달라집니다. 하지만 이 공식으로 결정되는 버퍼 크기가 모든 시나리오에 적합한 것은 아닙니다. 따라서 아래 이미지와 같이 버퍼 크기를 재정의할 수 있습니다.
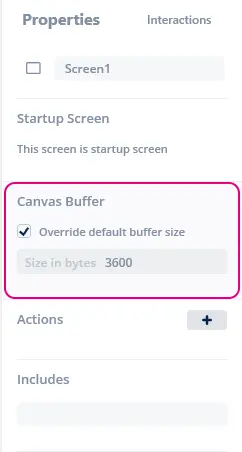
스크린 속성에서 재정의하는 캔버스 버퍼 크기
사용자 코드의 메모리 할당
The TouchGFX Designer only allocates a memory buffer for screens that uses Canvas Widgets in the Designer. If you add Canvas Widgets in user code in a screen that does not have Canvas Widgets in the Designer you must manually setup a buffer. It is recommended to do this in the Screen::setupScreen method.
Add this to your Screen class definition as private members:
private:
  static const uint16_t CANVAS_BUFFER_SIZE = 3600;
  static uint8_t canvasBuffer[CANVAS_BUFFER_SIZE]
Then in setupScreen() method of ScreenView.cpp the following line setting up the buffer can be added.
void ScreenView::setupScreen()
{
    ...
    CanvasWidgetRenderer::setupBuffer(canvasBuffer, CANVAS_BUFFER_SIZE);
    ...
}
필요한 CWR 메모리 용량은 애플리케이션에서 그리기 작업을 할 모양의 최대 크기에 따라 결정됩니다. 하지만 예약할 수 있는 메모리는 가장 복잡한 형상일 때 필요한 용량보다 적습니다. CWR은 이러한 상황에 대처하기 위해 형상 그리기 작업을 더 작은 프레임 버퍼 영역으로 분할하는데, 이 경우 형상을 한 번 이상 렌더링 해야 할 수도 있기 때문에 렌더링 시간이 다소 길어지게 됩니다. 시뮬레이터 모드에서 실행할 때 메모리 사용량을 더욱 자세히 분석하여 정밀하게 조정할 수 있습니다. 방법은 간단합니다. 다음 함수 호출을 main.cpp에 추가하기만 하면 됩니다.
CanvasWidgetRenderer::setWriteMemoryUsageReport(true);
이후부터는 그리기 연산을 마칠 때마다 CWR이 필요했던 메모리 용량을 보고합니다(콘솔로 출력합니다). canvas_widget_example의 경우, 첫 번째 드로잉 연산에서 “CWR requires 3604 bytes”라고 출력되고 이어서 두 번째 그리기 연산에서 “CWR requires 7932 bytes (4328 bytes missing)”라고 출력될 수 있습니다. 두 번째에서 CWR에 메모리가 부족한 것으로(이 경우 4328바이트가 부족함) 표시되더라도 애플리케이션은 정상적으로 실행됩니다. 이는 단일 실행으로는 복잡한 그리기 연산을 완료하는 데 필요한 메모리가 부족하다는 것을 CWR이 감지하기 때문입니다. 이에 따라 그리기 연산을 2회로 따로 분할하고 형상은 정상적으로 그려지게 되지만 렌더링 시간은 좀 더 길어지게 됩니다.
따라서 올바른 메모리 버퍼 크기 설정은 메모리와 성능(렌더링 시간)을 서로 절충한 결과입니다. 처음에 시작할 때 유효한 값은 약 3000입니다. 하지만 위의 기법을 사용하면 대체로 더 나은 값을 지정할 수 있습니다. If the shape is too complex and the allocated memory buffer is way too small, part of the shape will not be drawn (some vertical pixel lines will be skipped) and it is possible that nothing is drawn at all. 어떤 경우가 되었든 렌더링 시간이 크게 늘어납니다.
이 말은 애플리케이션에서 CWR 드로잉을 최대 속도로 렌더링하려면 요청에 따라서 메모리 용량을 할당해야 한다는 것을 의미합니다. 하지만 더욱 느린 렌더링 타이머를 사용한다면 메모리 버퍼를 줄일 수 있는 방법으로 손색이 없습니다.
CWR 좌표계
TouchGFX의 좌표계는 일반적으로 디스플레이에서 비트맵 위치를 결정할 목적으로 픽셀을 처리하는 데 사용됩니다. 비트맵, 텍스트, 기타 그래픽 요소가 모두 좌표계에 배치됩니다. 여기에서 (0, 0)은 왼쪽 상단 픽셀에 해당하며, x-축은 오른쪽으로, y-축은 아래로 연장됩니다. CWR에서는 정수만으로 픽셀을 처리하지 못합니다. 특별한 경우에는 충분할 수도 있지만 일반적으로는 부족합니다. 이해를 돕기 위해 선 폭이 1인 원이 있으며, 이 원이 5 x 5 픽셀의 박스 안에 정확하게 맞아야 한다고 가정하겠습니다. The center of this circle must be at (2.5, 2.5) and the radius must be 2 (the line is drawn .5 out from both sides of the circumference), so fractions are required for the center coordinate. 마찬가지로 원이 6 x 6 픽셀의 박스에 정확하게 맞아야 한다면 중심은 (3, 3)이고, 반경은 2.5가 되어야 합니다. 따라서 여기서는 반경에 분수가 필요합니다.
그래픽을 그리기 위한 이러한 좌표 지정 하는 새로운 방법은 (0,0) 픽셀에서는 중심이 CWR 좌표 (0.5, 0.5)에 해당하는 것을 의미합니다. 따라서 스크린의 왼쪽 상단 모퉁이에 픽셀이 포함된 박스는 다음과 같은 윤곽선을 갖습니다. (0,0) -> (1,0) -> (1,1) -> (0,1) -> (0,0).

(0, 0) 픽셀에 해당하는 CWR 좌표계
이러한 방법이 처음에는 혼란스러울 수도 있지만 곧 익숙해지게 됩니다. 비트맵 좌표계가 픽셀을 처리하는 경우에는 동일한 캔버스 위젯 좌표가 픽셀 바로 앞과 위의 간극을 처리합니다.
Since circles are shapes that often will have to be moved half a pixel to place the center correctly, the function Circle::setPixelCenter() will place the circle center at the center of the given pixel, i.e. half a pixel further to the right and down, compared to the coordinates specified.
커스텀 캔버스 위젯
커스텀 캔버스 위젯을 구현하려면 다음 함수를 사용해 새로운 클래스를 구현해야 합니다.
virtual bool drawCanvasWidget(const Rect& invalidatedArea) const;
virtual Rect getMinimalRect() const;
위에서 drawCanvasWidget() 함수는 커스텀 위젯에 필요한 것을 그려야 하고, getMinimalRect() 함수는 기하학적 형상이 포함되는 위젯에 실제 직사각형을 반환해야 합니다.
Note
getMinimalRect() 함수가 필요한 이유는 기하학적 형상이 위젯 내에서 움직일 수 있기 때문입니다. 또한 형상이 바뀔 때마다 최소 영역을 무효화할 목적으로 위젯의 크기와 위치를 조정하는 것은 대체로 실용적이지 않습니다. 여기서 getMinimalRect() 함수의 더미 구현체는 return rect;, 즉 위젯의 크기만 반환할 수 있지만 캔버스 위젯이 다시 그려지게 되어 기하학적 형상이 포함된 영역이 아닌 전체 영역을 가리게 됩니다. 기하학적 형상은 대체로 캔버스 위젯의 일부 영역만 차지하기 때문입니다.
캔버스 위젯은 모두 캔버스 클래스를 사용합니다. 이 캔버스 클래스는 위에서 설명했듯이 CWR을 압축합니다. CWR 은 여러 가지 최적화 기능이 자동적으로 적용되지만 무효화 영역된 영역과 관련된 기하학적 형상을 인식하여 무효화 영역 외부에서 불필요하게 그려지는 것을 피하는 것이 성능을 향상시키는데 효과적입니다.
예를 들어 10 x 10 박스 안에 다이아몬드 형상의 사각형을 대략적으로 구현하면 다음과 같습니다.
#include <touchgfx/widgets/canvas/CanvasWidget.hpp>
#include <touchgfx/widgets/canvas/Canvas.hpp>

using namespace touchgfx;

class Diamond10x10 : public CanvasWidget
{
public:
  virtual Rect getMinimalRect() const
  {
    return Rect(0,0,10,10);
  }
  virtual bool drawCanvasWidget(const Rect& invalidatedArea) const
  {
    Canvas canvas(this, invalidatedArea);
    canvas.moveTo(5,0);
    canvas.lineTo(10,5);
    canvas.lineTo(5,10);
    canvas.lineTo(0,5);
    return canvas.render(); // Shape is automatically closed
  }
};
Note
getMinimalRect() 함수가 직사각형을 정확하게 반환하는지 주의해서 살펴야 합니다. 그렇지 않으면 스크린에 그래픽이 잘못 표시될 수 있습니다.In order to see the Diamond10x10 on the display, the color must be set up by passing a Painter to the diamond. Read more about Painters in the next section. 또한 Diamond10x10의 위치와 크기가 정확해야 합니다. 결과적으로 다음과 같은 모습이 될 수 있습니다.
헤더 파일에서 아래와 같이 선언합니다.
Diamond10x10 box;
PainterRGB565 myPainter; // For 16bpp displays
and in the code you should have something like this in setupScreen():
myPainter.setColor(Color::getColorFromRGB(0xFF, 0x0, 0x0));
box.setPosition(100,100,10,10);
box.setPainter(myPainter);
add(box);
Painter
Painter는 캔버스 위젯 객체를 채우는 채색 방식을 정의하기 때문에 가시적 형상을 만드는 데 필요합니다. Painter는 모든 픽셀에 단일 색상을 제공하거나(예: PainterRGB565), 혹은 제공되는 비트맵에서 각 픽셀을 복사할 수 있습니다(예: PainterRGB565Bitmap). Since a painter writes the pixels directly to the framebuffer, the selected painter must match the format of the framebuffer or dynamic bitmap. TouchGFX는 불투명 색상 전용, 즉 비트맵을 그려야 하는 Painter를 포함해 지원되는 모든 디스플레이에 적합한 Painter와 함께 제공합니다.
Painter classes
The following table lists the available painters in TouchGFX. When you use Canvas Widgets with the TouchGFX Designer, the Designer will select the correct painter, but if you write code yourself that uses Canvas Widgets, you must select a suitable painter.
| Framebuffer format | Color Painter | Bitmap painters |
|---|---|---|
| BW | PainterBW | PainterBWBitmap |
| GRAY2 | PainterGRAY2 | PainterGRAY2Bitmap |
| GRAY4 | PainterGRAY4 | PainterGRAY4Bitmap |
| ABGR2222 | PainterABGR2222 | PainterABGR2222Bitmap |
| ARGB2222 | PainterARGB2222 | PainterARGB2222Bitmap |
| BGRA2222 | PainterBGRA2222 | PainterBGRA2222Bitmap |
| RGBA2222 | PainterRGBA2222 | PainterRGBA2222Bitmap |
| RGB565 | PainterRGB565 | PainterRGB565Bitmap, PainterRGB565L8Bitmap |
| RGB888 | PainterRGB888 | PainterRGB888Bitmap, PainterRGB888L8Bitmap |
| ARGB8888 | PainterARGB8888 | PainterARGB8888Bitmap, PainterARGB8888L8Bitmap |
| XRGB8888 | PainterXRGB8888 | PainterXRGB8888Bitmap, PainterXRGB8888L8Bitmap |
The bitmap painters support various bitmap formats:
| Painter | Supported bitmap formats |
|---|---|
| PainterBWBitmap | BW, BW_RLE |
| PainterGRAY2Bitmap | GRAY2 |
| PainterGRAY4Bitmap | GRAY4 |
| PainterABGR2222Bitmap | ABGR2222 |
| PainterARGB2222Bitmap | ARGB2222 |
| PainterBGRA2222Bitmap | BGRA2222 |
| PainterRGBA2222Bitmap | RGBA2222 |
| PainterRGB565Bitmap | RGB565, ARGB8888 |
| PainterRGB565L8Bitmap | L8_RGB565, L8_RGB888, L8_ARGB8888 |
| PainterRGB888Bitmap | RGB888, ARGB8888 |
| PainterRGB888L8Bitmap | L8_RGB565, L8_RGB888, L8_ARGB8888 |
| PainterARGB8888Bitmap | RGB565, RGB888, ARGB8888 |
| PainterARGB8888L8Bitmap | L8_RGB565, L8_RGB888, L8_ARGB8888 |
| PainterXRGB8888Bitmap | RGB565 (no transparency), RGB888, ARGB8888 |
| PainterXRGB8888L8Bitmap | L8_RGB565, L8_RGB888, L8_ARGB8888 |
Tiled bitmaps
Painters that draw pixels from a bitmap puts the bitmap in upper left corner of the Canvas Widget. The pixels of the shape that are outside of the bitmap dimension is not drawn.
The bitmap painters can be configured to repeat the widget (tiled) to cover the whole shape.
Tiling is enabled by calling the setTiled(bool) method on your painter:
    PainterRGB888Bitmap bitmapPainter;
    ...
    bitmapPainter.setBitmap(touchgfx::Bitmap(BITMAP_BLUE_LOGO_TOUCHGFX_LOGO_ID));
    bitmapPainter.setTiled(true);
Tiling can not be enabled in the Designer.

An application showing an Image, Circle with bitmap painter, and Circle with tiling bitmap painter.
커스텀 Painter
Even though TouchGFX comes with a set of predefined painter classes covering most use case scenarios, custom painters can also be implemented.
In this section we will give a few examples, that can be used as inspiration. The examples are for 16bpp RGB565 only. Slight modifications must be done for other framebuffer formats.
A custom painter is just a subclass of the AbstractPainter class. Painters for 16bpp (RGB565) framebuffers can use the AbstractPainterRGB565 class as superclass. Painters for 24bpp (RGB888) framebuffers can use AbstractPainterRGB888 as superclass.
These super classes are abstract classes. The custom painter class must implement the method:
virtual void paint(uint8_t* destination, int16_t offset, int16_t widgetX, int16_t widgetY, int16_t count, uint8_t alpha) const = 0;
The destination points to the start position in the framebuffer (the left edge of the widget).
The offset is how many pixels from this start position to put the first pixel.
widgetX, widgetY are the coordinates of the first pixel relative to widget (given in the framebuffer coordinate system).
count is the number of pixels to draw with the specified alpha.
The Canvas Widgets will call this method many times, so it is very important that the implementation of paint is not slow. If the Canvas Widget is not updated often, this is less important.
Color painters
The simplest painter just writes a fixed color to the framebuffer. Here is how to implement that:
#include <touchgfx/widgets/canvas/AbstractPainterRGB565.hpp>
using namespace touchgfx;
class RedPainter : public AbstractPainterRGB565
{
public:
    virtual void paint(uint8_t* destination, int16_t offset, int16_t widgetX, int16_t widgetY, int16_t count, uint8_t alpha) const
    {
        uint16_t* framebuffer = reinterpret_cast<uint16_t*>(destination) + offset; // Address of first pixel to paint
        const uint16_t* const lineend = framebuffer + count; // Address of last pixel to paint
        const uint16_t redColor565 = 0xF800;  // Full red in RGB565
        do
        {
            *framebuffer = redColor565;
        } while (++framebuffer < lineend);
    }
};
Remember to create an instance of your painter and assign it to your Canvas widget. Add a member of the painter type to your class:
Circle myCircle;
RedPainter myPainter;
and in the code you should have something like this in setupScreen():
...
myCircle.setPainter(myPainter);
...

The RedPainter painting a Circle. On the right a magnified part.
The RedPainter class above ignores the alpha parameter. This makes the edges harsh (no alpha-blending) as all pixels are made fully red. We can improve this with a slight code update where we use the alpha parameter to do blending if needed:
#include <touchgfx/widgets/canvas/AbstractPainterRGB565.hpp>
using namespace touchgfx;
class AlphaRedPainter : public AbstractPainterRGB565
{
public:
    virtual void paint(uint8_t* destination, int16_t offset, int16_t widgetX, int16_t widgetY, int16_t count, uint8_t alpha) const
    {
        uint16_t* framebuffer = reinterpret_cast<uint16_t*>(destination) + offset; // Address of first pixel to paint
        const uint16_t* const lineend = framebuffer + count;
        const uint16_t redColor565 = 0xF800;  // Full red in RGB565
        do
        {
            if (alpha == 0xFF)
            {
                *framebuffer = redColor565; // Write red to framebuffer
            }
            else
            {
                *framebuffer = alphaBlend(redColor565, *framebuffer, alpha); // Blend red with the framebuffer color
            }
        } while (++framebuffer < lineend);
    }
};
The function alphaBlend blends two RGB565 pixels with a given alpha for the first pixel. The function is provided by the super class AbstractPainterRGB565. The circle now has smooth edges with this code:

The RedAlphaPainter painting a Circle. On the right a magnified part showing alpha blending.
The WidgetX and WidgetY parameters can be used to restrict the drawing to certain areas. Here is for example a painter that only draws on every other horizontal line. The WidgetY is used to control that:
#include <touchgfx/widgets/canvas/AbstractPainterRGB565.hpp>
using namespace touchgfx;
class StripePainter : public AbstractPainterRGB565
{
public:
    virtual void paint(uint8_t* destination, int16_t offset, int16_t widgetX, int16_t widgetY, int16_t count, uint8_t alpha) const
    {
        if ((widgetY & 2) == 0)
        {
            return; // Do not draw anything on line 0,1, 4,5, 8,9, etc.
        }
        uint16_t* framebuffer = reinterpret_cast<uint16_t*>(destination) + offset;
        const uint16_t* const lineend = framebuffer + count;
        if (alpha == 0xFF)
        {
            do
            {
                *framebuffer = 0xF800;
            } while (++framebuffer < lineend);
        }
        else
        {
            do
            {
                *framebuffer = alphaBlend(0xF800, *framebuffer, alpha);
            } while (++framebuffer < lineend);
        }
    }
};
The StripePainter painting a Circle. On the right a magnified part.
Changing the framebuffer
The painter in this section does not paint a specific content to the framebuffer, but changes the framebuffer to be gray-scale. It does this by reading the pixel value in the framebuffer (written by the Widgets that are in the background of the Circle), extracting the green component, using this to create a gray color (same value for red, green, blue), and writing that back to the framebuffer.
Many similar techniques can be developed using this principle of reading and modifying the framebuffer.
#include <touchgfx/widgets/canvas/AbstractPainterRGB565.hpp>
#include <touchgfx/Color.hpp>
using namespace touchgfx;
class GrayscalePainter : public AbstractPainterRGB565
{
public:
    virtual void paint(uint8_t* destination, int16_t offset, int16_t widgetX, int16_t widgetY, int16_t count, uint8_t alpha) const
    {
        uint16_t* framebuffer = reinterpret_cast<uint16_t*>(destination) + offset;
        const uint16_t* const lineend = framebuffer + count;
        do
        {
            const uint8_t green = Color::getGreenFromRGB565(*framebuffer) & 0xF8; // Keep only 5 bits of the green
            const uint16_t color565 = LCD16bpp::getNativeColorFromRGB(green, green, green);
            if (alpha == 0xFF)
            {
                *framebuffer = color565;
            }
            else
            {
                *framebuffer = alphaBlend(color565, *framebuffer, alpha);
            }
        } while (++framebuffer < lineend);
    }
};

Original background on the left. On the right the Circle painter has changed the inner pixels in the circle to gray-scale.
Custom Containers on rotated displays
If your application is using a rotated display, the custom container code must take this into account, if it is using the coordinates in the painting.
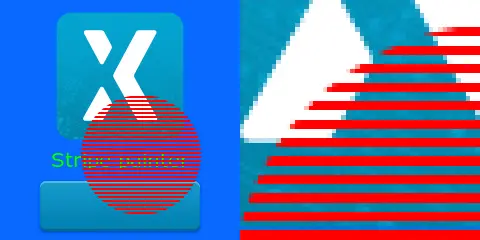
Here is the StripePainter used with a rotated display:

The StripePainter painting a Circle. On the right a magnified part.
The Image, text, and the Button has been rotated by the TouchGFX engine, but we see that the stripes are now perpendicular to the text, where it is supposed to parallel. The lines have not been rotated.
The problem is that the framebuffer is not rotated, so as the painter paints in sequential addresses (pixels in the framebuffer), the lines are oriented as before (not rotated).
We can fix that by using the WidgetX to decide if we are painting or not. The widgetX and widgetY parameters are given in the framebuffer coordinate system. This means that widgetX grows when we go down on the display and corresponds to y in the display coordinate system.
#include <touchgfx/widgets/canvas/AbstractPainterRGB565.hpp>
#include <touchgfx/Color.hpp>
using namespace touchgfx;
class StripePainterRotate90 : public AbstractPainterRGB565
{
public:
    virtual void paint(uint8_t* destination, int16_t offset, int16_t widgetX, int16_t widgetY, int16_t count, uint8_t alpha) const
    {
        uint16_t* framebuffer = reinterpret_cast<uint16_t*>(destination) + offset;
        const uint16_t* const lineend = framebuffer + count;
        if (alpha == 0xFF)
        {
            do
            {
                if (widgetX++ & 2)
                {
                    *framebuffer = 0xF800;
                }
            } while (++framebuffer < lineend);
        }
        else
        {
            do
            {
                if (widgetX++ & 2)
                {
                    *framebuffer = alphaBlend(0xF800, *framebuffer, alpha);
                }
            } while (++framebuffer < lineend);
        }
    }
};
The stripes are now correctly oriented:

The StripePainterRotate90 painting a Circle.