Custom Containers
When creating applications you might need a widget that is not found in the standard widget set included in TouchGFX.
One way of creating your own widgets is using custom containers. A custom container is an object that contains other existing widgets and combines the visual appearance and behaviours of these widgets. It is not dissimilar to the classic composite design pattern and we also refer to the contained widgets as the children of the container.
Drawing performance of custom containers will in general be very high. It will utilize the underlying drawing mechanisms of TouchGFX and will determine which parts of a container and the children needs to be redrawn automatically. This means that you do not need to worry about drawing performance when using containers.
However, there can be times where you need to reduce the footprint of a widget and in these scenarios, the more advanced approach called Custom Widget might be preferable.
In TouchGFX Designer
If you want to create and use custom containers in TouchGFX Designer, we give a general introduction to how you can use them in your projects in the video below:
Composite Custom Containers
It is possible to create a custom container that is composed of other custom containers. This can be a powerful way to construct components made up of smaller components. You can do this by adding instances of an already defined custom container found in the Widgets menu:
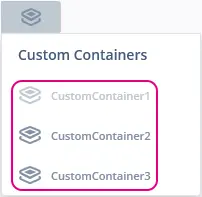
Inserting instances of custom containers
Note that TouchGFX Designer will help you to avoid inserting instances that would result in a circular reference such as adding a custom container instance to the definition of itself:
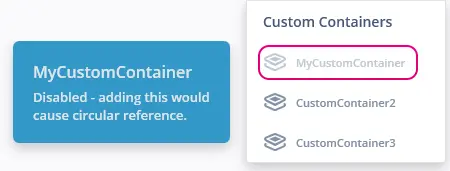
Potential circular reference disables the ability to insert an instance
Custom Triggers and Actions
One of the powerful aspects to a custom container is the ability to define custom triggers (callbacks) and custom actions (methods). This means that you can define integral behaviour to your custom container so it becomes more than just a reusable collection of widgets and enables communication with the rest of your application.
Further reading
In Code
In this section we will create a custom container in code. The steps are as follows:
- Create a class that extends the touchgfx::Container class
- Declaring all children of the container as member variables
- Setting the width and height of the container
- Setting up each of the children
- Adding each of the children to the hierarchy, in the right order
- Implementing the desired behaviour via methods and callbacks
We will start from scratch and build upon the code until we end up with a simple fully functional custom container.
Create a class that extends the touchgfx::Container class
Start by creating a MyCustomContainer.hpp header file with the code below. Use C++ inheritance to gain access to the methods and members of touchgfx::Container (remember to include the header file for Container.hpp):
MyCustomContainer.hpp
#include <gui/common/FrontendApplication.hpp>
#include <touchgfx/containers/Container.hpp>

class MyCustomContainer : public touchgfx::Container
{
public:
    MyCustomContainer();
    virtual ~MyCustomContainer() {}
    virtual void initialize();

protected:
    FrontendApplication& application() {
        return *static_cast<FrontendApplication*>(touchgfx::Application::getInstance());
    }

private:

};
Declaring all children of the container as member variables
Declare which widgets are going to compose your custom container in the header file. In this example we will just add a box myBox and a button myButton.
MyCustomContainer.hpp
#include <gui/common/FrontendApplication.hpp>
#include <touchgfx/containers/Container.hpp>

class MyCustomContainer : public touchgfx::Container
{
public:
    MyCustomContainer();
    virtual ~MyCustomContainer() {}
    virtual void initialize();

protected:
    FrontendApplication& application() {
        return *static_cast<FrontendApplication*>(touchgfx::Application::getInstance());
    }

    /*
     * Member Declarations
     */
    touchgfx::Box myBox;
    touchgfx::Button myButton;

private:

};
Setting the width and height of the container
Create a cpp file MyCustomContainer.cpp which includes the header file we just created. Use the setWidth() and setHeight() methods in the constructor to set whatever size you want for the custom container:
MyCustomContainer.cpp
#include <gui/include/containers/MyCustomContainer.hpp>

MyCustomContainer::MyCustomContainer()
{
    setWidth(250);
    setHeight(250);
}

void MyCustomContainer::initialize()
{

}
Setting up each of the children
Now we need to set up the properties for each widget in the constructor:
MyCustomContainer.cpp
#include <gui/include/containers/MyCustomContainer.hpp>

MyCustomContainer::MyCustomContainer()
{
    setWidth(250);
    setHeight(250);

    myBox.setPosition(0, 0, 250, 250);
    myBox.setColor(touchgfx::Color::getColorFromRGB(255, 255, 255));

    myButton.setXY(40, 95);
    myButton.setBitmaps(touchgfx::Bitmap(BITMAP_BLUE_BUTTONS_ROUND_EDGE_SMALL_ID), touchgfx::Bitmap(BITMAP_BLUE_BUTTONS_ROUND_EDGE_SMALL_PRESSED_ID));
}

void MyCustomContainer::initialize()
{

}
Adding each of the children to the hierarchy, in the right order
Use the add() method in the constructor to add the widgets as children of the custom container:
MyCustomContainer.cpp
#include <gui/containers/MyCustomContainer.hpp>

MyCustomContainer::MyCustomContainer()
{
    setWidth(250);
    setHeight(250);

    myBox.setPosition(0, 0, 250, 250);
    myBox.setColor(touchgfx::Color::getColorFromRGB(255, 255, 255));

    myButton.setXY(40, 95);
    myButton.setBitmaps(touchgfx::Bitmap(BITMAP_BLUE_BUTTONS_ROUND_EDGE_SMALL_ID), touchgfx::Bitmap(BITMAP_BLUE_BUTTONS_ROUND_EDGE_SMALL_PRESSED_ID));

    add(myBox);
    add(myButton);
}

void MyCustomContainer::initialize()
{

}
Implementing the desired behaviour via methods and callbacks
To add some behaviour to our custom container, we can define some methods and callbacks in MyCustomContainer.hpp. In this example we define a method doSomething() whose sole purpose is to emit the callback somethingHappened:
MyCustomContainer.hpp
#include <gui/common/FrontendApplication.hpp>
#include <touchgfx/containers/Container.hpp>

class MyCustomContainer : public touchgfx::Container
{
public:
    MyCustomContainerBase();
    virtual ~MyCustomContainerBase() {}
    virtual void initialize();

    /*
     * Callback Setters
     */
    void setSomethingHappenedCallback(touchgfx::GenericCallback<>& callback)
    {
        somethingHappenedCallback = &callback;
    }

    /*
     * Methods
     */
    virtual void doSomething();

protected:
    FrontendApplication& application() {
        return *static_cast<FrontendApplication*>(touchgfx::Application::getInstance());
    }

    /*
     * Callback Emitters
     */
    virtual void emitSomethingHappenedCallback()
    {
        if (somethingHappenedCallback && somethingHappenedCallback->isValid())
        {
            somethingHappenedCallback->execute();
        }
    }

    /*
     * Member Declarations
     */
    touchgfx::Box myBox;
    touchgfx::Button myButton;

private:

    /*
     * Callback Declarations
     */
    touchgfx::GenericCallback<>* somethingHappenedCallback;

};
Then to add the behaviour to our method and callback, implement them in the MyCustomContainer.cpp file. For this simple surface level example, we will simply emit the somethingHappened callback, but you can customize this as you want:
MyCustomContainer.cpp
#include <gui/containers/MyCustomContainer.hpp>

MyCustomContainer::MyCustomContainer()
{
    setWidth(250);
    setHeight(250);

    myBox.setPosition(0, 0, 250, 250);
    myBox.setColor(touchgfx::Color::getColorFromRGB(255, 255, 255));

    myButton.setXY(40, 95);
    myButton.setBitmaps(touchgfx::Bitmap(BITMAP_BLUE_BUTTONS_ROUND_EDGE_SMALL_ID), touchgfx::Bitmap(BITMAP_BLUE_BUTTONS_ROUND_EDGE_SMALL_PRESSED_ID));

    add(myBox);
    add(myButton);
}

void MyCustomContainer::initialize()
{

}

void MyCustomContainer::doSomething()
{
    MyCustomContainer::emitSomethingHappenedCallback();
}