Tutorial 3: Applications with Multiple Screens
In this tutorial, you will learn how to create multiple screens in an application and share data between the two screens. We will create an application that simulates a clock, which will use one screen to set hour and minute and pass the time to another screen which has a running clock.
You will also learn how to use the TouchGFX Designer to create animations based on interaction such as screen changes.
The images we will use in this tutorial can be downloaded from this link. Unzip the file to a directory on your disk.
Step 1: Setting up the Two Screens
Create a new project just as was done in tutorial 2. Again the graphics is designed for a resoultion of 480x272. If you base the project on the Application Template for the "STM32F746G Discovery Kit", your project will have this resolution. If you have a demo board with a different resolution you should" be able to modify the graphics to match it yourself. If you have no demo board simply base it on the "Simulator" Application Template and make sure to enter 480x272 as the resolution.
Setting up Screen1
The first screen to create is Screen1, which is the screen where the hour and minute values can be set and sent to the screen with the running clock. Screen1 is shown below and contains two text boxes which contain the desired time for the clock. To adjust the value in the boxes the up and down arrows is used. For saving the selected values and thereby pass them on to the clock the save button below the respective boxes is used. Lastly switching to the Screen2 with the clock is done by pressing the Clock button.
Let us start out by inserting the background and the text areas for our application. Insert the widgets and update the properties as listed in the picture and table below.
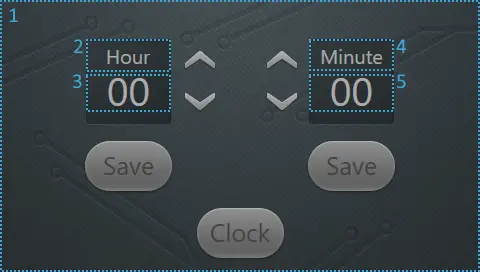
Screenshot of screen1 with the location of the background and the text areas highlighted
| Location | Widget | Properties |
|---|---|---|
| 1 | Image |
|
| 2 | TextArea |
|
| 3 | TextArea |
|
| 4 | TextArea |
|
| 5 | TextArea |
|
Then insert the buttons to the application as shown in the picture and table below.
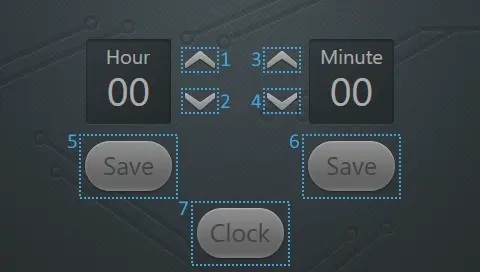
Screenshot of screen 1 with the location of the buttons highlighted
| Location | Widget | Properties |
|---|---|---|
| 1 | Button |
|
| 2 | Button |
|
| 3 | Button |
|
| 4 | Button |
|
| 5 | Button With Label |
|
| 6 | Button With Label |
|
| 7 | Button With Label |
|
With the graphical elements set up next step is to add the triggers for the buttons, which adjust the selected values and saves them:
| Interaction | Properties |
|---|---|
| Hour up button is clicked |
|
| Hour down button is clicked |
|
| Minute up button is clicked |
|
| Minute down button is clicked |
|
| Save Hour button is clicked |
|
| Save Minute button is clicked |
|
If you press "Generate Code" or "Run Simulator" the specified virtual functions will be generated by the Designer. Let us start by integrating the four functions for the arrow buttons. To keep track of the values for hour and minute, two counters are also added.
Now add the following code:
TouchGFX/gui/include/gui/screen1_screen/Screen1View.hpp
...
public:
...
    virtual void buttonHourUpClicked();
    virtual void buttonHourDownClicked();
    virtual void buttonMinuteUpClicked();
    virtual void buttonMinuteDownClicked();

protected:
    int16_t hour;
    int16_t minute;
...
When pressing the arrows the corresponding value changes to fit within the values for a clock.
The logic for the four functions should be added in the following way:
TouchGFX/gui/src/screen1_screen/Screen1View.cpp
Screen1View::Screen1View()
    : hour(0), minute(0) //clear the new counters
{
}
...
void Screen1View::buttonHourUpClicked()
{
    hour = (hour + 1) % 24; // Keep new value in range 0..23
    Unicode::snprintf(textAreaHourBuffer, TEXTAREAHOUR_SIZE, "%02d", hour);
    textAreaHour.invalidate();
}

void Screen1View::buttonHourDownClicked()
{
    hour = (hour + 24 - 1) % 24; // Keep new value in range 0..23
    Unicode::snprintf(textAreaHourBuffer, TEXTAREAHOUR_SIZE, "%02d", hour);
    textAreaHour.invalidate();
}

void Screen1View::buttonMinuteUpClicked()
{
    minute = (minute + 1) % 60; // Keep new value in range 0..59
    Unicode::snprintf(textAreaMinuteBuffer, TEXTAREAMINUTE_SIZE, "%02d", minute);
    textAreaMinute.invalidate();
}

void Screen1View::buttonMinuteDownClicked()
{
    minute = (minute + 60 - 1) % 60; // Keep new value in range 0..59
    Unicode::snprintf(textAreaMinuteBuffer, TEXTAREAMINUTE_SIZE, "%02d", minute);
    textAreaMinute.invalidate();
}
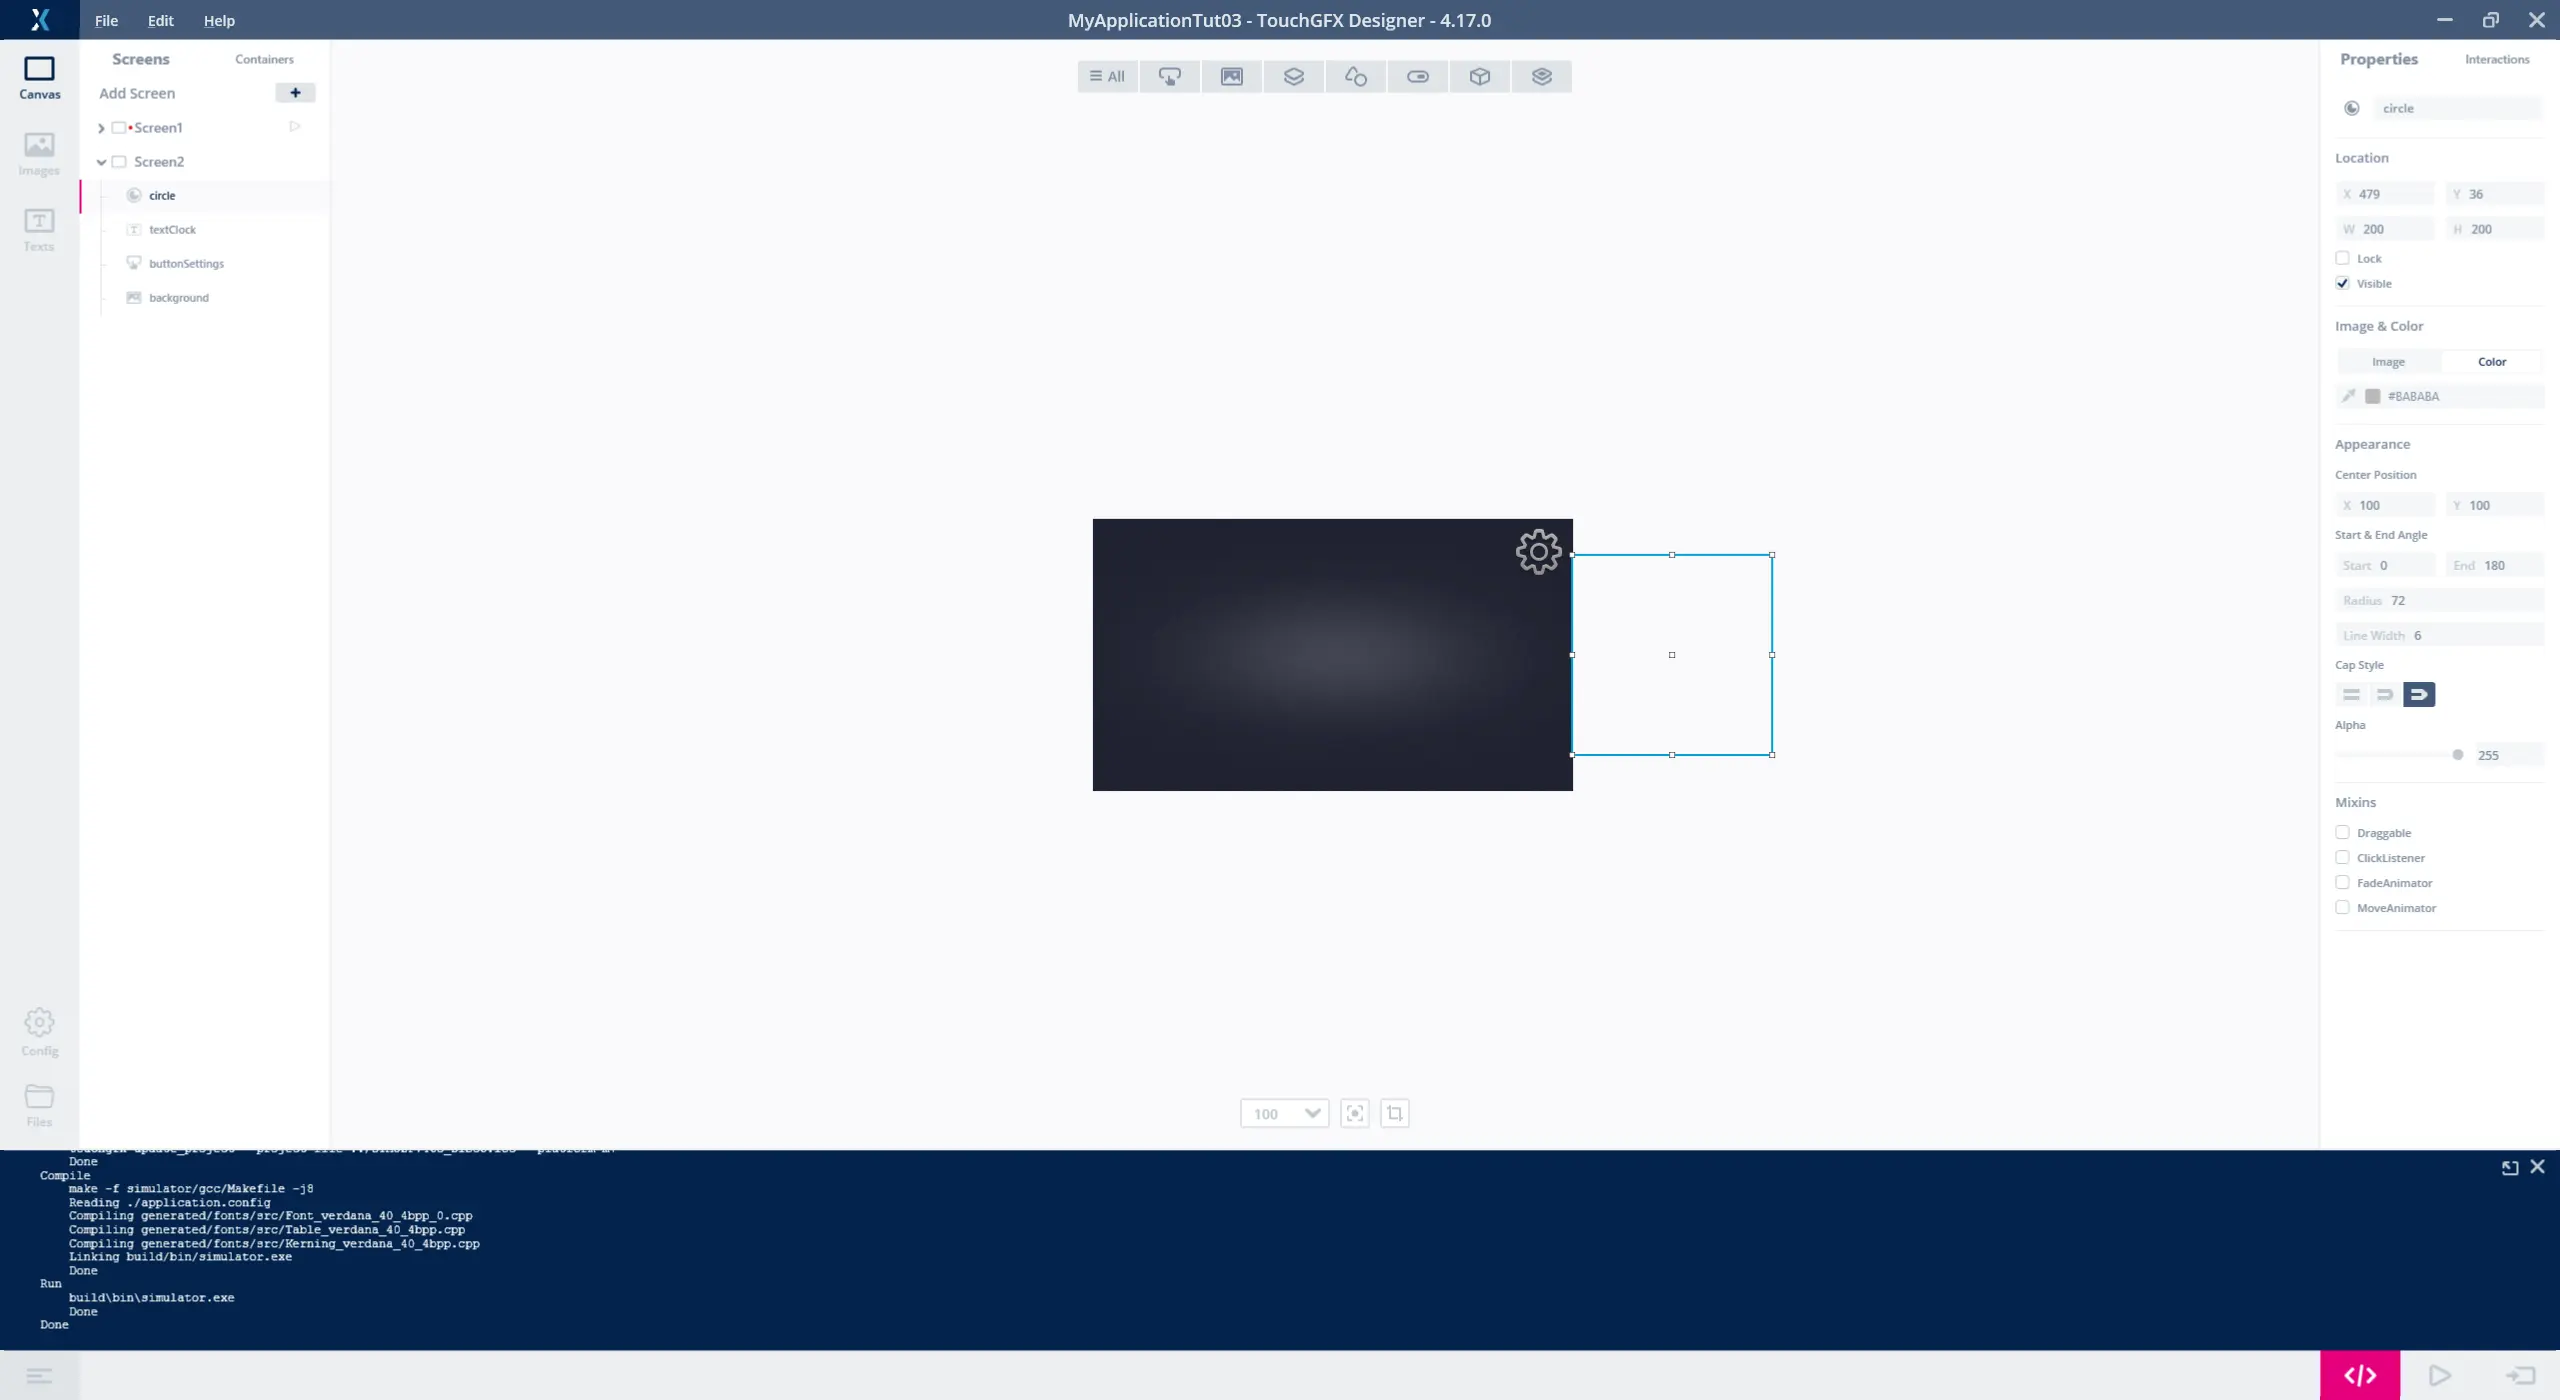
Setting up Screen2
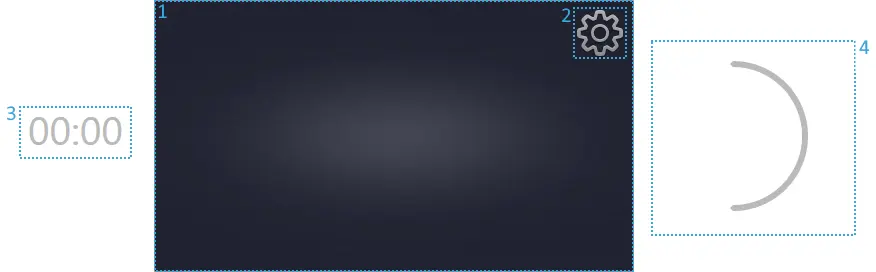
The second screen, Screen2, is where the running clock is placed, starting from the values saved in Screen1. Other than the clock Screen2 also consist off a circle animating around the clock, indicating that the clock is running. Finally to return to Screen1 a button is implemented which changes the screen to Screen1.

Screenshot of screen2 when running the application with the simulator
Before adding elements to Screen2, a new screen has to be created. This is done with the "Add Screen" button (1) in the TouchGFX Designer illustrated in the picture below.
The location of the add screen button in the TouchGFX Designer
When entering "screen2", we want both the clock and the circle to animate into their position, by moving into view from outside the screen, with the clock moving in from the left and the circle from the right. The two widgets are therefore initially placed outside the canvas in the TouchGFX Designer.
The placement of the widgets should be done as in the picture and table below.
The loaction of the Wigets in screen2
| Location | Widget | Properties |
|---|---|---|
| 1 | Image |
|
| 1 | Button |
|
| 3 | TextArea |
|
| 4 | Circle |
|
After adding all the Widgets the Screen should look like below. The TextArea and the Circle are outside the screen, and are therefore not visible.
All widgets added to Screen 2
Switching between Screens
Now we need to add functionality to switch between the two screens. For this we assign interactions to the Clock button on Screen1 and the Configuration button on Screen2. Also, we want the two elements that are placed outside the screen area on Screen2 to move into place when Screen2 is entered.
To do this add the following interaction to Screen1:
| Interaction | Properties |
|---|---|
| Change to "Screen2" |
|
Also add the following interaction to Screen2:
| Interaction | Properties |
|---|---|
| Change to "Screen1" |
|
| Move circle into place |
|
| Move text clock into place |
|
After adding the interactions, the screen looks like this:

All widgets added to Screen 2
To update the clock and animate the circle at runtime we use the virtual function handleTickEvent is used.
handleTickEvent is called periodically (in each frame) by the TouchGFX framework enabling it to update elements in the active screen dynamically, which in this case will be the clock and circle.
Similar to Screen1 an hour and a minute counter is used to keep track of the clock. Since handleTickEvent is called more frequently than the clock should be updated, a tickCounter is added to determine the number of ticks between the clock updates. For updating the angle of the arc in the circle the functions addStart and addEnd are used. The handleTickEvent function and the variables are added as shown to Screen2View.hpp as shown below.
TouchGFX/gui/include/gui/screen2_screen/Screen2View.hpp
public:
...
    virtual void handleTickEvent();

protected:
    int16_t hour;
    int16_t minute;
    int16_t tickCount;
    int16_t addStart;
    int16_t addEnd;
...
The implementation of handleTickEvent in Screen2View.cpp, thereby, the code which updates the clock and the circle is shown below
TouchGFX/gui/src/screen2_screen/Screen2View.cpp
Screen2View::Screen2View()
    : hour(0), minute(0), tickCount(0), addStart(1), addEnd(2)
{ }
...
void Screen2View::handleTickEvent()
{
    if (tickCount == 60)
    {
        minute++;
        hour = (hour + (minute / 60)) % 24;
        minute %= 60;

        Unicode::snprintf(textClockBuffer1, TEXTCLOCKBUFFER1_SIZE, "%02d", hour);
        Unicode::snprintf(textClockBuffer2, TEXTCLOCKBUFFER2_SIZE, "%02d", minute);

        textClock.invalidate();

        tickCount = 0;
    }

    if (!textClock.isMoveAnimationRunning())
    {
        tickCount++;
        if (circle.getArcStart() + 340 == circle.getArcEnd())
        {
            addStart = 2;
            addEnd = 1;
        }
        else if (circle.getArcStart() + 20 == circle.getArcEnd())
        {
            addStart = 1;
            addEnd = 2;
        }
        circle.updateArc(circle.getArcStart() + addStart, circle.getArcEnd() + addEnd);
    }
}
...
As learned in tutorial 2 we need to add the characters used in the wildcards. In this case you need to add "0-9" in the column Wildcard Ranges for the typography used for the TextAreas.
Further reading
Step 2: Saving Data
In this step, we will show how to save data when switching between screens and how to retrieve the saved data.
TouchGFX applications follows the Model-View-Presenter design pattern, so in order to persist data manipulated in a view (i.e. a Screen), the data should be sent to the Model class(through a presenter). More information on the Model-View-Presenter design pattern can be found on the Model-View-Presenter Design Pattern page.
Adding Hour and Minute to the Model
The Model is responsible for holding data for the application. Temporary data, such as button states, currently visible widget etc. should not be in the model.
To save and retrieve data via the model, add protected hour and minute values to the model, as well as public functions to access these values:
TouchGFX/gui/include/gui/model/Model.hpp
...
public:
    void saveHour(int16_t saveHour)
    {
        hour = saveHour;
    }

    void saveMinute(int16_t saveMinute)
    {
        minute = saveMinute;
    }

    int16_t getHour()
    {
        return hour;
    }

    int16_t getMinute()
    {
        return minute;
    }

protected:
    int16_t hour;
    int16_t minute;
...
Note
model.hpp file should also include #include <touchgfx/hal/types.hpp> in order to enable the usage of the type int16_tMake sure to initialize hour and minute in the constructor:
TouchGFX/gui/src/model/Model.cpp
...
Model::Model() : modelListener(0), hour(0), minute(0)
{
}
...
With this code, the hour and minute have a place in the Model where they can be saved between Screen changes (data saved in a Screen is lost when changing to another Screen). Since the Model is available to all presenters, this the recommended way to share information between presenters (and views). The Model is also where the UI is able to connect to the rest of the system, such as hardware peripherals and other software modules.
Accessing the Model from the View
Now, in order to access the data in the model from the view, the presenter should provide functions to allow Screen1View to load and save the data from the model as follows:
TouchGFX/gui/include/gui/screen1_screen/Screen1Presenter.hpp
...
public:
    void saveHour(int16_t hour)
    {
        model->saveHour(hour);
    }

    void saveMinute(int16_t minute)
    {
        model->saveMinute(minute);
    }

    int16_t getHour()
    {
        return model->getHour();
    }

    int16_t getMinute()
    {
        return model->getMinute();
    }
...
Since Screen2 should also be able to access the data in the model, add the same lines to Screen2Presenter.hpp.
Data from the Model
The code to access hour and minute in the Model is now in place, and Screen1 and Screen2 should be updated to get these values from the Model instead of using local variables only.
Updating Screen1
Now we can initialize the hour and minute in Screen1View with the values from the model and initialize the buffers for the Text Areas:
Screen1View.cpp
...
void Screen1View::setupScreen()
{
    Screen1ViewBase::setupScreen();

    hour = presenter->getHour();
    minute = presenter->getMinute();

    Unicode::snprintf(textAreaHourBuffer, TEXTAREAHOUR_SIZE, "%02d", hour);
    Unicode::snprintf(textAreaMinuteBuffer, TEXTAREAMINUTE_SIZE, "%02d", minute);
}
...
For saving the hour and minute values, the virtual functions, that were created under interactions, for the two save buttons, is implemented in Screen1View.hpp and stores the values in the model (via the presenter):
Screen1View.hpp
...
public:
    virtual void buttonSaveHourClicked()
    {
        presenter->saveHour(hour);
    }

    virtual void buttonSaveMinuteClicked()
    {
        presenter->saveMinute(minute);
    }
...
Screen1 now gets the initial values for hour and minute from the model.
Updating Screen2
Screen2 also needs to synchronize its values with the model.
Similar to Screen1, the initial value shown in the text clock must match the data from the Model.
Screen2View.cpp
...
void Screen2View::setupScreen()
{
    Screen2ViewBase::setupScreen();

    hour = presenter->getHour();
    minute = presenter->getMinute();

    Unicode::snprintf(textClockBuffer1, TEXTCLOCKBUFFER1_SIZE, "%02d", hour);
    Unicode::snprintf(textClockBuffer2, TEXTCLOCKBUFFER2_SIZE, "%02d", minute);
}
...
This fetches the hour and minute from the Model. The updated values must be sent back to the Model when we leave the screen (to go to the configuration screen on Screen1):
Screen2View.cpp
...
void Screen2View::tearDownScreen()
{
    presenter->saveHour(hour);
    presenter->saveMinute(minute);

    Screen2ViewBase::tearDownScreen();
}
...
This will send the updated values of hour and minute to the model just before going to the configuration screen.
This concludes the small application and thereby tutorial 3.