影片解碼
本節介紹如何設定TouchGFX Generator,以產生具有影片解碼功能的TouchGFX HAL。
在閱讀本文之前,請閱讀關於在TouchGFX中使用MJPEG影片的文件和關於影片小工具的文件。
以下將詳細說明了如何使能TouchGFX HAL,以通過軟體(LibJPEG)或硬體(JPEG)支援影像解碼。
請務必先閱讀本文所有章節,然後再為特定專案設定MCU。
一般情況下,LibJPEG和JPEG設定可以在STM32CubeMX的Middleware (中介軟體)及Multimedia (多媒體)類別中找到:
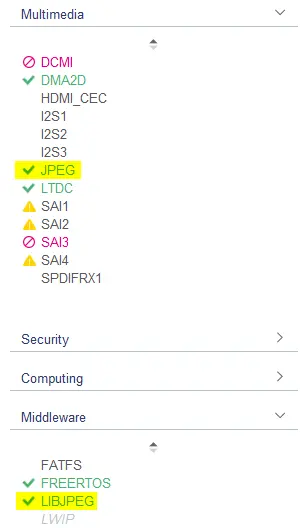
STM32CubeMX之中的JPEG及LibJPEG設定
Tip
- Several of the TouchGFX Board Setups (TBSs) in TouchGFX Designer include support for MJPEG video decoding.
- Use the STM32CubeMX configurations found in these example projects as inspiration to enable MJPEG video decoding on your specific MCU.
- An example of software decoding can be found in the TBS for STM32H735G-DK, while hardware decoding is used in the TBS for STM32U5G9J-DK2.
支援RTOS
The Generator User Guide mentions that Single- and Double buffer video decoding strategies require a CMSIS compliant RTOS, such as FreeRTOS. TouchGFX Generator會產生必須與影片解碼任務關聯的入口函數videoTaskFunc()。 STM32CubeMX可以產生此設定,方法是在FreeRTOS中介軟體設定的Task and Queues (工作和佇列)索引標籤定義工作和入口函數。
影片工作堆疊大小(於CMSIS V2文字中定義)和RTOS堆積大小是兩項重要因素。
For software decoding, the stack size must be carefully set because LibJPEG uses dynamic memory allocation. This means that the FreeRTOS heap should be large enough to accommodate your general application + 0xA000 (~41kB). For hardware decoding, the stack size can be substantially lower because there is no software stack that dynamically allocates memory.

FreeRTOS任務配置

FreeRTOS堆尺寸配置
基於以上設定,STM32CubeMX為影片工作產生以下程式碼:
main.c
/* Definitions for VideoTask */
osThreadId_t VideoTaskHandle;
const osThreadAttr_t VideoTask_attributes = {
  .name = "VideoTask",
  .stack_size = 1000 * 4,
  .priority = (osPriority_t) osPriorityLow,
};
...
void main()
{
    ...
    /* creation of VideoTask */
    VideoTaskHandle = osThreadNew(videoTaskFunc, NULL, &VideoTask_attributes);
    ...
}
FreeRTOSConfig.h
#define configTOTAL_HEAP_SIZE ((size_t)75000)
軟體解碼
軟體解碼解決方案要求LibJPEG中介軟體由STM32CubeMX啟用,如Generator使用者指南所述。 軟體解碼設置對於所有具備LibJPEG功能的MCU(如STM32F4、STM32F7、STM32H7)都是相同的。
TouchGFX軟體解碼器期望LibJPEG解碼的資料按照BGR像素排序。 如果該設置保留為RGB,R和B顏色分量將在應用中互換。
此外如果使用16位元或24位元的影片RGB緩衝區,每個像素的大小應為3位元組,如果使用32位元影片RGB緩衝區則為4位元組。
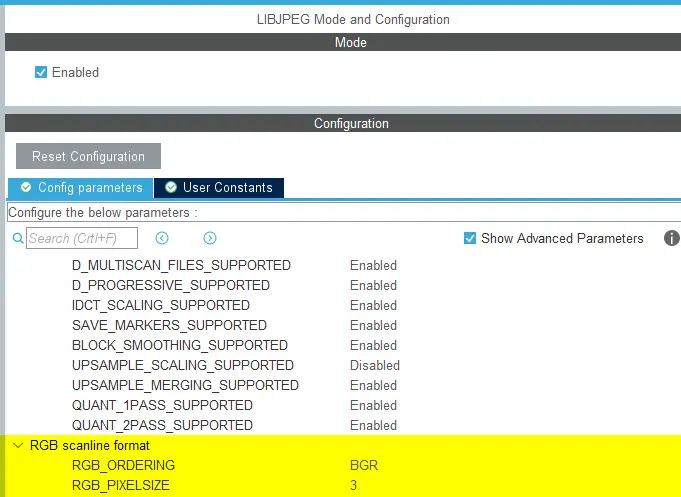
適用於16位元或24位元影片RGB緩衝區的LibJPEG設定
Caution
- The RGB_ORDERING setting must be configured as BGR, and the pixel size must be set according to which video RGB buffer format is used.
- If your application uses Direct to Framebuffer strategy in a ARGB8888 (32-bit) application the pixel size must be set to 4.
影片影片
TouchGFX links the video data to the ExtFlashSection, which needs to be defined in the linker script. If ExtFlashSection is placed in non-memory-mapped flash, the data must be read from the flash memory using a data reader and handed to the decoder.
For projects with video data in non-memory-mapped memory, please refer to the FileReader section later in this article in this article.
硬體解碼
The Generator User Guide mentions that the JPEG IP must be enabled in STM32CubeMX to enable hardware decoding.
RGB_FORMAT設定位於JPEG設定之中,必須遵循TouchGFX影像緩衝區JPEG_RGB565的像素格式,如以下範例所示。
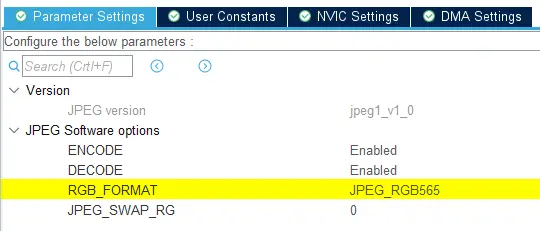
JPEG IP Parameter Settings
When using hardware decoding, a DMA is used to transfer data to (memory-to-peripheral) and from (peripheral-to-memory) the JPEG IP. Which DMA to use and how to configure it differs between MCU families.
Tip
- STM32U5G9J-DK2: JPEG + GPDMA
- STM32H750B-DK: JPEG + MDMA
- STM32H7S78-DK: JPEG + HPDMA
STM32H750 example
Here is an example of how to set up the DMA on STM32H750 for JPEG decoding. For the STM32H750, the JPEG peripheral must be configured to use the MDMA peripheral instead of the regular DMA peripherals. Add an MDMA configuration for both the input and output FIFO threshold signals, as shown in the image below. The configuration is identical for both the input and output buffers.
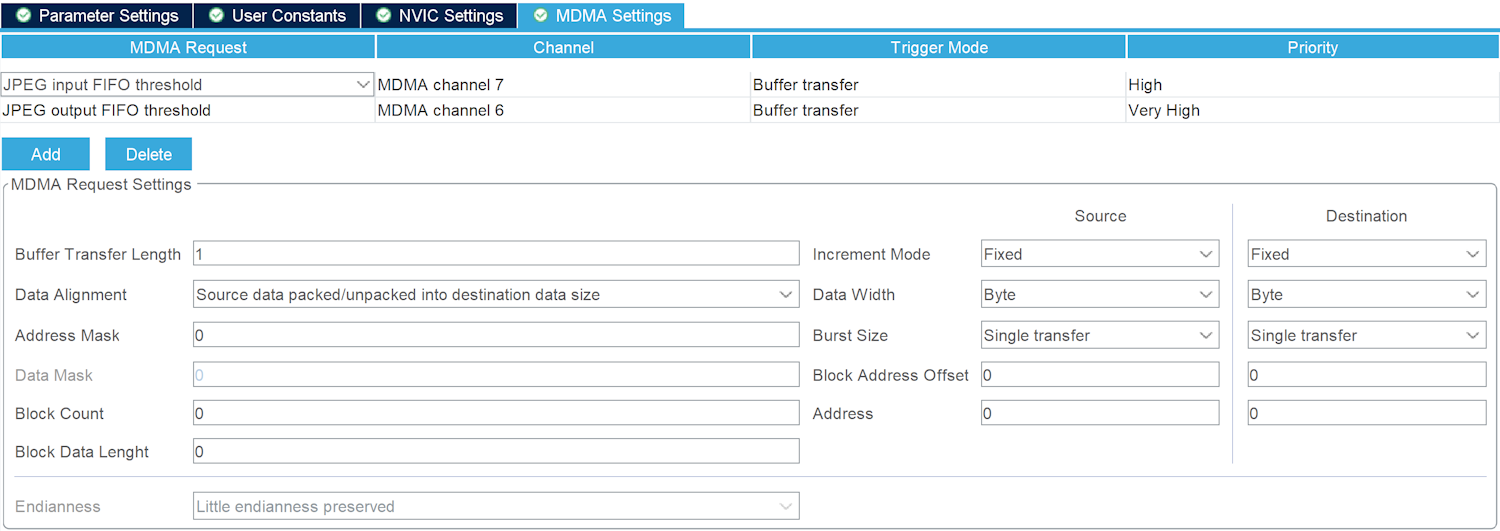
JPEG DMA settings for STM32H750
FileReader介面
當在非記憶體映射的記憶體上存儲MJPEG影像時,開發人員可以指定touchgfx::VideoDataReader的實現,TouchGFX影片控制器可以使用它將需要解碼的資料傳輸到配置的解碼器(軟體/硬體)。 下面是此介面的簡單範例,它將影像資料從一個緩衝區複製到另一個緩衝區。
VideoView.cpp
class MyReader : public touchgfx::VideoDataReader
{
public:
    MyReader() : position(0) { }
    virtual uint32_t getDataLength() { return video_len; }
    virtual void seek(uint32_t pos) { position = pos; }
    virtual bool readData(void* dst, uint32_t bytes)
    {
        memcpy(dst, &video_data[position], bytes);
        position += bytes;
        return true;
    }
    private:
        uint32_t position;
} myReader;
開發人員可以配置小工具以使用資料讀取器,而不是將一個影像小工具指向映射記憶體中的影像開始部分:
VideoView.cpp
video.setVideoData(myReader);
遷移TBS,以影片解碼
如果您要轉移由TouchGFX開發板設定(TBS)建立的專案,使用支援影片解碼的MCU,而當時使用的TouchGFX Designer版本尚未支援影片解碼功能,且您希望能在TouchGFX Designer之中於該專案使用「Run Target」(執行目標),就必須對GCC Makefile進行手動變更。
以下部分將列出所需的變更、以及進行變更的原因。 其中有一些一定要套用的一般變更,此外還有一些LibJPEG (軟體解碼)及JPEG (硬體解碼)專屬變更,需視開發人員的應用程式用途而定。 這些更改是對舊TBS中已經存在的GCC Makefile的擴展。
如上述場景所述,除了更新Makefile,您還必須在STM32CubeMX中設置影片解碼。
一般變更
定義您專案中的LIBJPEG路徑:
# LibJPEG path
libjpeg_path := $(cubemx_middlewares_path)/Third_Party/LibJPEG
然後必須定義影片資產輸入路徑:
asset_texts_input  := TouchGFX/assets/texts

asset_videos_input := TouchGFX/assets/videos
影片資產輸出路徑也必須定義在現有資產輸出路徑下面:
asset_images_output := $(asset_root_path)/images
asset_fonts_output := $(asset_root_path)/fonts
asset_texts_output := $(asset_root_path)/texts
asset_videos_output := $(asset_root_path)/videos
將影片輸出資產添加到元件清單中:
all_components := $(components) \
    $(asset_fonts_output) \
    $(asset_images_output) \
    $(asset_texts_output)
    $(asset_texts_output) \
    $(asset_videos_output)
必須定義影片目的檔。 影片目的檔案與已經存在的物件分離:
c_source_files := $(call find, $(source_paths),*.c) $(os_source_files) $(board_c_files)
source_files += $(board_cpp_files)

video_object_files := $(call find, $(asset_videos_output),*.o)
必須定義到影片轉換器腳本的路徑
textconvert_script_path := $(touchgfx_path)/framework/tools/textconvert
textconvert_executable := $(call find, $(textconvert_script_path), *.rb)
videoconvert_script_path := $(touchgfx_path)/framework/tools/videoconvert
可以新增一個選用的echo,以查看所有影片目的檔案。 影片目的檔必須添加到連結階段。 該行將$(video_object_files) 和其他目的檔加在一起:
$(binary_output_path)/$(target_executable): $(object_files) $(object_asm_files)
    @echo Video Objects: $(video_object_files)
    @echo Linking $(@)
    @mkdir -p $(@D)
    @mkdir -p $(object_output_path)
    @$(file >$(build_root_path)/objects.tmp) $(foreach F,$(object_files) $(video_object_files),$(file >>$(build_root_path)/objects.tmp,$F))
將影片規則添加到現有資產和.PHONY:
_assets_: BitmapDatabase TextKeysAndLanguages Videos

.PHONY: BitmapDatabase TextKeysAndLanguages Videos
添加影片轉換後,接著添加影片規則:
Videos:
    @ruby $(videoconvert_script_path)/videoconvert.rb $(asset_videos_input) $(asset_videos_output)
最後更新清除規則,也刪除與影片相關的輸出。
_clean_:
    @echo Cleaning: $(board_name)
    @rm -rf $(build_root_path)
    # Do not remove gui_generated
    @rm -rf $(asset_images_output)
    @rm -rf $(asset_fonts_output)
    @rm -rf $(asset_texts_output)
    @rm -rf $(asset_videos_output)
    # Create directory to avoid error if it does not exist
    @mkdir -p $(asset_root_path)
    # Remove assets folder if it is empty (i.e. no gui_generated folder)
    @rmdir --ignore-fail-on-non-empty $(asset_root_path)
    # Clean bootloader project
    @$(MAKE) -r -f ExtMem_Boot/gcc/Makefile -s $(MFLAGS) clean
軟體變更
添加所有LIBJPEG路徑到包括路徑:
include_paths := $(library_includes) \
    $(foreach comp, $(all_components), $(comp)/include) \
    $(foreach comp, $(cubemx_components), $(comp)/Inc) \
    $(foreach comp, $(touchgfx_generator_components), $(comp)/generated) \
    $(framework_includes) \
    $(cubemx_middlewares_path) \
    $(touchgfx_middlewares_path) \
    $(touchgfx_generator_components) \
    LIBJPEG/Target \
    $(libjpeg_path)/include \
    LIBJPEG/App
必須定義LIBJPEG源路徑:
c_source_files := $(call find, $(source_paths),*.c) $(os_source_files) $(board_c_files)
source_files += $(board_cpp_files)

libjpeg_source_path = Middlewares/Third_Party/LibJPEG/source
接下來,所有LIBJPEG原始檔案必須添加到board_c_files:
board_c_files := \
    $(Drivers_path)/BSP/STM32H750B-DK/stm32h750b_discovery_bus.c \
    $(Drivers_path)/BSP/STM32H750B-DK/stm32h750b_discovery_qspi.c \
    $(Drivers_path)/BSP/STM32H750B-DK/stm32h750b_discovery_sdram.c \
    $(Drivers_path)/BSP/STM32H750B-DK/stm32h750b_discovery_ts.c \
    $(Drivers_path)/BSP/Components/ft5336/ft5336.c \
    $(Drivers_path)/BSP/Components/ft5336/ft5336_reg.c \
    $(Drivers_path)/BSP/Components/mt25tl01g/mt25tl01g.c \
    $(Drivers_path)/BSP/Components/mt48lc4m32b2/mt48lc4m32b2.c \
    $(libjpeg_source_path)/jaricom.c \
    $(libjpeg_source_path)/jcomapi.c \
    $(libjpeg_source_path)/jdapimin.c \
    $(libjpeg_source_path)/jdapistd.c \
    $(libjpeg_source_path)/jdarith.c \
    $(libjpeg_source_path)/jdatasrc.c \
    $(libjpeg_source_path)/jdcoefct.c \
    $(libjpeg_source_path)/jdcolor.c \
    $(libjpeg_source_path)/jddctmgr.c \
    $(libjpeg_source_path)/jdhuff.c \
    $(libjpeg_source_path)/jdinput.c \
    $(libjpeg_source_path)/jdmainct.c \
    $(libjpeg_source_path)/jdmarker.c \
    $(libjpeg_source_path)/jdmaster.c \
    $(libjpeg_source_path)/jdmerge.c \
    $(libjpeg_source_path)/jdpostct.c \
    $(libjpeg_source_path)/jdsample.c \
    $(libjpeg_source_path)/jdtrans.c \
    $(libjpeg_source_path)/jerror.c \
    $(libjpeg_source_path)/jidctflt.c \
    $(libjpeg_source_path)/jidctfst.c \
    $(libjpeg_source_path)/jidctint.c \
    $(libjpeg_source_path)/jmemmgr.c \
    $(libjpeg_source_path)/jmemnobs.c \
    $(libjpeg_source_path)/jquant1.c \
    $(libjpeg_source_path)/jquant2.c \
    $(libjpeg_source_path)/jutils.c \
    LIBJPEG/App/libjpeg.c
然後將LIBJPEG原始檔案添加到現有的目的檔案中,方法與其他中介軟體原始檔案相同:
# Start converting paths
object_files := $(object_files:$(touchgfx_path)/%.cpp=$(object_output_path)/touchgfx/%.o)
object_files := $(object_files:%.cpp=$(object_output_path)/%.o)
object_files := $(object_files:$(touchgfx_middlewares_path)/%.c=$(object_output_path)/$(touchgfx_middlewares_path)/%.o)
object_files := $(object_files:$(cubemx_middlewares_path)/%.c=$(object_output_path)/$(cubemx_middlewares_path)/%.o)
object_files := $(object_files:$(libjpeg_source_path)/%.c=$(object_output_path)/$(libjpeg_source_path)/%.o)
object_files := $(object_files:$(Drivers_path)/%.c=$(object_output_path)/Drivers/%.o)
object_files := $(object_files:%.c=$(object_output_path)/%.o)
硬體變更
添加所有JPEG路徑到包括路徑:
include_paths := $(library_includes) \
    $(foreach comp, $(all_components), $(comp)/include) \
    $(foreach comp, $(cubemx_components), $(comp)/Inc) \
    $(foreach comp, $(touchgfx_generator_components), $(comp)/generated) \
    $(framework_includes) \
    $(cubemx_middlewares_path) \
    $(touchgfx_middlewares_path) \
    $(touchgfx_generator_components) \
    Utilities/JPEG
接下來,所有JPEG原始檔案必須添加到board_c_files:
board_c_files := \
    $(Drivers_path)/BSP/STM32H750B-DK/stm32h750b_discovery_bus.c \
    $(Drivers_path)/BSP/STM32H750B-DK/stm32h750b_discovery_qspi.c \
    $(Drivers_path)/BSP/STM32H750B-DK/stm32h750b_discovery_sdram.c \
    $(Drivers_path)/BSP/STM32H750B-DK/stm32h750b_discovery_ts.c \
    $(Drivers_path)/BSP/Components/ft5336/ft5336.c \
    $(Drivers_path)/BSP/Components/ft5336/ft5336_reg.c \
    $(Drivers_path)/BSP/Components/mt25tl01g/mt25tl01g.c \
    $(Drivers_path)/BSP/Components/mt48lc4m32b2/mt48lc4m32b2.c \
    Utilities/JPEG/jpeg_utils.c
將影片緩衝區置於外部記憶體中
When developers create new projects with STM32CubeMX, the linker scripts associated with the generated projects do not contain default regions used by TouchGFX. Because of this, 'ExtFlashSection' where the video is stored is placed in internal flash by default. It will often be required to place 'ExtFlashSection' in external flash memory to avoid running out of internal flash memory.
Tip
- STM32F746-DISCO
- STM32H735G-DK
- STM32H750-DK
- STM32U5G9J-DK2
If the video strategy selected is not direct to framebuffer, an RGB buffer dedicated to JPEG decoding is generated by TouchGFX Generator when video is enabled. 該定義是用一個位置指示來實現的,它告訴連結器應該將緩衝區放在哪個部分。 如果連結器在連結器腳本中找不到該存儲區域,緩衝區將被放在內部存儲中。
LOCATION_PRAGMA_NOLOAD("Video_RGB_Buffer")
uint32_t videoRGBBuffer[57600] LOCATION_ATTRIBUTE_NOLOAD("Video_RGB_Buffer");
The following compiler-specific subsections describe an example of the modifications that developers can make to achieve placing the buffer in SDRAM on STM32F746G-DISCO. Video_RGB_Buffer表示用於影片解碼的緩衝區。 連結器腳本範例在SDRAM中為TouchGFX影像緩衝區保留了一些空間(從0xC0000000開始)。
- EWARM
- STM32CubeIDE
- MDK-ARM
Further reading
下面的例子都在STM32F746G-DISCO板(0xC0000000->0xC00FF000)上的SDRAM開始部分保留了一些空間,允許應用程式通過位址(例如0xC0000000)引用影像緩衝區,而不存在連結器覆寫影像緩衝區資料的風險。 每個範例都允許連結器將Video_RGB_Buffer放入已定義的SDRAM區域。
Tip
EWARM (IAR)
stm32f746xx_flash.icf
define symbol __ICFEDIT_region_SDRAM_start__   = 0xC00FF000;
define symbol __ICFEDIT_region_SDRAM_end__     = 0xC0700FFF;

define region SDRAM_region    = mem:[from __ICFEDIT_region_SDRAM_start__ to __ICFEDIT_region_SDRAM_end__];

place in SDRAM_region    { first section Video_RGB_Buffer };
連結之後,EWARM\STM32F746G_DISCO\List\STM32F746G_DISCO.map包含Video_RGB_Buffer的以下放置資訊:
STM32F746G_DISCO.map
Video_RGB_Buffer        zero     0xc00f'f000   0x3'8400  TouchGFXGeneratedHAL.o [2]
                               - 0xc013'7400   0x3'8400
STM32CubeIDE
STM32F746NGHX_FLASH.ld
MEMORY
{
  ...
  SDRAM      (xrw)    : ORIGIN = 0xC00FF000,   LENGTH = 8M
}

BufferSection (NOLOAD) :
{
  *(Video_RGB_Buffer Video_RGB_Buffer.*)
  *(.gnu.linkonce.r.*)
  . = ALIGN(0x4);
} >SDRAM
編譯之後,STM32CubeIDE\Debug\STM32F746G_DISCO.map 包含Video_RGB_Buffer的以下放置資訊:
STM32F746G_DISCO.map
BufferSection   0x00000000c00ff000    0x1c200
 *(Video_RGB_Buffer Video_RGB_Buffer.*)
 Video_RGB_Buffer
                0x00000000c00ff000    0x1c200 Application/User/TouchGFX/target/generated/TouchGFXGeneratedHAL.o
                0x00000000c00ff000                videoRGBBuffer
MDK-ARM (Keil)
STM32F746G_DISCO.sct
LR_IROM1 0x08000000 0x00200000  {    ; load region size_region
  ER_IROM1 0x08000000 0x00200000  {  ; load address = execution address
    *.o (RESET, +First)
    *(InRoot$$Sections)
    .ANY (+RO)
  }
  RW_IRAM1 0x20000000 0x00050000  {  ; RW data
    .ANY (+RW +ZI)
  }
  RW_SDRAM 0xC00FF000 UNINIT 0xC0700FFF  {
    *.o (Video_RGB_Buffer)
  }
}
請務必在儲存影片緩衝區的區段中加入UNINIT屬性。 這樣可確保留下記憶體區域作為未初始化資料。 連結之後,MDK-ARM\STM32F746G_DISCO\STM32F746G_DISCO.map包含Video_RGB_Buffer的以下放置資訊:
STM32F746G_DISCO.map
Video_RGB_Buffer 0xc00ff000 Section 115200 touchgfxgeneratedhal.o(Video_RGB_Buffer)