커스텀 컨테이너
애플리케이션을 생성할 때 TouchGFX의 표준 위젯 세트에 없는 위젯이 필요할 때가 있습니다.
이러한 위젯을 생성할 때 사용하는 것이 바로 커스텀 컨테이너입니다. 커스텀 컨테이너란 다른 기존 위젯들을 포함하며 이들 위젯의 시각적 형태와 동작을 모아 놓은 객체를 말합니다. 일반적인 복합 디자인 패턴과는 다르지만 여기에 포함된 위젯을 컨테이너의 하위 위젯이라고도 부릅니다.
커스텀 컨테이너는 일반적으로 그리기 성능이 매우 높습니다. TouchGFX의 기본적인 그리기 메커니즘을 이용할 뿐만 아니라 컨테이너와 하위 위젯에서 어떤 부분을 다시 그려야 할지를 자동으로 결정하기 때문입니다. 따라서 컨테이너를 사용할 때 그리기 성능에 대해 걱정할 필요가 없습니다.
하지만 위젯의 공간을 줄여야 하는 경우도 있는데, 이러한 시나리오에서는 커스텀 위젯이라고 하는 고급 접근 방식을 사용하는 것이 좋습니다.
TouchGFX Designer에서 생성하여 사용할 경우
TouchGFX Designer에서 커스텀 컨테이너를 생성해 사용할 수 있도록 프로젝트에서 커스텀 컨테이너를 사용하는 방법을 아래 동영상에서 종합적으로 소개합니다.
복합 커스텀 컨테이너
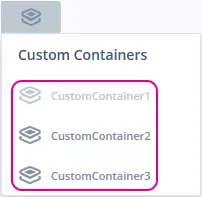
다른 커스텀 컨테이너로 구성된 커스텀 컨테이너를 생성할 수 있습니다. 이렇게 하면 더욱 작은 구성요소들을 모아 구성요소를 생성한다는 점에서 강력한 방법이 될 수 있습니다. 생성 방법은 위젯 메뉴에서 이미 정의되어 있는 커스텀 컨테이너의 인스턴스를 추가하는 것입니다.
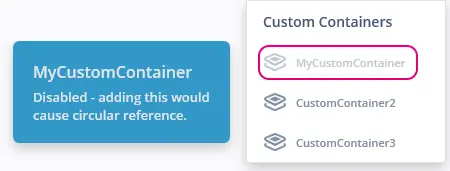
TouchGFX Designer는 다음과 같이 커스텀 컨테이너 인스턴스를 정의 자체에 추가하는 등 순환 참조를 일으키는 인스턴스의 삽입을 방지하는 데 효과적입니다.
커스텀 트리거 및 액션
커스텀 컨테이너에서 강력한 요소 중 하나는 커스텀 트리거(콜백)와 커스텀 액션(메소드)을 정의할 수 있다는 점입니다. 이 말은 커스텀 컨테이너에게 없어서는 안 될 동작을 정의할 수 있다는 것을 의미합니다. 따라서 단순히 재사용이 가능한 위젯 모음에 그치지 않고 나머지 애플리케이션과도 통신이 가능합니다.
Further reading
코드로 생성할 경우
이 섹션에서는 코드에서 커스텀 컨테이너를 생성합니다. 절차는 다음과 같습니다:
- touchgfx::Container 클래스를 확장하는 클래스 생성
- 컨테이너의 하위 위젯을 모두 멤버 번수로 선언
- 컨테이너의 가로 및 세로 길이 설정
- 각 하위 위젯 설정
- 각 하위 위젯을 올바른 순서대로 계층에 추가
- 메소드와 콜백을 통해 원하는 동작 구현
여기에서는 처음부터 시작해 코드를 작성하여 단순하지만 완전한 기능을 갖춘 커스텀 컨테이너를 생성하겠습니다.
touchgfx::Container 클래스를 확장하는 클래스 생성
먼저 아래 코드를 사용해 MyCustomContainer.hpp 헤더 파일을 생성합니다. C++ 상속을 통해 touchgfx::Container의 메소드와 멤버에 대한 액세스 권한을 얻습니다(이때 헤더 파일로 Container.hpp를 추가해야 합니다).
MyCustomContainer.hpp
#include <gui/common/FrontendApplication.hpp>
#include <touchgfx/containers/Container.hpp>

class MyCustomContainer : public touchgfx::Container
{
public:
    MyCustomContainer();
    virtual ~MyCustomContainer() {}
    virtual void initialize();

protected:
    FrontendApplication& application() {
        return *static_cast<FrontendApplication*>(touchgfx::Application::getInstance());
    }

private:

};
컨테이너의 하위 위젯을 모두 멤버 변수로 선언
헤더 파일에서 커스텀 컨테이너를 구성할 위젯을 선언합니다. 아래 예제에서는 박스로 myBox와 버튼으로 myButton만 추가합니다.
MyCustomContainer.hpp
#include <gui/common/FrontendApplication.hpp>
#include <touchgfx/containers/Container.hpp>

class MyCustomContainer : public touchgfx::Container
{
public:
    MyCustomContainer();
    virtual ~MyCustomContainer() {}
    virtual void initialize();

protected:
    FrontendApplication& application() {
        return *static_cast<FrontendApplication*>(touchgfx::Application::getInstance());
    }

    /*
     * Member Declarations
     */
    touchgfx::Box myBox;
    touchgfx::Button myButton;

private:

};
컨테이너의 가로 및 세로 길이 설정
앞에서 생성한 헤더 파일을 추가하여 MyCustomContainer.cpp 파일을 생성합니다. 이때 생성자에서 setWidth() 메소드와 setHeight() 메소드를 사용해 원하는 커스텀 컨테이너의 크기를 설정합니다.
MyCustomContainer.cpp
#include <gui/include/containers/MyCustomContainer.hpp>

MyCustomContainer::MyCustomContainer()
{
    setWidth(250);
    setHeight(250);
}

void MyCustomContainer::initialize()
{

}
각 하위 위젯 설정
이제 생성자에서 각 위젯의 속성을 설정해야 합니다.
MyCustomContainer.cpp
#include <gui/include/containers/MyCustomContainer.hpp>

MyCustomContainer::MyCustomContainer()
{
    setWidth(250);
    setHeight(250);

    myBox.setPosition(0, 0, 250, 250);
    myBox.setColor(touchgfx::Color::getColorFrom24BitRGB(255, 255, 255));

    myButton.setXY(40, 95);
    myButton.setBitmaps(touchgfx::Bitmap(BITMAP_BLUE_BUTTONS_ROUND_EDGE_SMALL_ID), touchgfx::Bitmap(BITMAP_BLUE_BUTTONS_ROUND_EDGE_SMALL_PRESSED_ID));
}

void MyCustomContainer::initialize()
{

}
각 하위 위젯을 올바른 순서대로 계층에 추가
생성자에서 add() 메소드를 사용해 위젯을 커스텀 컨테이너의 하위 위젯으로 추가합니다.
MyCustomContainer.cpp
#include <gui/containers/MyCustomContainer.hpp>

MyCustomContainer::MyCustomContainer()
{
    setWidth(250);
    setHeight(250);

    myBox.setPosition(0, 0, 250, 250);
    myBox.setColor(touchgfx::Color::getColorFrom24BitRGB(255, 255, 255));

    myButton.setXY(40, 95);
    myButton.setBitmaps(touchgfx::Bitmap(BITMAP_BLUE_BUTTONS_ROUND_EDGE_SMALL_ID), touchgfx::Bitmap(BITMAP_BLUE_BUTTONS_ROUND_EDGE_SMALL_PRESSED_ID));

    add(myBox);
    add(myButton);
}

void MyCustomContainer::initialize()
{

}
메소드와 콜백을 통해 원하는 동작 구현
커스텀 컨테이너에 동작을 추가하려면 MyCustomContainer.hpp에서 몇 가지 메소드와 콜백을 정의하면 됩니다. 아래 예제에서는 somethingHappened 콜백 실행이 유일한 목적인 doSomething() 메소드를 정의합니다.
MyCustomContainer.hpp
#include <gui/common/FrontendApplication.hpp>
#include <touchgfx/containers/Container.hpp>

class MyCustomContainer : public touchgfx::Container
{
public:
    MyCustomContainerBase();
    virtual ~MyCustomContainerBase() {}
    virtual void initialize();

    /*
     * Callback Setters
     */
    void setSomethingHappenedCallback(touchgfx::GenericCallback<>& callback)
    {
        somethingHappenedCallback = &callback;
    }

    /*
     * Methods
     */
    virtual void doSomething();

protected:
    FrontendApplication& application() {
        return *static_cast<FrontendApplication*>(touchgfx::Application::getInstance());
    }

    /*
     * Callback Emitters
     */
    virtual void emitSomethingHappenedCallback()
    {
        if (somethingHappenedCallback && somethingHappenedCallback->isValid())
        {
            somethingHappenedCallback->execute();
        }
    }

    /*
     * Member Declarations
     */
    touchgfx::Box myBox;
    touchgfx::Button myButton;

private:

    /*
     * Callback Declarations
     */
    touchgfx::GenericCallback<>* somethingHappenedCallback;

};
그런 다음 MyCustomContainer.cpp 파일에서 원하는 동작을 메소드와 콜백에 추가하여 구현합니다. 이 예제에서는 단순하게 somethingHappened 콜백을 실행하지만 원하는 대로 사용자 정의할 수 있습니다.
MyCustomContainer.cpp
#include <gui/containers/MyCustomContainer.hpp>

MyCustomContainer::MyCustomContainer()
{
    setWidth(250);
    setHeight(250);

    myBox.setPosition(0, 0, 250, 250);
    myBox.setColor(touchgfx::Color::getColorFrom24BitRGB(255, 255, 255));

    myButton.setXY(40, 95);
    myButton.setBitmaps(touchgfx::Bitmap(BITMAP_BLUE_BUTTONS_ROUND_EDGE_SMALL_ID), touchgfx::Bitmap(BITMAP_BLUE_BUTTONS_ROUND_EDGE_SMALL_PRESSED_ID));

    add(myBox);
    add(myButton);
}

void MyCustomContainer::initialize()
{

}

void MyCustomContainer::doSomething()
{
    MyCustomContainer::emitSomethingHappenedCallback();
}

