影片解碼
本節介紹如何設定TouchGFX Generator,以產生具有影片解碼功能的TouchGFX HAL。
在閱讀本文之前,請閱讀關於在TouchGFX中使用MJPEG影片的文件和關於影片小工具的文件。
以下將詳細說明了如何使能TouchGFX HAL,以通過軟體(LibJPEG)或硬體(JPEG)支援影像解碼。 它涵蓋STM32F7和STM32H7,因為支援硬體(JPEG)解碼的STM32CubeMX配置與STM32F7略有不同。
請務必先閱讀本文所有章節,然後再為特定專案設定MCU。
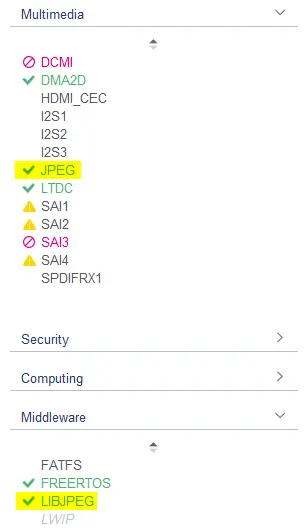
一般情況下,LibJPEG和JPEG設定可以在STM32CubeMX的Middleware (中介軟體)及Multimedia (多媒體)類別中找到:
Tip
支援RTOS
Generator使用者指南提到,單和雙緩衝區解碼策略需要符合CMSIS標準的RTOS,比如FreeRTOS。 TouchGFX Generator會產生必須與影片解碼任務關聯的入口函數videoTaskFunc()。 STM32CubeMX可以產生此設定,方法是在FreeRTOS中介軟體設定的Task and Queues (工作和佇列)索引標籤定義工作和入口函數。
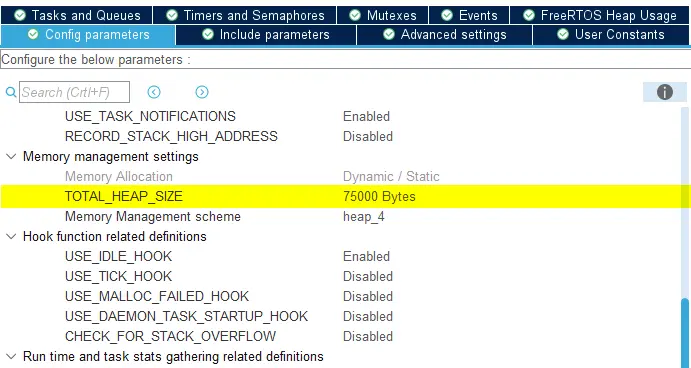
影片工作堆疊大小(於CMSIS V2文字中定義)和RTOS堆積大小是兩項重要因素。
進行軟體解碼時,堆疊大小必須謹慎設定,因為LibJPEG會使用動態記憶體分配。 進行硬體解碼時,堆疊大小可大幅減少,因為其中沒有軟體堆疊會動態分配記憶體。
FreeRTOS堆對於您的一般應用 + 0xA000應該足夠大。
基於以上設定,STM32CubeMX為影片工作產生以下程式碼:
main.c
/* Definitions for VideoTask */
osThreadId_t VideoTaskHandle;
const osThreadAttr_t VideoTask_attributes = {
  .name = "VideoTask",
  .stack_size = 1000 * 4,
  .priority = (osPriority_t) osPriorityLow,
};
...
void main()
{
    ...
    /* creation of VideoTask */
    VideoTaskHandle = osThreadNew(videoTaskFunc, NULL, &VideoTask_attributes);
    ...
}
FreeRTOSConfig.h
#define configTOTAL_HEAP_SIZE ((size_t)75000)
軟體解碼
軟體解碼解決方案要求LibJPEG中介軟體由STM32CubeMX啟用,如Generator使用者指南所述。 軟體解碼設置對於所有具備LibJPEG功能的MCU(如STM32F4、STM32F7、STM32H7)都是相同的。
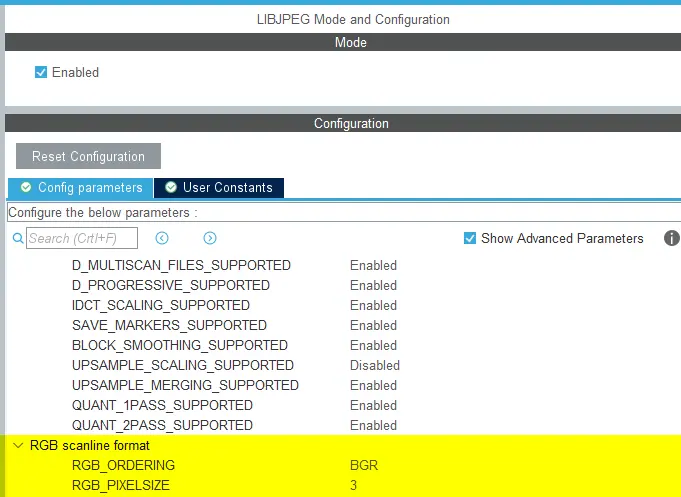
TouchGFX軟體解碼器期望LibJPEG解碼的資料按照BGR像素排序。 如果該設置保留為RGB,R和B顏色分量將在應用中互換。
此外如果使用16位元或24位元的影片RGB緩衝區,每個像素的大小應為3位元組,如果使用32位元影片RGB緩衝區則為4位元組。
Caution
影片影片
Caution
下面來自EWARM專案的程式碼片段顯示了由TouchGFX Designer創建的額外選項,以及它如何將資料放在ExtFlashSection中,後者是在所有TouchGFX開發包的連結器腳本中定義的。 這不適用於非記憶體映射的flash或未定義此部分的專案。
ewarm_project.ewp
        <option>
          <name>IlinkExtraOptions</name>
          <state>--image_input $PROJ_DIR$\..\TouchGFX\generated\videos\bin\washerdryer.bin,video_washerdryer_bin_start,ExtFlashSection,4</state>
          <state>--keep video_washerdryer_bin_start</state>
        </option>
對於影片資料位於非存儲映射的flash中的專案,請閱讀本文中的FileReader部分。
硬體解碼
Generator使用者指南提到,JPEG IP必須在STM32CubeMX中啟用,以啟用硬體解碼。
STM32F769-DISCO
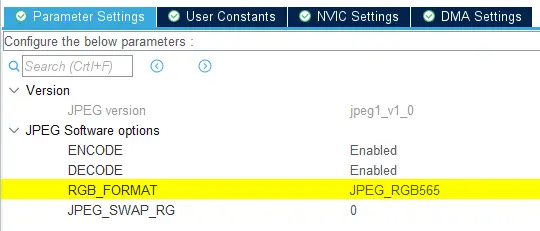
支援JPEG功能的STM32F7系列(例如STM32F769)的JPEG配置,與STM32H7系列略有不同。 RGB_FORMAT設定位於JPEG設定之中,必須遵循TouchGFX影像緩衝區JPEG_RGB565的像素格式,如以下範例所示。
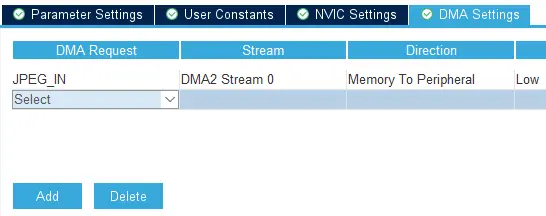
透過JPEG設定的DMA Settings (DMA設定)索引標籤,使用DMA傳輸資料至JPEG週邊設備(記憶體至週邊設備),以及由週邊設備傳輸資料(週邊設備至記憶體)。 為IN和OUT各添加一個DMA請求將自動設置方向參數。
本節總結了支援JPEG功能的STM32F7(例如STM32F769)上關於硬體解碼的TouchGFX HAL配置。 從STM32CubeMX生成程式碼後,在從Designer使用影像小工具時,應用程式將能夠使用JPEG外設解碼影像。
Caution
STM32H750-DK
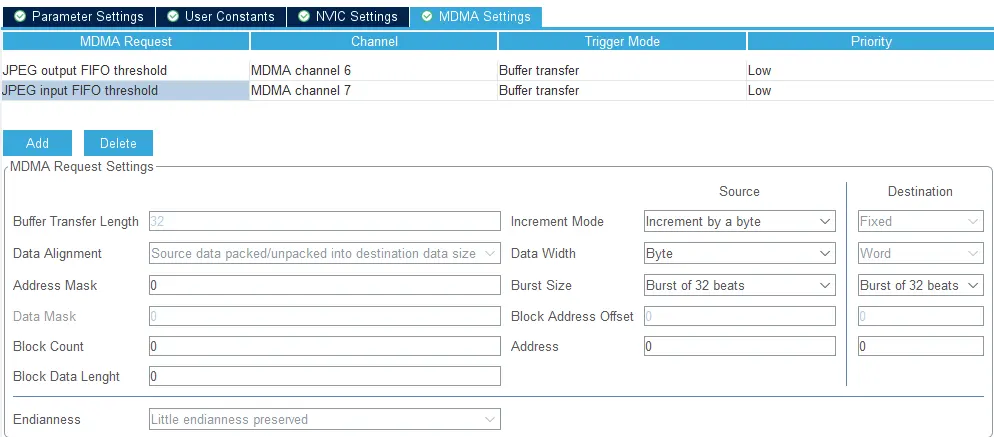
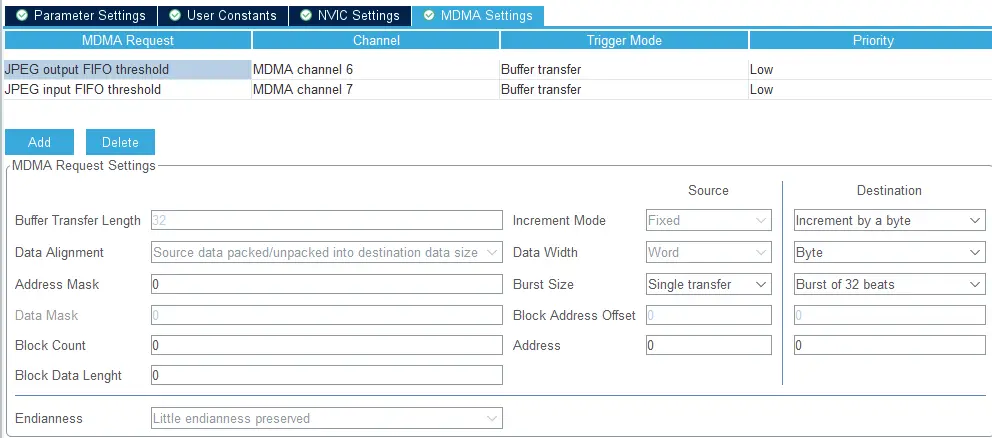
唯一能將(例如)STM32H750和STM32F769上的硬體解碼(支援JPEG)加以區分的因素是在STM32CubeMX中配置DMA傳輸的方式。 不僅UI不同,DMA概念也不同。
對於STM32H750,JPEG外設只能配置為使用MDMA外設(而不是常規DMA外設)。 為輸入和輸出FIFO閾值信號添加MDMA配置,如下圖所示。
Note
FileReader介面
當在非記憶體映射的記憶體上存儲MJPEG影像時,開發人員可以指定touchgfx::VideoDataReader的實現,TouchGFX影片控制器可以使用它將需要解碼的資料傳輸到配置的解碼器(軟體/硬體)。 下面是此介面的簡單範例,它將影像資料從一個緩衝區複製到另一個緩衝區。
VideoView.cpp
class MyReader : public touchgfx::VideoDataReader
{
public:
    MyReader() : position(0) { }
    virtual uint32_t getDataLength() { return video_len; }
    virtual void seek(uint32_t pos) { position = pos; }
    virtual bool readData(void* dst, uint32_t bytes)
    {
        memcpy(dst, &video_data[position], bytes);
        position += bytes;
        return true;
    }
    private:
        uint32_t position;
} myReader;
開發人員可以配置小工具以使用資料讀取器,而不是將一個影像小工具指向映射記憶體中的影像開始部分:
VideoView.cpp
video.setVideoData(myReader);
遷移TBS,以影片解碼
如果您要轉移由TouchGFX開發板設定(TBS)建立的專案,使用支援影片解碼的MCU,而當時使用的TouchGFX Designer版本尚未支援影片解碼功能,且您希望能在TouchGFX Designer之中於該專案使用「Run Target」(執行目標),就必須對GCC Makefile進行手動變更。
以下部分將列出所需的變更、以及進行變更的原因。 其中有一些一定要套用的一般變更,此外還有一些LibJPEG (軟體解碼)及JPEG (硬體解碼)專屬變更,需視開發人員的應用程式用途而定。 這些更改是對舊TBS中已經存在的GCC Makefile的擴展。
如上述場景所述,除了更新Makefile,您還必須在STM32CubeMX中設置影片解碼。
一般變更
定義您專案中的LIBJPEG路徑:
# LibJPEG path
libjpeg_path := $(cubemx_middlewares_path)/Third_Party/LibJPEG
然後必須定義影片資產輸入路徑:
asset_texts_input  := TouchGFX/assets/texts

asset_videos_input := TouchGFX/assets/videos
影片資產輸出路徑也必須定義在現有資產輸出路徑下面:
asset_images_output := $(asset_root_path)/images
asset_fonts_output := $(asset_root_path)/fonts
asset_texts_output := $(asset_root_path)/texts
asset_videos_output := $(asset_root_path)/videos
將影片輸出資產添加到元件清單中:
all_components := $(components) \
    $(asset_fonts_output) \
    $(asset_images_output) \
    $(asset_texts_output)
    $(asset_texts_output) \
    $(asset_videos_output)
必須定義影片目的檔。 影片目的檔案與已經存在的物件分離:
c_source_files := $(call find, $(source_paths),*.c) $(os_source_files) $(board_c_files)
source_files += $(board_cpp_files)

video_object_files := $(call find, $(asset_videos_output),*.o)
必須定義到影片轉換器腳本的路徑
textconvert_script_path := $(touchgfx_path)/framework/tools/textconvert
textconvert_executable := $(call find, $(textconvert_script_path), *.rb)
videoconvert_script_path := $(touchgfx_path)/framework/tools/videoconvert
可以新增一個選用的echo,以查看所有影片目的檔案。 影片目的檔必須添加到連結階段。 該行將$(video_object_files) 和其他目的檔加在一起:
$(binary_output_path)/$(target_executable): $(object_files) $(object_asm_files)
    @echo Video Objects: $(video_object_files)
    @echo Linking $(@)
    @mkdir -p $(@D)
    @mkdir -p $(object_output_path)
    @$(file >$(build_root_path)/objects.tmp) $(foreach F,$(object_files) $(video_object_files),$(file >>$(build_root_path)/objects.tmp,$F))
將影片規則添加到現有資產和.PHONY:
_assets_: BitmapDatabase TextKeysAndLanguages Videos

.PHONY: BitmapDatabase TextKeysAndLanguages Videos
添加影片轉換後,接著添加影片規則:
Videos:
    @ruby $(videoconvert_script_path)/videoconvert.rb $(asset_videos_input) $(asset_videos_output)
最後更新清除規則,也刪除與影片相關的輸出。
_clean_:
    @echo Cleaning: $(board_name)
    @rm -rf $(build_root_path)
    # Do not remove gui_generated
    @rm -rf $(asset_images_output)
    @rm -rf $(asset_fonts_output)
    @rm -rf $(asset_texts_output)
    @rm -rf $(asset_videos_output)
    # Create directory to avoid error if it does not exist
    @mkdir -p $(asset_root_path)
    # Remove assets folder if it is empty (i.e. no gui_generated folder)
    @rmdir --ignore-fail-on-non-empty $(asset_root_path)
    # Clean bootloader project
    @$(MAKE) -r -f ExtMem_Boot/gcc/Makefile -s $(MFLAGS) clean
軟體變更
添加所有LIBJPEG路徑到包括路徑:
include_paths := $(library_includes) \
    $(foreach comp, $(all_components), $(comp)/include) \
    $(foreach comp, $(cubemx_components), $(comp)/Inc) \
    $(foreach comp, $(touchgfx_generator_components), $(comp)/generated) \
    $(framework_includes) \
    $(cubemx_middlewares_path) \
    $(touchgfx_middlewares_path) \
    $(touchgfx_generator_components) \
    LIBJPEG/Target \
    $(libjpeg_path)/include \
    LIBJPEG/App
必須定義LIBJPEG源路徑:
c_source_files := $(call find, $(source_paths),*.c) $(os_source_files) $(board_c_files)
source_files += $(board_cpp_files)

libjpeg_source_path = Middlewares/Third_Party/LibJPEG/source
接下來,所有LIBJPEG原始檔案必須添加到board_c_files:
board_c_files := \
    $(Drivers_path)/BSP/STM32H750B-DK/stm32h750b_discovery_bus.c \
    $(Drivers_path)/BSP/STM32H750B-DK/stm32h750b_discovery_qspi.c \
    $(Drivers_path)/BSP/STM32H750B-DK/stm32h750b_discovery_sdram.c \
    $(Drivers_path)/BSP/STM32H750B-DK/stm32h750b_discovery_ts.c \
    $(Drivers_path)/BSP/Components/ft5336/ft5336.c \
    $(Drivers_path)/BSP/Components/ft5336/ft5336_reg.c \
    $(Drivers_path)/BSP/Components/mt25tl01g/mt25tl01g.c \
    $(Drivers_path)/BSP/Components/mt48lc4m32b2/mt48lc4m32b2.c \
    $(libjpeg_source_path)/jaricom.c \
    $(libjpeg_source_path)/jcomapi.c \
    $(libjpeg_source_path)/jdapimin.c \
    $(libjpeg_source_path)/jdapistd.c \
    $(libjpeg_source_path)/jdarith.c \
    $(libjpeg_source_path)/jdatasrc.c \
    $(libjpeg_source_path)/jdcoefct.c \
    $(libjpeg_source_path)/jdcolor.c \
    $(libjpeg_source_path)/jddctmgr.c \
    $(libjpeg_source_path)/jdhuff.c \
    $(libjpeg_source_path)/jdinput.c \
    $(libjpeg_source_path)/jdmainct.c \
    $(libjpeg_source_path)/jdmarker.c \
    $(libjpeg_source_path)/jdmaster.c \
    $(libjpeg_source_path)/jdmerge.c \
    $(libjpeg_source_path)/jdpostct.c \
    $(libjpeg_source_path)/jdsample.c \
    $(libjpeg_source_path)/jdtrans.c \
    $(libjpeg_source_path)/jerror.c \
    $(libjpeg_source_path)/jidctflt.c \
    $(libjpeg_source_path)/jidctfst.c \
    $(libjpeg_source_path)/jidctint.c \
    $(libjpeg_source_path)/jmemmgr.c \
    $(libjpeg_source_path)/jmemnobs.c \
    $(libjpeg_source_path)/jquant1.c \
    $(libjpeg_source_path)/jquant2.c \
    $(libjpeg_source_path)/jutils.c \
    LIBJPEG/App/libjpeg.c
然後將LIBJPEG原始檔案添加到現有的目的檔案中,方法與其他中介軟體原始檔案相同:
# Start converting paths
object_files := $(object_files:$(touchgfx_path)/%.cpp=$(object_output_path)/touchgfx/%.o)
object_files := $(object_files:%.cpp=$(object_output_path)/%.o)
object_files := $(object_files:$(touchgfx_middlewares_path)/%.c=$(object_output_path)/$(touchgfx_middlewares_path)/%.o)
object_files := $(object_files:$(cubemx_middlewares_path)/%.c=$(object_output_path)/$(cubemx_middlewares_path)/%.o)
object_files := $(object_files:$(libjpeg_source_path)/%.c=$(object_output_path)/$(libjpeg_source_path)/%.o)
object_files := $(object_files:$(Drivers_path)/%.c=$(object_output_path)/Drivers/%.o)
object_files := $(object_files:%.c=$(object_output_path)/%.o)
硬體變更
添加所有JPEG路徑到包括路徑:
include_paths := $(library_includes) \
    $(foreach comp, $(all_components), $(comp)/include) \
    $(foreach comp, $(cubemx_components), $(comp)/Inc) \
    $(foreach comp, $(touchgfx_generator_components), $(comp)/generated) \
    $(framework_includes) \
    $(cubemx_middlewares_path) \
    $(touchgfx_middlewares_path) \
    $(touchgfx_generator_components) \
    Utilities/JPEG
接下來,所有JPEG原始檔案必須添加到board_c_files:
board_c_files := \
    $(Drivers_path)/BSP/STM32H750B-DK/stm32h750b_discovery_bus.c \
    $(Drivers_path)/BSP/STM32H750B-DK/stm32h750b_discovery_qspi.c \
    $(Drivers_path)/BSP/STM32H750B-DK/stm32h750b_discovery_sdram.c \
    $(Drivers_path)/BSP/STM32H750B-DK/stm32h750b_discovery_ts.c \
    $(Drivers_path)/BSP/Components/ft5336/ft5336.c \
    $(Drivers_path)/BSP/Components/ft5336/ft5336_reg.c \
    $(Drivers_path)/BSP/Components/mt25tl01g/mt25tl01g.c \
    $(Drivers_path)/BSP/Components/mt48lc4m32b2/mt48lc4m32b2.c \
    Utilities/JPEG/jpeg_utils.c
將影片緩衝區置於外部記憶體中
開發人員使用STM32CubeMX建立新專案時,與產生專案相關聯的連結器指令碼,不包含TouchGFX任何可能使用的區域。 因此,用於解碼MJPEG影片的特定緩衝區被連結器放置在內部flash中,直至開發人員修改他們的連結器腳本,將緩衝區放置到其他地方。 如果沒有這樣的修改,開發人員將會遇到大量內部存儲被使用的情況,可能無法容納大一點的影片緩衝區,比如全螢幕影片解碼所需的緩衝區。
Tip
- STM32F746-DISCO
- STM32F769-DISCO
- STM32H750-DK
啟用影片解碼以後,TouchGFX Generator生成用於JPEG解碼的RGB緩衝區的定義。 該定義是用一個位置指示來實現的,它告訴連結器應該將緩衝區放在哪個部分。 如果連結器在連結器腳本中找不到該存儲區域,緩衝區將被放在內部存儲中。
LOCATION_PRAGMA_NOLOAD("Video_RGB_Buffer")
uint32_t videoRGBBuffer[57600] LOCATION_ATTRIBUTE_NOLOAD("Video_RGB_Buffer");
下面特定於編譯器的子章節描述了開發人員可以進行的修改,以實現在SDRAM中放置緩衝區。 Video_RGB_Buffer表示用於影片解碼的緩衝區。 連結器腳本範例在SDRAM中為TouchGFX影像緩衝區保留了一些空間(從0xC0000000開始)。
- EWARM
- STM32CubeIDE
- MDK-ARM
Further reading
下面的例子都在STM32F746G-DISCO板(0xC0000000->0xC00FF000)上的SDRAM開始部分保留了一些空間,允許應用程式通過位址(例如0xC0000000)引用影像緩衝區,而不存在連結器覆寫影像緩衝區資料的風險。 每個範例都允許連結器將Video_RGB_Buffer放入已定義的SDRAM區域。
Tip
EWARM (IAR)
stm32f746xx_flash.icf
define symbol __ICFEDIT_region_SDRAM_start__   = 0xC00FF000;
define symbol __ICFEDIT_region_SDRAM_end__     = 0xC0700FFF;

define region SDRAM_region    = mem:[from __ICFEDIT_region_SDRAM_start__ to __ICFEDIT_region_SDRAM_end__];

place in SDRAM_region    { first section Video_RGB_Buffer };
連結之後,EWARM\STM32F746G_DISCO\List\STM32F746G_DISCO.map包含Video_RGB_Buffer的以下放置資訊:
STM32F746G_DISCO.map
Video_RGB_Buffer        zero     0xc00f'f000   0x3'8400  TouchGFXGeneratedHAL.o [2]
                               - 0xc013'7400   0x3'8400
STM32CubeIDE
STM32F746NGHX_FLASH.ld
MEMORY
{
  ...
  SDRAM      (xrw)    : ORIGIN = 0xC00FF000,   LENGTH = 8M
}

BufferSection (NOLOAD) :
{
  *(Video_RGB_Buffer Video_RGB_Buffer.*)
  *(.gnu.linkonce.r.*)
  . = ALIGN(0x4);
} >SDRAM
編譯之後,STM32CubeIDE\Debug\STM32F746G_DISCO.map 包含Video_RGB_Buffer的以下放置資訊:
STM32F746G_DISCO.map
BufferSection   0x00000000c00ff000    0x1c200
 *(Video_RGB_Buffer Video_RGB_Buffer.*)
 Video_RGB_Buffer
                0x00000000c00ff000    0x1c200 Application/User/TouchGFX/target/generated/TouchGFXGeneratedHAL.o
                0x00000000c00ff000                videoRGBBuffer
MDK-ARM (Keil)
STM32F746G_DISCO.sct
LR_IROM1 0x08000000 0x00200000  {    ; load region size_region
  ER_IROM1 0x08000000 0x00200000  {  ; load address = execution address
    *.o (RESET, +First)
    *(InRoot$$Sections)
    .ANY (+RO)
  }
  RW_IRAM1 0x20000000 0x00050000  {  ; RW data
    .ANY (+RW +ZI)
  }
  RW_SDRAM 0xC00FF000 UNINIT 0xC0700FFF  {
    *.o (Video_RGB_Buffer)
  }
}
請務必在儲存影片緩衝區的區段中加入UNINIT屬性。 這樣可確保留下記憶體區域作為未初始化資料。 連結之後,MDK-ARM\STM32F746G_DISCO\STM32F746G_DISCO.map包含Video_RGB_Buffer的以下放置資訊:
STM32F746G_DISCO.map
Video_RGB_Buffer 0xc00ff000 Section 115200 touchgfxgeneratedhal.o(Video_RGB_Buffer)
