Code Structure
This section explains the structure of a TouchGFX project - from the code generated by TouchGFX Designer to the extending code written by the user.
Generated Code vs. User Code
The code generated by TouchGFX Designer will be completely separate from the code written by the user. In fact, the generated code is placed in the folder generated/gui_generated, whereas the handwritten code is placed in the gui folder.
The gui_generated code serves as base classes for user code classes. The base classes contain all the setup code configured in TouchGFX Designer. The following class diagram shows the relationship of the classes:
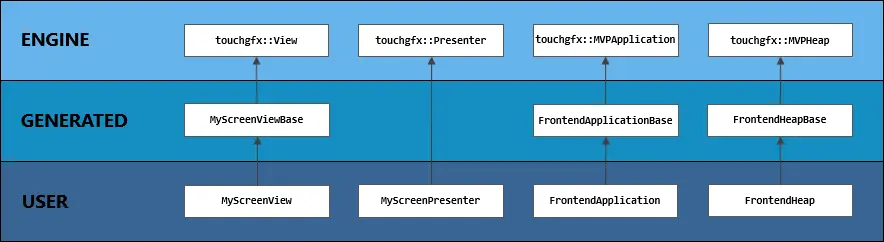
Class hierarchy of engine, generated and user classes
As shown above, TouchGFX Designer applications consist of 3 different layers of code:
- Engine: these classes are the standard classes provided by TouchGFX. These act as base classes for the generated classes.
- Generated: these classes and corresponding files will be regenerated whenever TouchGFX Designer generates code. Therefore, these classes and files should not be edited manually, as any manual changes will be overwritten on the next run of the code generator. These classes are base classes for the user classes.
- User: these classes are intended for handwritten code. The user is free to put any code in this layer. The user classes will be generated if not present, but will never be altered by TouchGFX Designer. They belong to the user.
Note
Files Generated by TouchGFX Designer
As a rule, TouchGFX Designer will only regenerate files within the generated folder in a TouchGFX project and it is therefore important that you do not manually edit these, as they will be overwritten. However, TouchGFX Designer can also generate missing files needed for compilation, e.g. application.config, simulator/main.cpp, skin images located in assets/images/__designer and sample videos located in assets/videos/__designer. In actuality, TouchGFX Designer only needs the following to be able to generate, compile and run a project:
- The
.touchgfxfile describing the project - User code (if any) located in the
guifolder - User images (if any) located in the
assets/imagesfolder - Texts (if any) located in the
assets/texts/texts.xmlfile - Fonts (if any) located in the
assets/fontsfolder - Videos (if any) located in the
assets/videosfolder
Tip
Example
A simple example of an application having both generated and user code will be given below. This should illustrate the aspects above in more detail.
TouchGFX Designer View
The following example has just one screen. The screen MyScreen consists of a Box box1 and a Button button1. We have set up an interaction to call the virtual function setRandomColor() when button1 is clicked.
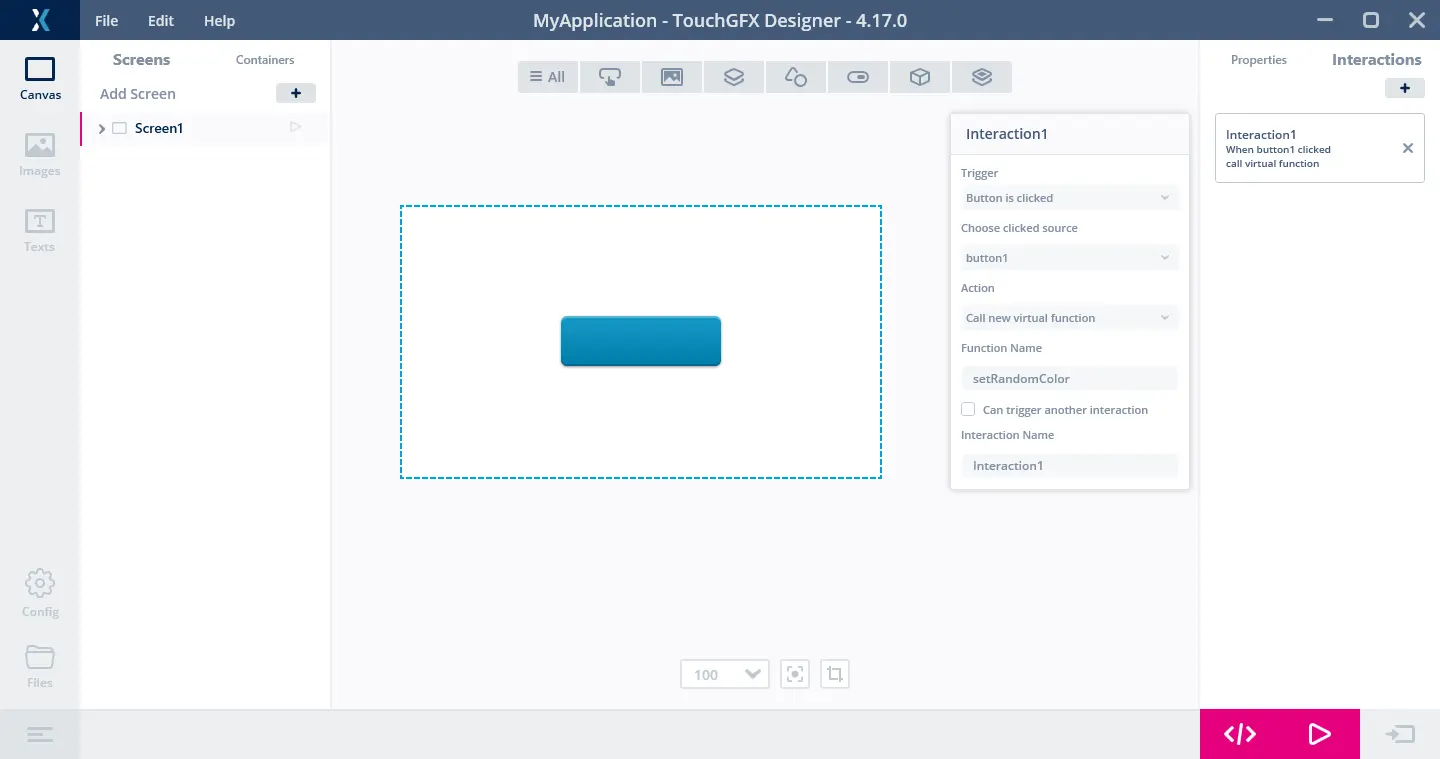
TouchGFX Designer application
Whenever we press the button we would like to change the color of the background box to a new random color. To demonstrate how to write your own custom code, we will implement this behavior in user code.
Layers
The different classes involved in this example can be seen below:
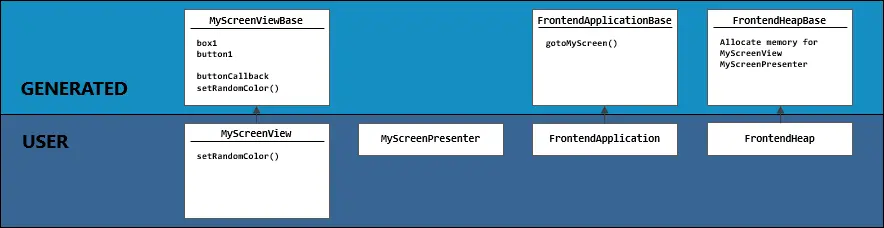
Example classes
We see that:
MyScreenViewBase,FrontendApplicationBaseandFrontendHeapBaseare in the generated space, implying that:- They will be regenerated whenever a change is made in TouchGFX Designer
- The user should not manually edit these classes
MyScreenView,MyScreenPresenter,FrontendApplicationandFrontendHeapare created in the user code space, meaning that:- These will not be regenerated when changes are made in TouchGFX Designer
- The user is free to add custom code here
- All the setup of
box1andbutton1is done in the generated view base classMyScreenViewBase. - All the functions for transitioning between screens are in the generated application base class
FrontendApplicationBase. - All the book keeping, making sure that the right amount of memory is allocated, is located in the generated heap base class
FrontendHeapBase.
The user is free to edit the user code classes. For instance you could add more widgets. For now we will just implement the setRandomColor function to actually change the color of box1.
Code
Looking at the view base code, we see the setup of the box and button generated by TouchGFX Designer. We also see the setup of and the call to the virtual function setRandomColor in the buttonCallbackHandler, but at the moment this function does not do anything:
MyApplication/generated/gui_generated/src/my_screen/MyScreenViewBase.cpp
/*********************************************************************************/
/********** THIS FILE IS GENERATED BY TOUCHGFX DESIGNER, DO NOT MODIFY ***********/
/*********************************************************************************/
#include <gui_generated/myscreen_screen/MyScreenViewBase.hpp>
#include <touchgfx/Color.hpp>
#include "BitmapDatabase.hpp"

MyScreenViewBase::MyScreenViewBase() :
    buttonCallback(this, &MyScreenViewBase::buttonCallbackHandler)
{
    box1.setPosition(0, 0, 800, 480);
    box1.setColor(touchgfx::Color::getColorFromRGB(255, 255, 255));

    button1.setXY(155, 106);
    button1.setBitmaps(touchgfx::Bitmap(BITMAP_BLUE_BUTTONS_ROUND_EDGE_SMALL_ID), touchgfx::Bitmap(BITMAP_BLUE_BUTTONS_ROUND_EDGE_SMALL_PRESSED_ID));
    button1.setAction(buttonCallback);

    add(box1);
    add(button1);
}

void MyScreenViewBase::setupScreen()
{

}

void MyScreenViewBase::buttonCallbackHandler(const touchgfx::AbstractButton& src)
{
    if (&src == &button1)
    {
        //Interaction1
        //When button1 clicked call virtual function
        //Call setRandomColor
        setRandomColor();
    }
}
Looking at the header file for the view base class, we see the declaration of setRandomColor and an instruction to override and implement the function in user code:
MyApplication/generated/gui_generated/src/my_screen/MyScreenViewBase.hpp
/*********************************************************************************/
/********** THIS FILE IS GENERATED BY TOUCHGFX DESIGNER, DO NOT MODIFY ***********/
/*********************************************************************************/
#ifndef MYSCREENVIEWBASE_HPP
#define MYSCREENVIEWBASE_HPP

#include <gui/common/FrontendApplication.hpp>
#include <mvp/View.hpp>
#include <gui/myscreen_screen/MyScreenPresenter.hpp>
#include <touchgfx/widgets/Box.hpp>
#include <touchgfx/widgets/Button.hpp>

class MyScreenViewBase : public touchgfx::View<MyScreenPresenter>
{
public:
    MyScreenViewBase();
    virtual ~MyScreenViewBase() {}
    virtual void setupScreen();

    /*
     * Virtual Action Handlers
     */
    virtual void setRandomColor()
    {
        // Override and implement this function in MyScreen
    }

protected:
    FrontendApplication& application() {
        return *static_cast<FrontendApplication*>(touchgfx::Application::getInstance());
    }

    /*
     * Member Declarations
     */
    touchgfx::Box box1;
    touchgfx::Button button1;

private:

    /*
     * Callback Declarations
     */
    touchgfx::Callback<MyScreenViewBase, const touchgfx::AbstractButton&> buttonCallback;

    /*
     * Callback Handler Declarations
     */
    void buttonCallbackHandler(const touchgfx::AbstractButton& src);

};

#endif // MYSCREENVIEWBASE_HPP
So let's do just that. Navigate to the user code header file MyScreenView.hpp and override the function:
MyApplication/generated/gui_generated/src/my_screen/MyScreenView.hpp
#ifndef MYSCREENVIEW_HPP
#define MYSCREENVIEW_HPP

#include <gui_generated/myscreen_screen/MyScreenViewBase.hpp>
#include <gui/myscreen_screen/MyScreenPresenter.hpp>

class MyScreenView : public MyScreenViewBase
{
public:
    MyScreenView();
    virtual ~MyScreenView() {}
    virtual void setupScreen();
    virtual void tearDownScreen();
    virtual void setRandomColor();
protected:
};

#endif // MYSCREENVIEW_HPP
Then we need to implement the actual behavior of setRandomColor in the cpp file for MyScreenView:
MyApplication/gui/src/my_screen/MyScreenView.cpp
#include <gui/myscreen_screen/MyScreenView.hpp>
#include <touchgfx/Color.hpp>
#include <stdlib.h>

MyScreenView::MyScreenView()
{

}

void MyScreenView::setupScreen()
{
    MyScreenViewBase::setupScreen();
}

void MyScreenView::tearDownScreen()
{
    MyScreenViewBase::tearDownScreen();
}

void MyScreenView::setRandomColor()
{
    box1.setColor(touchgfx::Color::getColorFromRGB(rand()&0xff, rand()&0xff, rand()&0xff));
    box1.invalidate();
}
Running the simulator now shows that we have succeeded in creating a simple application utilizing both generated and user code - the background box now changes to a random color everytime you click the button.
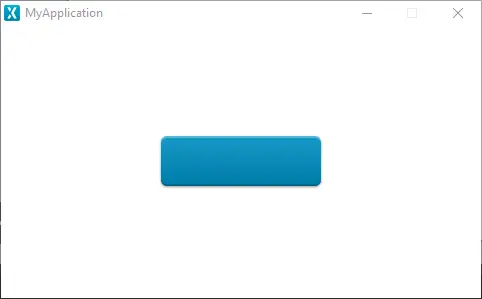
Simulator showcasing the application
Tip
It is also possible to mix and match. For example, you can have screens that are not defined within the TouchGFX Designer project. You can add the
gotoXYZ functions to the FrontendApplication class and add the views, presenters and transitions you need for your screen to the FrontendHeap.