SPI
The following scenario shows, generally, the steps involved in creating a TouchGFX driver when selecting "Custom" display interface in the TouchGFX generator using SPI. The steps involved are similar to that of other display interfaces where the MCU lacks an embedded display controller, e.g. through FMC over an Intel 8080 interface.
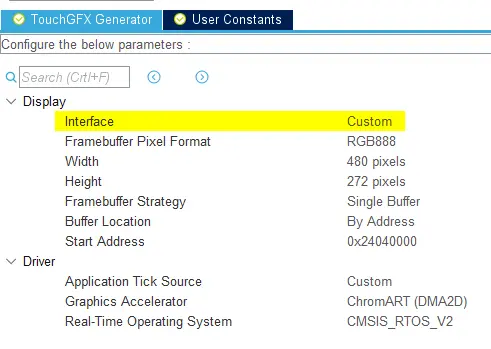
Once the SPI peripheral is configured in CubeMX the TouchGFX Generator can be used to generate a HAL, using a "custom" display interface, that allows developers to transfer the updated parts of the framebuffer to a connected display using a proprietary driver that developers write themselves. Figure X shows a TouchGFX Generator configuration in which selecting Custom display interface will allow the generated code to support the transfer of the updated parts of the framebuffer to the display.
Project activity
Generally, for displays with embedded GRAM such as 8080 or SPI displays, the driver is structured as follows:
- Based on area of the framebuffer to be redrawn, move the "display cursor" to a place in GRAM that matches this.
- GRAM에 입력되는 픽셀 데이터를 기록할 준비를 합니다.
- 픽셀 데이터를 전송합니다.
Transfering the framebuffer
When an area of the framebuffer has been updated, the TouchGFX Engine will call HAL::flushFrameBuffer.
React to signal (S?) from TouchGFX Engine.
void  TouchGFXHAL::flushFrameBuffer(const Rect& rect)
{
    /* Set Cursor */
    __ST7789H2_SetDisplayWindow(rect.x, rect.y, rect.width, rect.height);

    /* Prepare to write to LCD RAM */
    ST7789H2_WriteReg(ST7789H2_WRITE_RAM, (uint8_t*)NULL, 0);

    /* Send Pixels */
    this->copyFrameBufferBlockToLCD(rect);
}
아래의 __ST7789H2_SetDisplayWindow 함수는 GRAM을 사용하는 디스플레이에서 보통 그러하듯이 특정 레지스터에 기록하여 GRAM의 가상 "cursor"에 대한 x, y 좌표를 설정합니다.
extern "C"
void __ST7789H2_SetDisplayWindow(uint16_t Xpos, uint16_t Ypos, uint16_t Width, uint16_t Height)
{
    uint8_t   parameter[4];

    /* CASET: Column Address Set */
    parameter[0] = 0x00;
    parameter[1] = Xpos;
    parameter[2] = 0x00;
    parameter[3] = Xpos + Width - 1;
    ST7789H2_WriteReg(ST7789H2_CASET, parameter, 4);

    /* RASET: Row Address Set */
    parameter[0] = 0x00;
    parameter[1] = Ypos;
    parameter[2] = 0x00;
    parameter[3] = Ypos + Height - 1;
    ST7789H2_WriteReg(ST7789H2_RASET, parameter, 4);
}
아래의 TouchGFXHAL::copyFrameBufferBlockToLCD 함수는 업데이트된 영역(Rect)의 라인을 한번에 하나씩 전송하고 프레임 버퍼 포인터를 그에 맞게 진행되게 하는 비공개 함수입니다.
void TouchGFXHAL::copyFrameBufferBlockToLCD(const Rect rect)
{
    __IO uint16_t* ptr;
    uint32_t height;

    // Use default implementation (CPU copy!).
    // This can be accelerated using regular DMA hardware
    for (height = 0; height < rect.height ; height++)
    {
        ptr = getClientFrameBuffer() + rect.x + (height + rect.y)  * BSP_LCD_GetXSize();
        LCD_IO_WriteMultipleData((uint16_t*)ptr, rect.width);
    }
}
Returning from flushFrameBuffer
Once the function returns, TouchGFX Engine returns to its. If developers desire to use DMA to perform these transfers, then they must ensure that HAL::flushFrameBuffer(Rect& rect) does not return by waiting on a semaphore that is signaled by a DMA Completed interrupt.