Part 2 – Appearance of TextArea and Wildcard
To do this second part of tutorial 6, make sure you have done the first part. We will finish the implementation of the application started in the first part of the tutorial. First, we will see how to modify the textArea appearance and we will implement the "appearance" button. Then to finish we will implement the wildcards of the imformationTextArea.
Step 1: Change the appearance of the TextArea
In this section, we will see how to change the appearance of a TextArea using TouchGFX Designer and also through code. The idea would be to change the color of a text, change the line spacing for multi lined texts, and rotate the text. We will manipulate the descriptionTextArea named widget previously created.
TouchGFX Designer
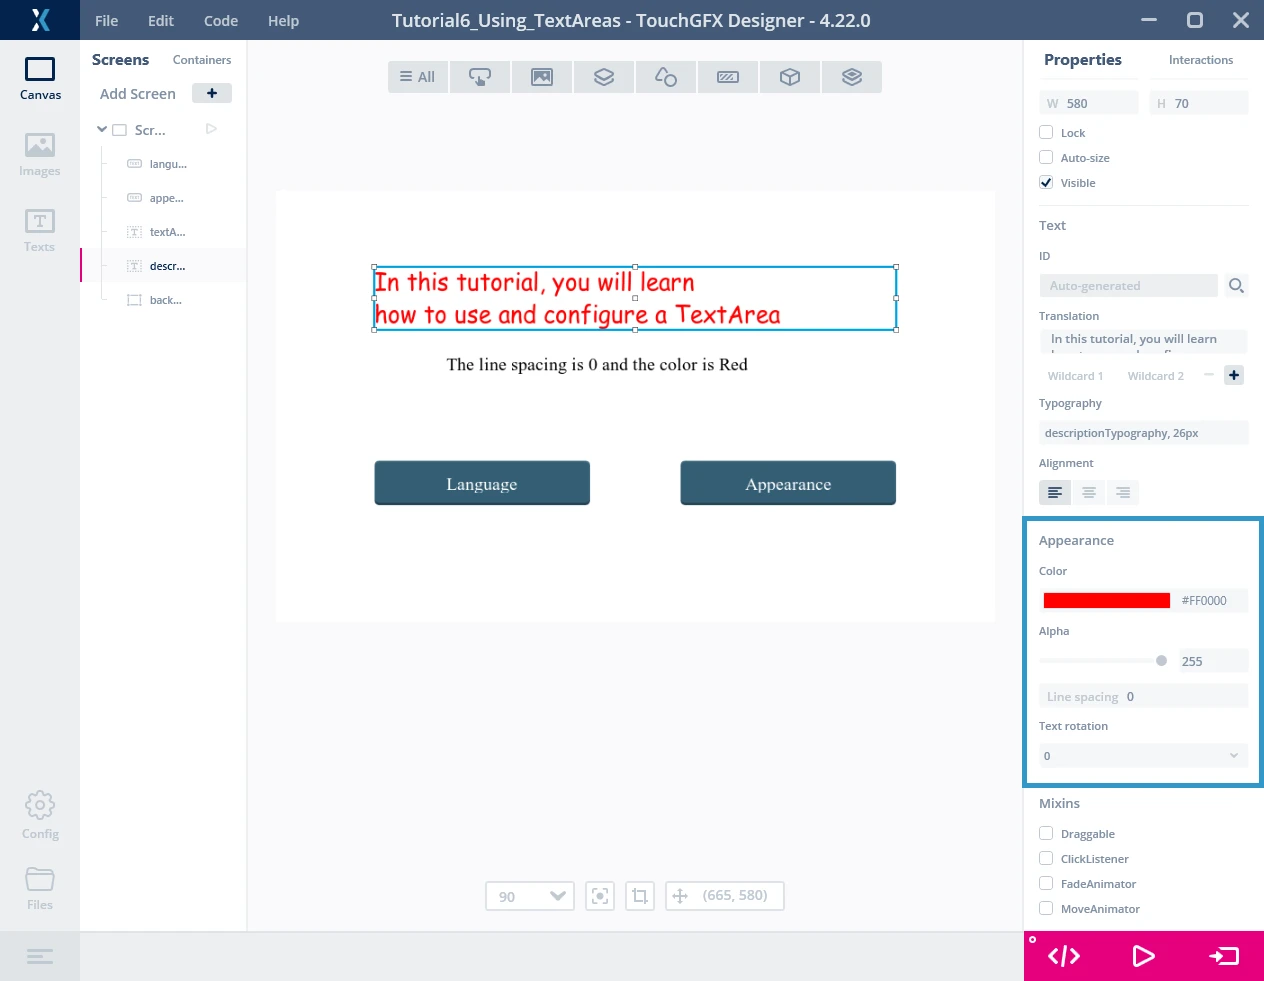
In TouchGFX Designer, when selecting a TextArea widget, you will be able to change the appearance under the “Properties” on the right panel. The first thing you can change is the color. You can either change the color with the color palette (just by clicking on a color) or, you can enter the hex color code if you know it already (for example #FF0000 for red). For this tutorial, we did select red color for desciptionTextArea (step 1 of part 1).
The second thing you can change through this “Appearance” section in TouchGFX Designer is the “Alpha” value. This is not something exclusive to TextAreas. Indeed, a lot of widgets let the user decide the alpha value (images for example). The alpha value can be defined as the transparency of an element. For example, let’s say you have a screen with 2 widgets on top of each other. If your widget on the foreground has an alpha value smaller than 255, you should be able to see your 2nd widget in the background through your 1st widget. If your foreground widget has 255 as alpha value, you should not be able to see your background widget. Let us keep an alpha value of 255 for the moment.
Then comes the “Line spacing” option. This parameter will influence the text only if it has multiple lines. It can be either positive, zero (default value), or a negative value. In case of a negative value, you’ll see the second line going upper and upper, and can even be above your first line. For this tutorial, put a value of 40 for line spacing.
Last parameter, the “Text rotating”. This value influences the orientation of the text. A value of 0 will show the text horizontally (default value). A 180 value is also horizontal but upside down. A value of 90 will show the text vertically and oriented to the right (top of the text on the right side). And lastly, a value of 270 will show the text vertically oriented to the left. For this tutorial we will use the default value, 0.
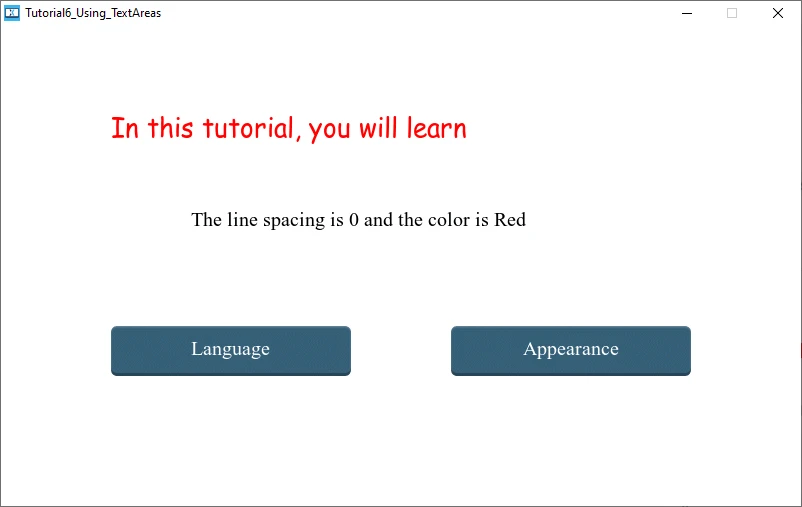
Now if you press on “Run Simulator” (F5 shortcut), you should see something which looks like this:
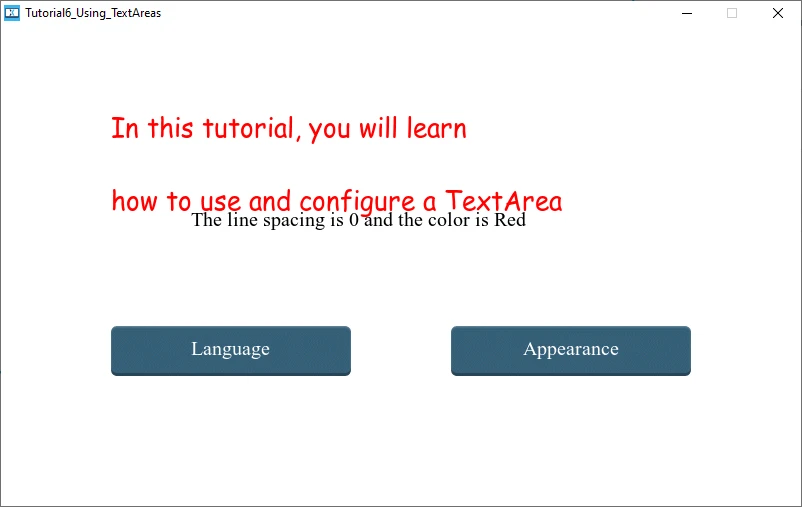
The reason you can’t see the second line is because your descriptionTextArea widget is too small to contain your text. So, go back to your canvas, and for this widget, under the “Location section”, check the box for “Auto-size”. Run on target once again, and you will now see the full text.
Code
Text Color
In this part, we will see how to change the appearance of the text through code. For that, we are going to use the function changeAppearance().
First, create the following interaction:
| Interaction | Properties |
|---|---|
| ChangeAppearance |
|
Press "Generate Code", the Designer will generate the specified virtual function.
We want to change the color of the text. We want it to be either red, blue or green, randomly. To be able to do that, we need to generate a random value between 0 and 2 and store it somewhere. So, go to your Screen1View.hpp file and let us declare an attribute of Screen1View.
class Screen1View : public Screen1ViewBase
{
public:
    ...
virtual void changeAppearance();

protected:
    ...
};
Now, let us add some code to get a random color value when pressing on the change Appearance button.
TouchGFX/gui/src/screen1_screen/Screen1View.cpp
void Screen1View::changeAppearance()
{   //Color
    int randomTextColor = rand()%3;
    switch (randomTextColor)
    {
    case 0:
        descriptionTextArea.setColor(touchgfx::Color::getColorFromRGB(255,0,0));
        break;
    case 1:
        descriptionTextArea.setColor(touchgfx::Color::getColorFromRGB(0,255,0));
        break;
    case 2:
        descriptionTextArea.setColor(touchgfx::Color::getColorFromRGB(0,0,255));
        break;
    }
}
You will notice that as the Tutorial 5, we are using the setColor() function to change the color of our text, the rand() function to get a random value and the touchgfx::Color::getColorFromRGB() function to get the wanted color. For more information about these functions, please refer to the API and the previous Tutorial.
Do not forget to add the needed include to be able to use the rand() and the getColorFromRGB() function:
#include <stdlib.h>
#include <touchgfx/Color.hpp>
Line Spacing
Let us change the line spacing now. We want it to be a random value between 0 and 20.
Add these lines in the changeAppearance() function:
TouchGFX/gui/src/screen1_screen/Screen1View.cpp
void Screen1View::changeAppearance()
{    ...
    int randomLineSpacing = rand()%21;
    descriptionTextArea.setLinespacing(randomLineSpacing);
}
Alpha value and Text Rotation
Let’s do the same thing to get a random alpha value (randomAlphaValue) and a random text rotation value (randomTextRotation).
At the end your code should look like this:
TouchGFX/gui/src/screen1_screen/Screen1View.cpp
void Screen1View::changeAppearance()
{   //Color
    int randomTextColor = rand()%3;
    switch (randomTextColor)
    {
    case 0:
        descriptionTextArea.setColor(touchgfx::Color::getColorFromRGB(255,0,0));
        break;
    case 1:
        descriptionTextArea.setColor(touchgfx::Color::getColorFromRGB(0,255,0));
        break;
    case 2:
        descriptionTextArea.setColor(touchgfx::Color::getColorFromRGB(0,0,255));
        break;
    }

    //Line spacing
    int randomLineSpacing = rand()%21;
    descriptionTextArea.setLinespacing(randomLineSpacing);

    //Alpha value
    int randomAlphaValue = rand()%256;
    descriptionTextArea.setAlpha(randomAlphaValue);

    //Text rotation
    int randomTextRotation = rand()%4;
    switch (randomTextRotation)
    {
    case 0:
        descriptionTextArea.setRotation(touchgfx::TextRotation::TEXT_ROTATE_0);
        break;
    case 1:
        descriptionTextArea.setRotation(touchgfx::TextRotation::TEXT_ROTATE_90);
      break;
    case 2:
        descriptionTextArea.setRotation(touchgfx::TextRotation::TEXT_ROTATE_180);
        break;
    case 3:
        descriptionTextArea.setRotation(touchgfx::TextRotation::TEXT_ROTATE_270);
        break;
    }
    descriptionTextArea.invalidate();
}
Other functions
The API for the TextArea is quite large and allows multiple manipulations on the text appearance. We can list for example the setIndentation() function which adds an indentation on the first line of a text or the setBaselineY() function which adjusts the TextArea “y” coordinate to have its baseline at the specified value. Feel free to explore the API, try functions, and see the impact on the code 😉.
Step 2: Use wildcards
In this part, we will learn how to change text of a TextArea during runtime. That's possible through wildcards.
We are going to use the informationTextArea component to display the size and the color of the text inside the descriptionTextArea.
Add Line spacing value
At first, we will get the line spacing value and assign it to the first wildcard of the informationTextArea. To do this we will add the following line of code at the end of your changeAppearance() function:
TouchGFX/gui/src/screen1_screen/Screen1View.cpp
void Screen1View::changeAppearance()
{
    ...
    Unicode::snprintf(informationTextAreaBuffer1, INFORMATIONTEXTAREABUFFER1_SIZE, "%d", randomLineSpacing);
    informationTextArea.invalidate();
}
The snprintf() function formats and stores a series of characters and values in the array buffer. The string is formatted as when using standard printf.
informationTextAreaBuffer1 -> it is the 1st Buffer for the formatted string of the informationTextArea. It is automatically generated by Designer after clicking on generate code.
The digit at the end is either 1 or 2 and represents the number of the wildcard in the text (means that we have a maximum of 2 wildcards per TextAreas).
INFORMATIONTEXTAREABUFFER1_SIZE -> It is the size of the buffer that we have specified when we created the wildcard on Designer.
"%d" -> Means that we are going to write in our string buffer something which is an integer type.
randomLineSpacing -> value of the line spacing created during step 4 (change appearance) (it’s the values to insert in the format string).
Now if you run the simulator, you can see that when you press the “Appearance” button the line spacing value changes depending on the line spacing.
Add Color name
Finally, we will get the color of the descriptionTextArea and fill the second wildcard of the informationTextArea according to this color. To do this, we will first create texts for each color. Here red, green, and blue. Once these texts are created, we will assign the texts to the second wildcard of the informationTextArea according to this color.
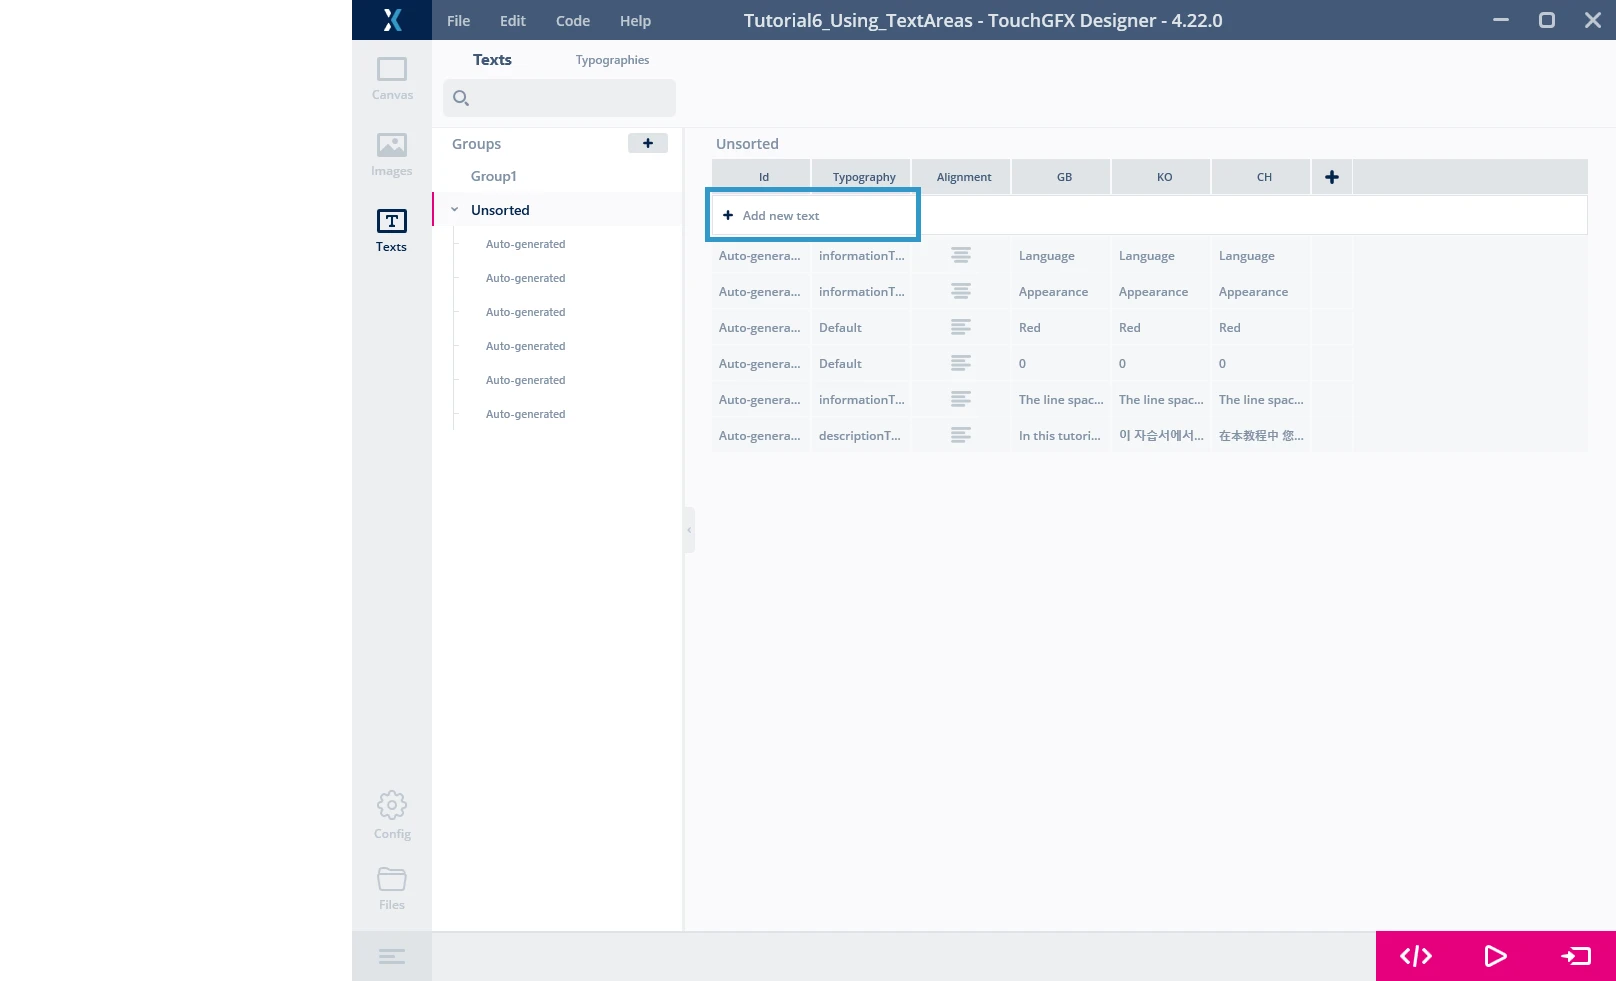
Go back to Designer to the Texts tab in texts. Click on “+ Add new text”. Replace the following values:
| Id | Typography | Alignment | GB | KO | CH |
|---|---|---|---|---|---|
| ColorG | informationTextArea | Left | Green | Green | Green |
Create in the same way the two other texts:
| Id | Typography | Alignment | GB | KO | CH |
|---|---|---|---|---|---|
| ColorR | informationTextArea | Left | Red | Red | Red |
| ColorB | informationTextArea | Left | Blue | Blue | Blue |
After creating the texts, we can use them to fill second wildcard of the informationTextArea. For this we will use the strncpy function as follow:
Unicode::strncpy(informationTextAreaBuffer2, TypedText(T_COLORR).getText(), INFORMATIONTEXTAREABUFFER2_SIZE);
The function strncpy copies n characters of a string to a destination buffer.
informationTextAreaBuffer2 -> it is the destination buffer (second wildcard of the informationTextArea).
T_COLORR -> it is an enum value of the text we just have created in TouchGFX Designer. You can see all the enums of texts in the TextKeysAndLanguages.hpp file. It's automatically generated by Designer after clicking on generate code.
TypedText(T_COLORR).getText() -> TypedText(T_COLORRR) will get the object and getText() will get the text associated to this object.
INFORMATIONTEXTAREABUFFER2_SIZE -> it is the maximum number of chars to copy. Here, it is the size of the second wildcard of the informationTextArea.
To conclude, add the last missing lines to the code:
TouchGFX/gui/src/screen1_screen/Screen1View.cpp
void Screen1View::changeAppearance()
{   //Color
    int randomTextColor = rand()%3;
    switch (randomTextColor)
    {
    case 0:
        descriptionTextArea.setColor(touchgfx::Color::getColorFromRGB(255,0,0));
        Unicode::strncpy(informationTextAreaBuffer2, TypedText(T_COLORR).getText(), INFORMATIONTEXTAREABUFFER2_SIZE);
        break;
    case 1:
        descriptionTextArea.setColor(touchgfx::Color::getColorFromRGB(0,255,0));
        Unicode::strncpy(informationTextAreaBuffer2, TypedText(T_COLORG).getText(), INFORMATIONTEXTAREABUFFER2_SIZE);
        break;
    case 2:
        descriptionTextArea.setColor(touchgfx::Color::getColorFromRGB(0,0,255));
        Unicode::strncpy(informationTextAreaBuffer2, TypedText(T_COLORB).getText(), INFORMATIONTEXTAREABUFFER2_SIZE);
        break;
    }
    informationTextArea.invalidate();
    ...
}
Do not forget to add the needed include to be able to use the TypedText() function:
#include <texts/TextKeysAndLanguages.hpp>
Now if you run the application and press the button “Appearance” you can see the line spacing value and the name color changes depending on appearance of the descriptionTextArea.
This concludes tutorial 6.


