비디오 디코딩
This section shows how to configure the TouchGFX Generator to generate a TouchGFX HAL that has video decoding capabilities.
이 시나리오를 읽기 전에 먼저 TouchGFX의 MJPEG 비디오 사용에 대한 설명서와 비디오 위젯에 대한 설명서를 읽어보시기 바랍니다.
아래 시나리오는 TouchGFX HAL을 활성화하여 소프트웨어(LibJPEG)나 하드웨어(JPEG)를 통해 비디오 디코딩을 지원하는 방법을 자세히 설명한 것입니다. 하드웨어(JPEG) 디코딩을 지원하기 위한 STM32CubeMX 구성은 STM32F7과 다소 다르기 때문에 여기서는 STM32F7과 STM32H7을 모두 살펴보겠습니다.
Be sure to read all sections in this article before configuring the MCU for your specific project.
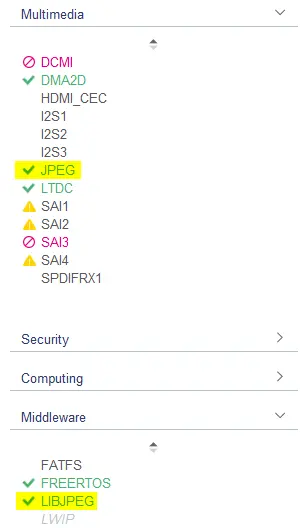
Generally, the LibJPEG and JPEG configurations can be found in STM32CubeMX in the Middleware and Multimedia catagories:
Tip
RTOS 지원
The Generator User Guide mentions that Single- and Double buffer decoding strategies require a CMSIS compliant RTOS, such as FreeRTOS. TouchGFX Generator generates an entry point function videoTaskFunc(), that must be associated with a Video decoding task. STM32CubeMX can generate this configuration by defining the task and entry point function in the Tasks and queues tab of the FreeRTOS Middleware configuration.
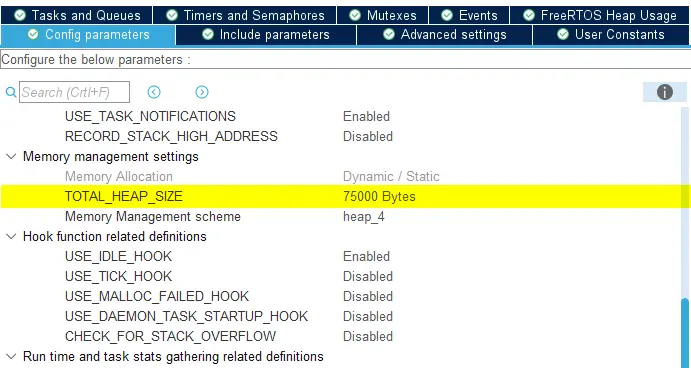
The video task stack size (defined in words for CMSIS V2) and RTOS heap size are two important factors.
For software decoding the stack size must be carefully set because LibJPEG uses dynamic memory allocation. For hardware decoding the stack size can be substantially lower because there is no software stack which dynamically allocates memory.
따라서 FreeRTOS 힙은 일반 애플리케이션 + 0xA000에 충분할 정도로 커야 합니다.
Based on the above configuration, STM32CubeMX generates the following code for the video task:
main.c
/* Definitions for VideoTask */
osThreadId_t VideoTaskHandle;
const osThreadAttr_t VideoTask_attributes = {
  .name = "VideoTask",
  .stack_size = 1000 * 4,
  .priority = (osPriority_t) osPriorityLow,
};
...
void main()
{
    ...
    /* creation of VideoTask */
    VideoTaskHandle = osThreadNew(videoTaskFunc, NULL, &VideoTask_attributes);
    ...
}
FreeRTOSConfig.h
#define configTOTAL_HEAP_SIZE ((size_t)75000)
소프트웨어 디코딩
The software decoding solution requires that the LibJPEG middleware is enabled from STM32CubeMX, as specified in Generator User Guide. 소프트웨어 디코딩 설정은 LibJPEG를 지원하는 MCU(예: STM32F4, STM32F7, STM32H7)에서 모두 동일합니다.
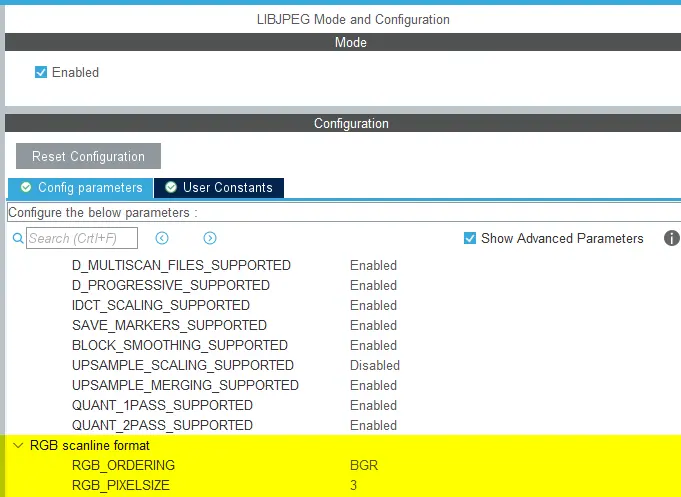
TouchGFX 소프트웨어 디코더는 LibJPEG에서 디코딩되는 데이터를 BGR 픽셀 순서로 설정합니다. 이 설정이 RGB로 남아 있다면 R 색상 성분과 B 색상 성분이 애플리케이션에서 서로 자리를 바꿉니다.
Furthermore, the size of each pixel should be 3 bytes if using a 16-bit or 24-bit video RGB buffer or 4 if using a 32-bit video RGB buffer.
Caution
비디오 데이터
Caution
아래 EWARM 프로젝트의 스니펫은 TouchGFX Designer에서 생성되는 추가 옵션을 비롯해 모든 TouchGFX 보드 패키지의 링커 스크립트에서 정의하는 ExtFlashSection에 데이터를 추가하는 방법을 나타낸 것입니다. 메모리 매핑이 되지 않는 플래시 또는 이 섹션을 정의하지 않는 프로젝트에서는 아래 스니펫이 유효하지 않습니다.
ewarm_project.ewp
        <option>
          <name>IlinkExtraOptions</name>
          <state>--image_input $PROJ_DIR$\..\TouchGFX\generated\videos\bin\washerdryer.bin,video_washerdryer_bin_start,ExtFlashSection,4</state>
          <state>--keep video_washerdryer_bin_start</state>
        </option>
메모리 매핑이 되지 않는 메모리에 비디오 데이터를 추가하는 프로젝트의 경우에는 이 설명서의 FileReader 섹션을 참조하십시오.
하드웨어 디코딩
The Generator User Guide mentions that the JPEG IP must be enabled in STM32CubeMX to enable Hardware decoding.
STM32F769-DISCO
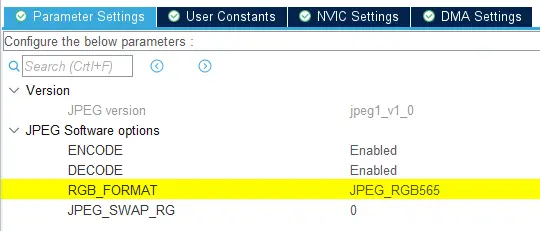
JPEG를 지원하는 STM32F7 시리즈(예: STM32F769)에서는 JPEG 구성이 STM32H7 라인과 다소 다릅니다. The RGB_FORMAT setting found in the JPEG configurations must respect the pixel format of the TouchGFX Framebuffer, JPEG_RGB565 in the example below.
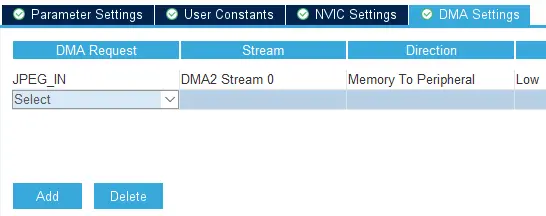
Use DMA to transfer data to (memory-to-peripheral) and from (peripheral-to-memory) the JPEG peripheral through the DMA Settings tab found in JPEG configurations. DMA 요청을 IN으로 추가하면 OUT 요청이 방향 매개변수를 자동으로 설정합니다.
이것으로 JPEG을 지원하는 STM32F7(예: STM32F769)에서 하드웨어 디코딩을 위한 TouchGFX HAL 구성이 끝났습니다. STM32CubeMX에서 코드 생성을 마치면 애플리케이션이 Designer에서 비디오 위젯을 사용할 때 JPEG 주변 장치로 비디오를 디코딩할 수 있습니다.
Caution
STM32H750-DK
예를 들어 STM32H750일 때 하드웨어 디코딩(JPEG 지원)이 STM32F769과 유일하게 다른 점은 STM32CubeMX에서 DMA 전송을 구성하는 방식입니다. UI는 물론이고 DMA 개념도 다릅니다.
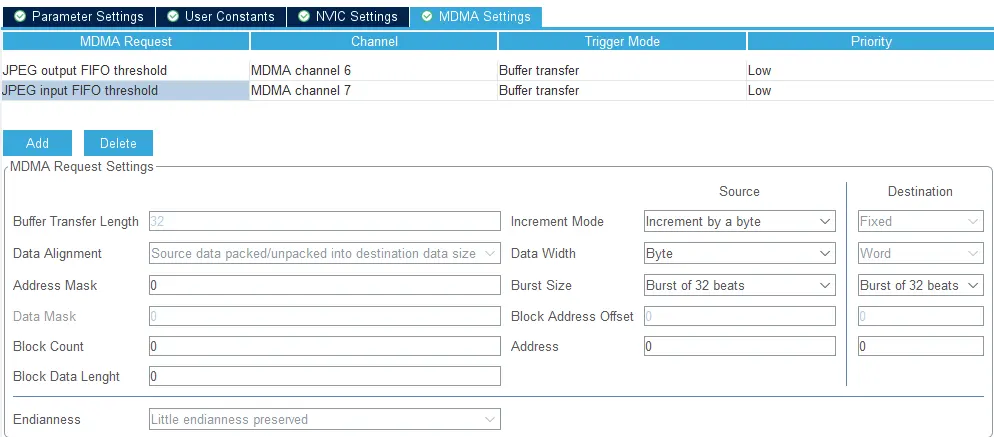
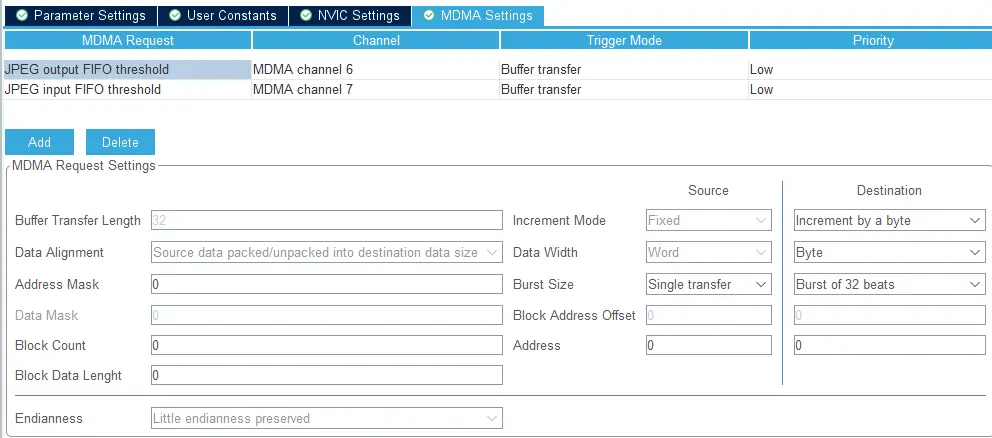
STM32H750의 경우에는 JPEG 주변 장치를 일반 DMA 주변 장치가 아닌 MDMA 주변 장치만 사용하도록 구성할 수 있습니다. 아래 이미지와 같이 input/output FIFO threshold 신호에 MDMA 구성을 추가하십시오.
Note
FileReader 인터페이스
개발자가 MJPEG 비디오를 메모리 매핑이 되지 않는 메모리에 저장하는 경우에는 TouchGFX 비디오 컨트롤러가 디코딩할 데이터를 구성된 디코더(소프트웨어/하드웨어)로 전달할 때 사용할 touchgfx::VideoDataReader 구현체를 지정할 수 있습니다. 아래는 비디오 데이터를 버퍼에서 다른 버퍼로 복사하는 인터페이스의 예시입니다.
VideoView.cpp
class MyReader : public touchgfx::VideoDataReader
{
public:
    MyReader() : position(0) { }
    virtual uint32_t getDataLength() { return video_len; }
    virtual void seek(uint32_t pos) { position = pos; }
    virtual bool readData(void* dst, uint32_t bytes)
    {
        memcpy(dst, &video_data[position], bytes);
        position += bytes;
        return true;
    }
    private:
        uint32_t position;
} myReader;
개발자는 Video 위젯에게 매핑 메모리에서 비디오 시작 방향으로 향하는 대신, 데이터 리더를 사용하도록 구성할 수 있습니다.
VideoView.cpp
video.setVideoData(myReader);
TBS 마이그레이션을 통한 비디오 디코딩 지원
If you want to migrate a project created from a TouchGFX Board Setups (TBS) - with a MCU that supports video decoding - from a version of TouchGFX Designer before video decoding was supported and you want to be able to use 'Run Target' in TouchGFX Designer with that project, some manual changes to the GCC Makefile are required.
필요한 변경 사항과 그 이유에 대해서는 다음 섹션에서 설명하겠습니다. There are some general changes that must always be applied and some LibJPEG (software decoding) and JPEG (hardware decoding) specific changes depending on what the developers application uses. 이전 TBS에서 이미 존재하는 GCC Makefile로 확장하는 변경이 필요합니다.
Makefile을 업데이트하는 것 외에도 위의 시나리오에서 설명한 것처럼 STM32CubeMX에서 비디오 디코딩을 설정해야 합니다.
General changes
프로젝트에서 LIBJPEG 경로를 정의합니다.
# LibJPEG path
libjpeg_path := $(cubemx_middlewares_path)/Third_Party/LibJPEG
그런 다음 비디오 애셋 입력 경로를 정의해야 합니다.
asset_texts_input  := TouchGFX/assets/texts

asset_videos_input := TouchGFX/assets/videos
The video assets output path must also be defined bellow the already existing assets output paths:
asset_images_output := $(asset_root_path)/images
asset_fonts_output := $(asset_root_path)/fonts
asset_texts_output := $(asset_root_path)/texts
asset_videos_output := $(asset_root_path)/videos
비디오 출력 애셋을 구성요소 목록에 추가합니다.
all_components := $(components) \
    $(asset_fonts_output) \
    $(asset_images_output) \
    $(asset_texts_output)
    $(asset_texts_output) \
    $(asset_videos_output)
비디오 객체 파일을 정의해야 합니다. The video object files are separated from the already existing object:
c_source_files := $(call find, $(source_paths),*.c) $(os_source_files) $(board_c_files)
source_files += $(board_cpp_files)

video_object_files := $(call find, $(asset_videos_output),*.o)
비디오 변환 도구 스크립트에 대한 경로를 정의해야 합니다.
textconvert_script_path := $(touchgfx_path)/framework/tools/textconvert
textconvert_executable := $(call find, $(textconvert_script_path), *.rb)
videoconvert_script_path := $(touchgfx_path)/framework/tools/videoconvert
An optional echo can be added to see all video objects files. 이때 비디오 객체 파일을 연결 단계에 추가해야 합니다. 이 행에는 나머지 객체 파일과 함께 $(video_object_files)가 추가됩니다.
$(binary_output_path)/$(target_executable): $(object_files) $(object_asm_files)
    @echo Video Objects: $(video_object_files)
    @echo Linking $(@)
    @mkdir -p $(@D)
    @mkdir -p $(object_output_path)
    @$(file >$(build_root_path)/objects.tmp) $(foreach F,$(object_files) $(video_object_files),$(file >>$(build_root_path)/objects.tmp,$F))
비디오 규칙을 기존 애셋과 .PHONY에 추가합니다.
_assets_: BitmapDatabase TextKeysAndLanguages Videos

.PHONY: BitmapDatabase TextKeysAndLanguages Videos
비디오 규칙이 비디오 변환 추가와 함께 추가됩니다.
Videos:
    @ruby $(videoconvert_script_path)/videoconvert.rb $(asset_videos_input) $(asset_videos_output)
마지막으로 비디오 관련 출력도 삭제할 수 있도록 삭제 규칙을 업데이트합니다.
_clean_:
    @echo Cleaning: $(board_name)
    @rm -rf $(build_root_path)
    # Do not remove gui_generated
    @rm -rf $(asset_images_output)
    @rm -rf $(asset_fonts_output)
    @rm -rf $(asset_texts_output)
    @rm -rf $(asset_videos_output)
    # Create directory to avoid error if it does not exist
    @mkdir -p $(asset_root_path)
    # Remove assets folder if it is empty (i.e. no gui_generated folder)
    @rmdir --ignore-fail-on-non-empty $(asset_root_path)
    # Clean bootloader project
    @$(MAKE) -r -f ExtMem_Boot/gcc/Makefile -s $(MFLAGS) clean
소프트웨어 변경 사항
모든 LIBJPEG 경로를 include 경로에 추가합니다.
include_paths := $(library_includes) \
    $(foreach comp, $(all_components), $(comp)/include) \
    $(foreach comp, $(cubemx_components), $(comp)/Inc) \
    $(foreach comp, $(touchgfx_generator_components), $(comp)/generated) \
    $(framework_includes) \
    $(cubemx_middlewares_path) \
    $(touchgfx_middlewares_path) \
    $(touchgfx_generator_components) \
    LIBJPEG/Target \
    $(libjpeg_path)/include \
    LIBJPEG/App
LIBJPEG 소스 경로를 정의해야 합니다.
c_source_files := $(call find, $(source_paths),*.c) $(os_source_files) $(board_c_files)
source_files += $(board_cpp_files)

libjpeg_source_path = Middlewares/Third_Party/LibJPEG/source
그런 다음 모든 LIBJPEG 소스 파일을 board_c_files에 추가해야 합니다.
board_c_files := \
    $(Drivers_path)/BSP/STM32H750B-DK/stm32h750b_discovery_bus.c \
    $(Drivers_path)/BSP/STM32H750B-DK/stm32h750b_discovery_qspi.c \
    $(Drivers_path)/BSP/STM32H750B-DK/stm32h750b_discovery_sdram.c \
    $(Drivers_path)/BSP/STM32H750B-DK/stm32h750b_discovery_ts.c \
    $(Drivers_path)/BSP/Components/ft5336/ft5336.c \
    $(Drivers_path)/BSP/Components/ft5336/ft5336_reg.c \
    $(Drivers_path)/BSP/Components/mt25tl01g/mt25tl01g.c \
    $(Drivers_path)/BSP/Components/mt48lc4m32b2/mt48lc4m32b2.c \
    $(libjpeg_source_path)/jaricom.c \
    $(libjpeg_source_path)/jcomapi.c \
    $(libjpeg_source_path)/jdapimin.c \
    $(libjpeg_source_path)/jdapistd.c \
    $(libjpeg_source_path)/jdarith.c \
    $(libjpeg_source_path)/jdatasrc.c \
    $(libjpeg_source_path)/jdcoefct.c \
    $(libjpeg_source_path)/jdcolor.c \
    $(libjpeg_source_path)/jddctmgr.c \
    $(libjpeg_source_path)/jdhuff.c \
    $(libjpeg_source_path)/jdinput.c \
    $(libjpeg_source_path)/jdmainct.c \
    $(libjpeg_source_path)/jdmarker.c \
    $(libjpeg_source_path)/jdmaster.c \
    $(libjpeg_source_path)/jdmerge.c \
    $(libjpeg_source_path)/jdpostct.c \
    $(libjpeg_source_path)/jdsample.c \
    $(libjpeg_source_path)/jdtrans.c \
    $(libjpeg_source_path)/jerror.c \
    $(libjpeg_source_path)/jidctflt.c \
    $(libjpeg_source_path)/jidctfst.c \
    $(libjpeg_source_path)/jidctint.c \
    $(libjpeg_source_path)/jmemmgr.c \
    $(libjpeg_source_path)/jmemnobs.c \
    $(libjpeg_source_path)/jquant1.c \
    $(libjpeg_source_path)/jquant2.c \
    $(libjpeg_source_path)/jutils.c \
    LIBJPEG/App/libjpeg.c
그러면 LIBJPEG 소스 파일이 나머지 미들웨어 소스 파일과 동일한 방식으로 기존 객체 파일에 추가됩니다.
# Start converting paths
object_files := $(object_files:$(touchgfx_path)/%.cpp=$(object_output_path)/touchgfx/%.o)
object_files := $(object_files:%.cpp=$(object_output_path)/%.o)
object_files := $(object_files:$(touchgfx_middlewares_path)/%.c=$(object_output_path)/$(touchgfx_middlewares_path)/%.o)
object_files := $(object_files:$(cubemx_middlewares_path)/%.c=$(object_output_path)/$(cubemx_middlewares_path)/%.o)
object_files := $(object_files:$(libjpeg_source_path)/%.c=$(object_output_path)/$(libjpeg_source_path)/%.o)
object_files := $(object_files:$(Drivers_path)/%.c=$(object_output_path)/Drivers/%.o)
object_files := $(object_files:%.c=$(object_output_path)/%.o)
하드웨어 변경 사항
모든 JPEG 경로를 include 경로에 추가합니다.
include_paths := $(library_includes) \
    $(foreach comp, $(all_components), $(comp)/include) \
    $(foreach comp, $(cubemx_components), $(comp)/Inc) \
    $(foreach comp, $(touchgfx_generator_components), $(comp)/generated) \
    $(framework_includes) \
    $(cubemx_middlewares_path) \
    $(touchgfx_middlewares_path) \
    $(touchgfx_generator_components) \
    Utilities/JPEG
그런 다음 모든 JPEG 소스 파일을 board_c_files에 추가해야 합니다.
board_c_files := \
    $(Drivers_path)/BSP/STM32H750B-DK/stm32h750b_discovery_bus.c \
    $(Drivers_path)/BSP/STM32H750B-DK/stm32h750b_discovery_qspi.c \
    $(Drivers_path)/BSP/STM32H750B-DK/stm32h750b_discovery_sdram.c \
    $(Drivers_path)/BSP/STM32H750B-DK/stm32h750b_discovery_ts.c \
    $(Drivers_path)/BSP/Components/ft5336/ft5336.c \
    $(Drivers_path)/BSP/Components/ft5336/ft5336_reg.c \
    $(Drivers_path)/BSP/Components/mt25tl01g/mt25tl01g.c \
    $(Drivers_path)/BSP/Components/mt48lc4m32b2/mt48lc4m32b2.c \
    Utilities/JPEG/jpeg_utils.c
비디오 버퍼를 외부 메모리에 저장하기
When developers create new projects with STM32CubeMX, the linker scripts associated with the generated projects do not contain any of the possible regions used by TouchGFX. 이로 인해 MJPEG 비디오를 디코딩하는 데 사용되는 버퍼는 개발자가 링커 스크립트를 수정하여 다른 곳에 저장할 때까지 링커를 통해 내부 플래시에 저장됩니다. 개발자가 이렇게 수정하지 않으면 내부 메모리 사용량이 크게 증가하여 전체 화면 비디오 디코딩과 같은 대용량의 비디오 버퍼를 저장하지 못할 수도 있습니다.
Tip
- STM32F746-DISCO
- STM32F769-DISCO
- STM32H750-DK
비디오 디코딩을 활성화하면 JPEG 디코딩 전용 RGB 버퍼에 대한 정의가 TouchGFX Generator에서 생성됩니다. 정의는 링커에게 버퍼를 저장할 섹션을 알려주는 location pragma로 계측됩니다. 링커가 링커 스크립트에서 이 메모리 영역을 찾지 못하면 버퍼가 내부 메모리에 저장됩니다.
LOCATION_PRAGMA_NOLOAD("Video_RGB_Buffer")
uint32_t videoRGBBuffer[57600] LOCATION_ATTRIBUTE_NOLOAD("Video_RGB_Buffer");
다음 컴파일러별 하위 섹션은 개발자가 버퍼를 SDRAM에 저장하려고 할 때 수정할 수 있는 내용을 설명한 것입니다. Video_RGB_Buffer는 비디오 디코딩에 사용되는 버퍼를 말합니다. 링커 스크립트 예제에서는 TouchGFX 프레임 버퍼를 위해 SDRAM에 일부 공간(0xC0000000에서 시작)을 남겨두었습니다.
- EWARM
- STM32CubeIDE
- MDK-ARM
Further reading
다음 예제는 모두 STM32F746G-DISCO 보드에서 애플리케이션이 주소(예: 0xC0000000)로 프레임 버퍼를 참조할 수 있도록 SDRAM 시작 위치에 일부 공간(0xC0000000->0xC00FF000)을 남겨두어 링커가 프레임 버퍼 데이터를 덮어쓸 위험이 없습니다. 각 예제마다 링커가 Video_RGB_Buffer를 정의된 SDRAM 영역에 저장할 수 있습니다.
Tip
EWARM (IAR)
stm32f746xx_flash.icf
define symbol __ICFEDIT_region_SDRAM_start__   = 0xC00FF000;
define symbol __ICFEDIT_region_SDRAM_end__     = 0xC0700FFF;

define region SDRAM_region    = mem:[from __ICFEDIT_region_SDRAM_start__ to __ICFEDIT_region_SDRAM_end__];

place in SDRAM_region    { first section Video_RGB_Buffer };
연결을 마치면 EWARM\STM32F746G_DISCO\List\STM32F746G_DISCO.map에 다음과 같이 Video_RGB_Buffer 저장 정보가 포함됩니다.
STM32F746G_DISCO.map
Video_RGB_Buffer        zero     0xc00f'f000   0x3'8400  TouchGFXGeneratedHAL.o [2]
                               - 0xc013'7400   0x3'8400
STM32CubeIDE
STM32F746NGHX_FLASH.ld
MEMORY
{
  ...
  SDRAM      (xrw)    : ORIGIN = 0xC00FF000,   LENGTH = 8M
}

BufferSection (NOLOAD) :
{
  *(Video_RGB_Buffer Video_RGB_Buffer.*)
  *(.gnu.linkonce.r.*)
  . = ALIGN(0x4);
} >SDRAM
컴파일을 마치면 STM32CubeIDE\Debug\STM32F746G_DISCO.map에 다음과 같이 Video_RGB_Buffer 저장 정보가 포함됩니다.
STM32F746G_DISCO.map
BufferSection   0x00000000c00ff000    0x1c200
 *(Video_RGB_Buffer Video_RGB_Buffer.*)
 Video_RGB_Buffer
                0x00000000c00ff000    0x1c200 Application/User/TouchGFX/target/generated/TouchGFXGeneratedHAL.o
                0x00000000c00ff000                videoRGBBuffer
MDK-ARM (Keil)
STM32F746G_DISCO.sct
LR_IROM1 0x08000000 0x00200000  {    ; load region size_region
  ER_IROM1 0x08000000 0x00200000  {  ; load address = execution address
    *.o (RESET, +First)
    *(InRoot$$Sections)
    .ANY (+RO)
  }
  RW_IRAM1 0x20000000 0x00050000  {  ; RW data
    .ANY (+RW +ZI)
  }
  RW_SDRAM 0xC00FF000 UNINIT 0xC0700FFF  {
    *.o (Video_RGB_Buffer)
  }
}
비디오 버퍼를 보유하고 있는 섹션에 UNINIT 속성을 포함시켜야 합니다. 이렇게 하면 메모리 영역이 초기화되지 않은 데이터로 남게 됩니다. 연결을 마치면 MDK-ARM\STM32F746G_DISCO\STM32F746G_DISCO.map에 다음과 같이 Video_RGB_Buffer 저장 정보가 포함됩니다.
STM32F746G_DISCO.map
Video_RGB_Buffer 0xc00ff000 Section 115200 touchgfxgeneratedhal.o(Video_RGB_Buffer)
